With a newly installed Windows 10, Microsoft assigned a random computer name to the installation. It’s hard to remember a randomly generated name especially if you are on a networked environment. It’s always preferable to change PC name to something that is recognizable and memorable. The computer name is an identifier of the system over the network.
In the olden days, We used to rename a computer by going to Computer properties. With Windows 10, Microsoft is pushing the use of Windows Settings instead of the control panel applets. In this article, we will discuss four ways to rename the computer in Windows 10 quickly. You can learn and follow the method you are comfortable with.
- Rename computer using Windows Settings
- Rename Windows 10 PC using control panel (the old way)
- Using PowerShell, rename the computer
- Change computer name using command-line
Table of Contents
Rename Windows 10 PC using Windows Settings
Microsoft is promoting Windows Settings instead of other tools like Control Panel. To change the computer name using Windows Settings, follow the steps below.
- Open Windows Settings from Start Menu (Windows key + i)
Windows Settings from Start Menu” src=”https://www.itechtics.com/wp-content/uploads/2019/08/Open-Windows-Settings-from-Start-Menu-670×269.jpg” alt=”Open Windows Settings from Start Menu” width=”670″ height=”269″ /> Open Windows Settings from Start Menu - Go to System –> About. In the right-hand pane, press the Rename this PC button.

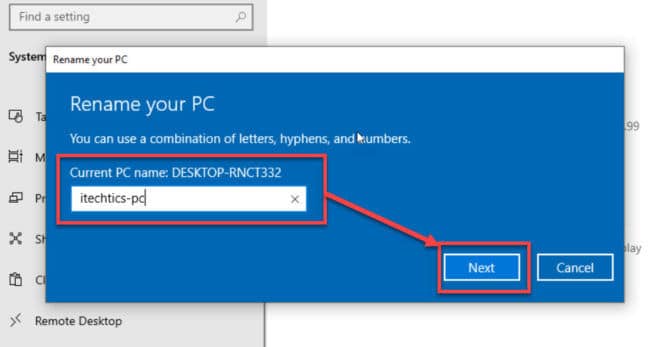
Rename This PC - This will open another dialog where you can enter the new system name.

Rename Your PC - Clicking on the Next button will open another dialog for restarting the system. You can either restart the system immediately or restart later.

Restart system after Rename Press Restart Now to restart the computer. Otherwise, press Restart later to restart your PC manually.
- After the restart, the system will display the new name.
Rename Windows 10 PC using Control Panel
The system name can be changed using Control Panel applets. This is the old way and is still very convenient and quick. Follow the steps below:
- Go to Run –> systempropertiescomputername. This will open the System Properties window with the Computer Name tab. Alternatively, you can use sysdm.cpl command. Choose whatever is easier to remember. Both the commands will open the same window.

Open System Properties Computer tab - Click on the Change button. Another window will open where you can change the computer name, domain, and workgroup. You can join a domain with active directory network. Otherwise, Workgroup is the way to go. You can keep this setting unchanged.

System Properties window - Under the Computer name field, delete the old name and input the new computer name.

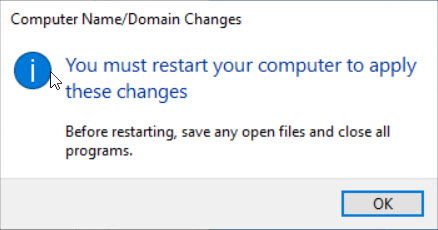
Computer Name Domain Changes - The system will display a restart notification but you will need to restart the system manually.

Restart System dialog - The new system name will take effect after restarting.
Change computer name using PowerShell
PowerShell is a very effective tool, especially for system admins. You can change the computer name in PowerShell using the following command:
Rename-Computer -NewName “itechtics-pc”
PowerShell gives a lot more advantage than just renaming your PC. As a network administrator, you can rename computers remotely. The remote computer needs to be a member of the domain network or you need to have administrator credentials to rename the computer successfully.
To change the computer name remotely, you can use the following command:
Rename-Computer -ComputerName “CurrentComputerName” -NewName “NewComputerName” -DomainCredential domain\username -Force -Restart
You can use PowerShell to get computer name remotely:
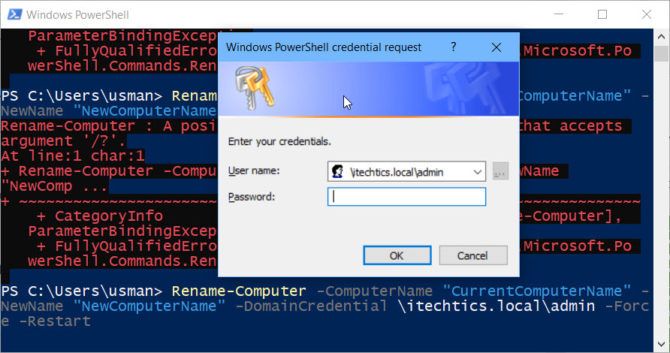
Rename-Computer -ComputerName “CurrentComputerName” -NewName “NewComputerName” -DomainCredential \itechtics.local\admin -Force -Restart
This will open a new login dialog. You can enter the password there and it will start the renaming process on the remote computer.
Please make sure that you are running PowerShell in the administrative mode for successfully running the above two commands. Otherwise, you will get access denied error.

If you want to rename several computers, you can use the following rename computer cmdlet (taken from Techrepublic):
$computers = Get-adcomputer | where {$_.name –like “sales-*”}
$num = 0
Foreach($computer in $computers)
{
For($num=1;$num –lt $computers.count;$num++)
{
Rename-computer –computername $computer –newname “s-$num” –domaincredential domain\user –force –restart
}
Change computer name using command prompt
You can also change the computer name using command prompt quickly. Just run the following command:
WMIC computersystem where caption=“CurrentPCName” rename “NewPCName”
To find the current system name, you can run the following command:
hostname

Make sure that you are running command prompt as administrator. Otherwise, you will get a permission denied error.
If you want to change the system name of a remote computer using the command prompt, you can run the following command:
WMIC /node:“CurrentSystemName” /user:Admin /password:AdminPassword computersystem call rename “NewSystemName”
We have listed down all the methods to quickly change the computer name in Windows 10 or even in earlier versions of Windows. These can be useful for system administrators who have to change computer names frequently. Which is your favorite method to rename your PC?
