Microsoft is all set to release Windows 10 version 21H2, and soon. How do we know this? They recently updated their document for the prior version of Windows 10 (version 21H1) stating that it is now ready for “broad deployment.” This means that Windows 10 v21H1 is now being pushed through Windows Update to everyone on version 20H2 or older.
When a broad deployment starts, it usually means that Microsoft is about to release a new feature update, which in this case will be 21H2. In another document, Microsoft stated that Windows 10 v21H2 Build 19044.1288 will be released publicly in November 2021, but did not disclose the exact date.
That said, not everyone would want to upgrade to the latest Windows 10 release right away. We would also suggest that if you are using the Windows 10 OS in a production environment, it would not be the wisest to upgrade just yet. We’ll tell you why.
Table of Contents
Why not to Upgrade to Windows 10 Version 21H2 (or Windows 11)
Even though all Windows security and non-security updates are tested through the Windows Insider Program before being released publicly, some glitches and sloppiness can still be observed. Microsoft then begins to fix these in future updates, but those could take months.
The best practice, in our opinion, is to keep all of your Windows devices at least one version older than the latest available one. This is because the older versions have been used by a great number of people over time, and most of the issues have already been fixed, ensuring more stability to the operating system. In simpler words, the OS version has been curated and matured.
If you stand by what we said, you can keep your Windows 10 version at 21H1 up to the point where you feel that there has been enough time for version 21H2 to mature, and then upgrade. This article shows how you can maintain your OS version to 21H1 even when 21H2 is beginning to push through Windows Update to the end-users.
How to Keep Windows 10 version 21H1
You can avoid an upgrade to version 21H2, or even Windows 11 (if your device is supported), using 2 main techniques:
Check if your system meets minimum hardware requirements for Windows 11.
- Perform a clean installation of Windows 10 version 21H1.
- Block November 2021 version 21H2 update.
If you are on Windows 10 version 2004 or older, we would suggest that you perform a clean install of version 21H1. This is because version 2004 is about to reach the end of support as of December 2021, and new updates will no longer be offered. By then, Windows 10 version 21H2 will be offered as a mandatory update which cannot be avoided. Therefore, we repeat, if you are on version 2004 or older, you should upgrade to version 21H1 before 21H2 is released.
If you are on Windows 10 version 20H2 or later, then you can use the second technique by blocking the November update from installing. 4 methods to block Windows 10 version 21H2 updates have been shown below.
Check your Windows version by typing in winver in Run.
How to Temporarily Block Windows 10 November 2021 Update Version 21H2 from Installing
Pause Windows Update
The Windows Update Settings page offers you access to pause all Windows updates for up to 35 days (5 weeks). Here’s how you can pause Windows updates:
- Navigate to the following:
Settings app >> Windows Update >> <a href="http://ms-settings:windowsupdate-options">Advanced Options</a> - Now scroll down and click on the drop-down menu under Pause updates. From that menu, select the date till when you would like Windows Update to pause.
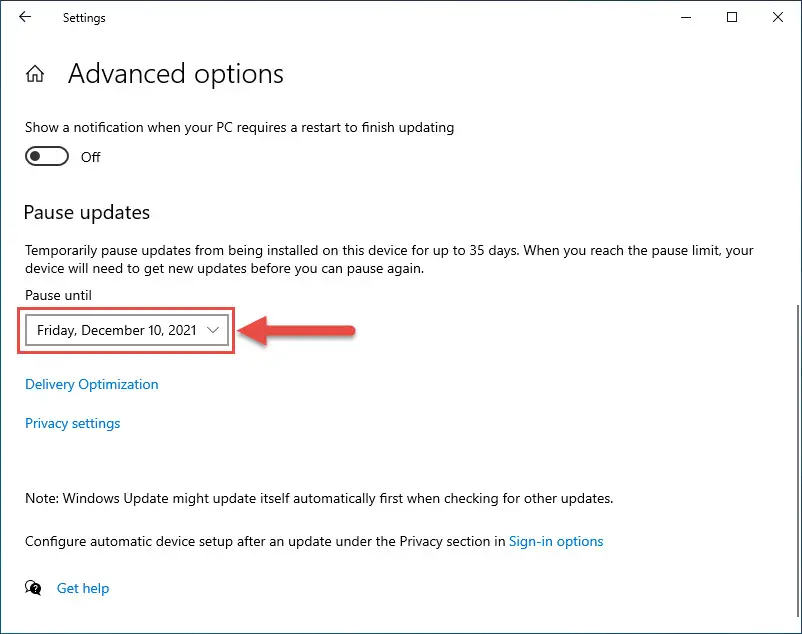
This approach will help you prevent 21H2 updates from installing on your PC. However, this will also prevent all other updates from being installed as well. Once the selected pause limit is reached, you will get the following error message:
“The pause limit has been reached. You’ll need to install the latest updates on this device before you can pause again.”
If so, you will then be required to install all pending Windows updates before you can pause them again.
Block Feature Updates for up to 365 Days using Group Policy
If you think that 35 days isn’t enough to prevent Windows from updating, you can also prevent them from installing for up to 365 days (a whole year!). Here is how:
- Launch the Group Policy Editor by typing in gpedit.msc in Run.
- Now navigate to the following from the left pane:
Computer Configuration ->> Administrative Templates >> Windows Components >> Windows Update >> Windows Update for Business - Double-click the Group Policy Object (GPO) and “Select when Preview Builds and Feature Updates are received” from the right pane.

- In the pop-up window, select the Enabled radio button. Now shift to the Options section below it. Select Semi-Annual Channel from the drop-down menu, and then enter the number of days you want to block the update for in the text field below it. Once done, click Apply and OK.

- To implement the changes, open Command Prompt with administrative privileges and run the following command:
gpupdate /force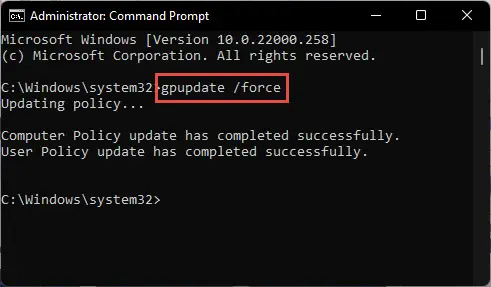
Your computer will now stop receiving automatic Windows updates for a defined amount of days. To check that the settings have been applied, you can navigate to the Windows Update Settings page and see a message at the top stating “Some settings are managed by your organization.”
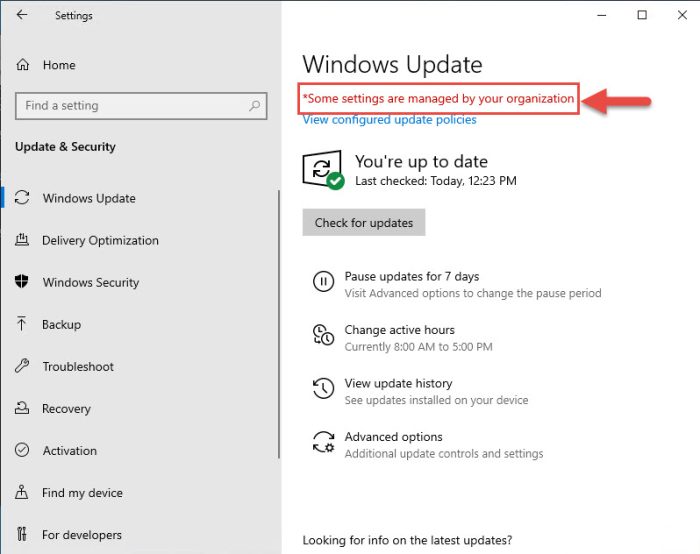
If you ever feel like changing the number of days or enabling Windows Update, simply change the number of days in the text field as in step 4 above, or select the Not Configured radio button, respectively. Run the gpupdate /force command in the Command Prompt after making any changes to the Group Policy.
How to Permanently Block Windows 10 November 2021 Update Version 21H2 from Installing
Enforce Current Windows Version Using Group Policy
You can also force your PC to stay on the current Windows version unless told otherwise. This policy will be enforced permanently unless you manually revert to the settings. Here is how you can keep your Windows 10 from upgrading to version 21H2:
- Launch the Group Policy Editor by typing in gpedit.msc in Run.
- Now navigate to the following from the left pane:
Computer Configuration ->> Administrative Templates >> Windows Components >> Windows Update >> Windows Update for Business - Double-click the Group Policy Object (GPO) and “Select the target Feature Update version” from the right pane.

- In the pop-up window, select the Enabled radio button. Now shift to the Options section below it. Enter Windows 10 in the first text field, and enter your current OS version in the field below it, as in the image below. Click Apply and OK when done.
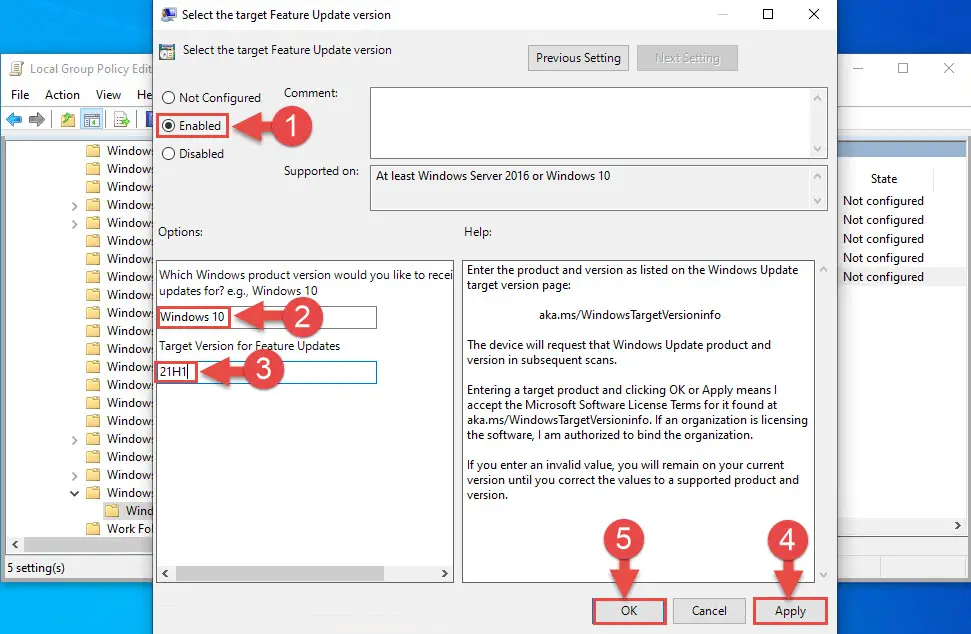
- To implement the changes, launch the Command Prompt with administrative privileges and run the following command:
gpupdate /force
With this configuration, your OS will stay on the current version while installing some Windows updates. Any Feature Update that changes the version of the OS will not be installed.
If you ever want to re-enable Windows Feature updates, select the Not Configured radio button from the “Select the target Feature Update version” GPO and run the cmdlet given in step 5 above.
Enforce Current Windows Version Using Windows Registry
This technique involves the manipulation of the Windows Registry. If done wrong, the results could be damaging to the operating system. Therefore, we recommend that you create a system restore point before proceeding with the steps below.
- Open the Registry Editor by typing in regedit in Run.
- Now paste the following into the address bar at the top of the editor for quick navigation:
Computer\HKEY_LOCAL_MACHINE\SOFTWARE\Policies\Microsoft\Windows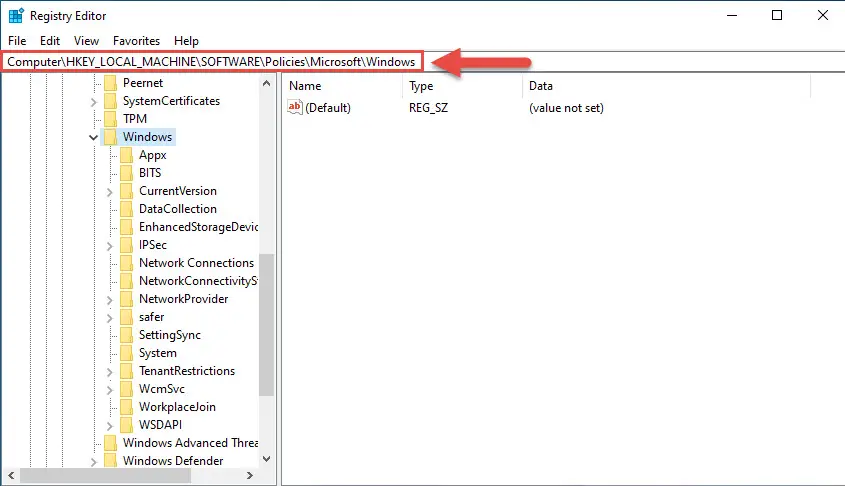
- Now right-click on the Windows key in the left pane, expand New from the context menu, and then click Key.
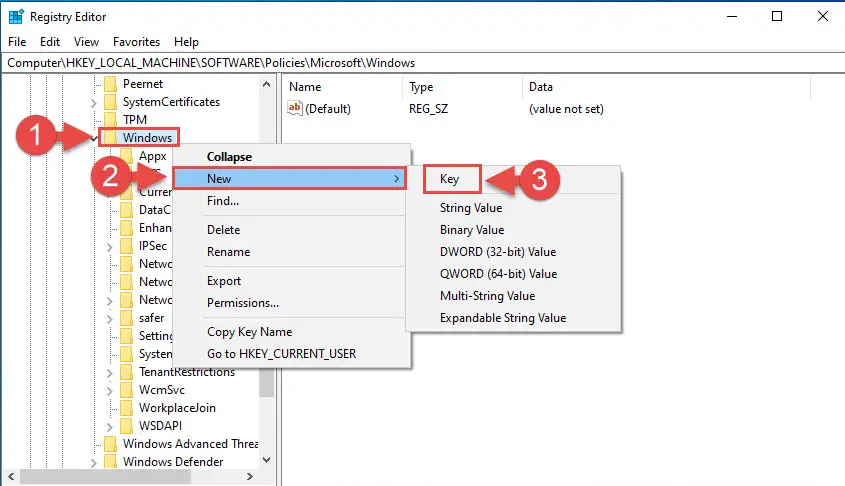
- Name this new key as WindowsUpdate.
- Now right-click WindowsUpdate key, expand New, and then click DWORD (32-bit) Value.
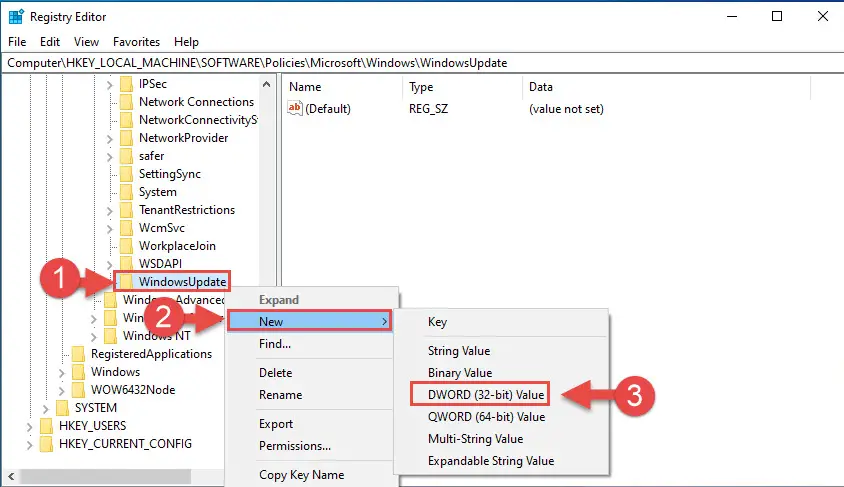
- Name this new DWORD TargetReleaseVersion.
- Now right-click WindowsUpdate, expand New, and then click String Value.
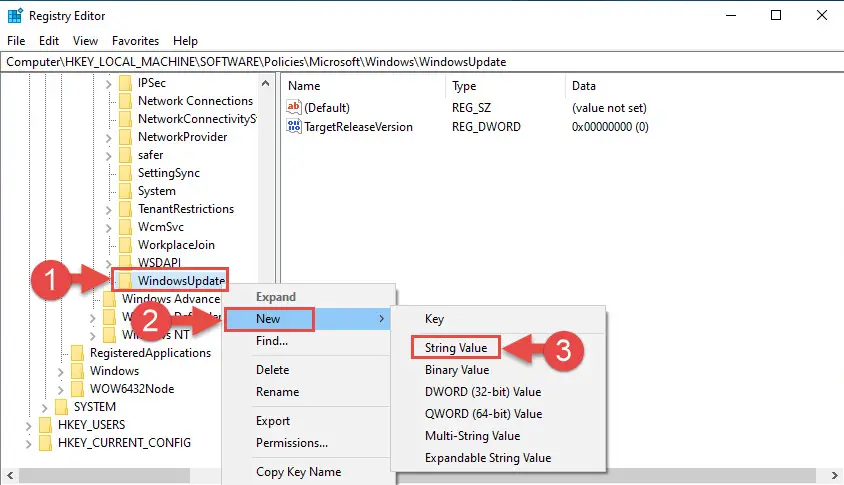
- Name this String Value ProductVersion.
- Repeat step 7 and name this String Value TargetReleaseVersionInfo.
- Now double-click TargetReleaseVersion and set its Value Data to 1. Then click Ok.

- Double-click ProductVersion and set its Value Data to Windows 10.
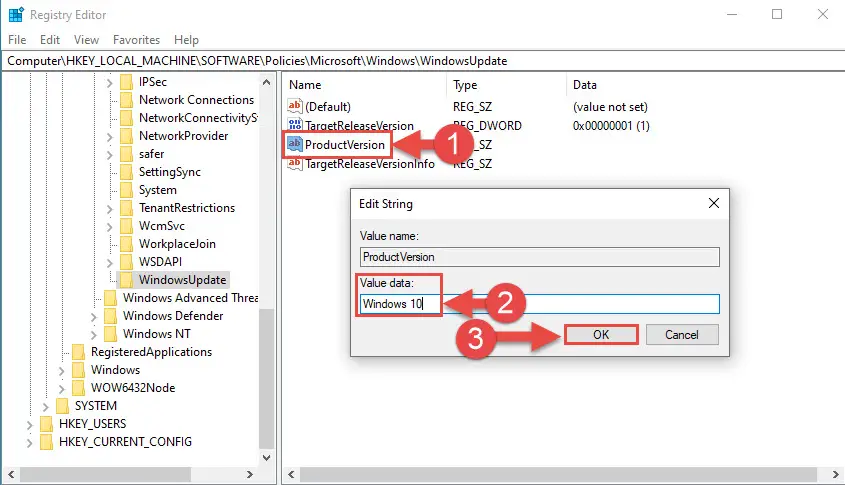
- Double-click TargetReleaseVersionInfo and set its Value Data to your current OS version.

- Now close the Registry Editor and restart your computer.
If you are not comfortable editing the Windows Registry manually and don’t want to use any other method, you can create a .reg file using the text given below. Copy the text in Notepad and save it with a .reg file extension. Then, run the file and Windows will automatically create the necessary keys and values for you. You will also be prompted with a UAC and a confirmation message while running the .reg file, follow through with them and then restart your computer.
Note that this text is for Windows 10 version 21H1. Make the necessary changes according to the OS version that you have.
Windows Registry Editor Version 5.00

[HKEY_LOCAL_MACHINE\SOFTWARE\Policies\Microsoft\Windows\WindowsUpdate]
"TargetReleaseVersion"=dword:00000001
"ProductVersion"="Windows 10"
"TargetReleaseVersionInfo"="21H1"
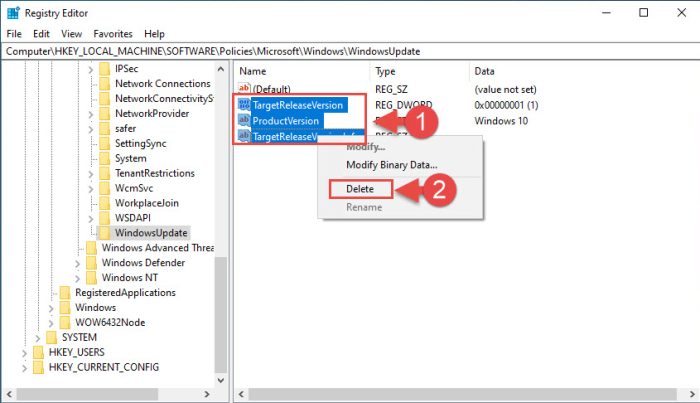
If you wish to continue installing Windows updates on your PC, simply return to the WindowsUpdate key within the Registry Editor, select the 3 values that were created, right-click on them and then click Delete from the context menu. A reboot will be required for the changes to take effect.
Conclusion
Windows updates bring security improvements as well as other fixes. Therefore, it is best to keep your system updated to mitigate any vulnerabilities. However, if you still wish to keep your device from updating, we would still suggest that you only do it temporarily.
According to Microsoft, Windows 10 is only supported until 14 October 2025. After that, users will need to upgrade their PCs to Windows 11 to keep their environments updated.
