Key Points
Change Boot Menu Timeout in Windows 11:
- Via Command Prompt (Admin): Type ‘bcdedit /timeout (seconds)’ and press Enter.
- Via System Configuration: Open it from the Start Menu, switch to ‘Boot’ tab, adjust ‘Timeout’ value (seconds), check ‘Make all boot settings permanent’, click ‘Apply’.
If you have installed multiple Operating Systems on your computer, you start your computer, you will get a boot menu to select which Operating System to boot from. This menu comes from the bootloader of your primary Operating System.
If Windows is the primary Operating System, the default boot menu timeout is 30 seconds. This means the boot menu will be displayed for 30 seconds. If no action is taken, the system will boot into the default Operating System.
In this article, we discuss how to change the default boot menu timeout period. Most of the methods discussed below apply to most Windows versions, including Windows 11 and Windows 10.
Table of Contents
On This Page
What is the Boot Menu
The boot menu timeout is the amount of time your computer’s boot menu is displayed on the screen before it automatically loads the default operating system. It signifies the waiting period when you turn on your computer and see a list of available operating systems to choose from.
This timeout is measured in seconds. By default, it is usually set to 30 seconds, which means the boot menu stays on the screen for 30 seconds before the computer picks the default operating system automatically.
If you don’t want to wait for the full timeout period, you can change the boot menu timeout value to make it shorter. For example, if you set it to 10 seconds, the boot menu will only be displayed for 10 seconds. Similarly, if you need more time to decide which operating system to load, you can increase the boot menu timeout.
Changing the boot menu timeout allows you to customize how quickly the computer starts up and which operating system is automatically loaded. It gives you the flexibility to make a selection if you have multiple operating systems installed on different hard drives, or simply to reduce the waiting time.
Why set the Boot Menu Timeout?
You might want to change the default boot menu timeout, which is usually set to 30 seconds, for a couple of reasons.
For example, if your computer has a fast SSD or NVMe drive and Windows boots up very quickly, you may not have enough time to choose the operating system you want. In that case, you may want to decrease the boot menu timeout so that the default option loads faster.
On the other hand, if your computer is slower or you are using an external hard drive to boot into Windows, you may need more time to make a selection. In such situations, increasing the boot menu timeout gives you more time to choose an operating system.
Methods to Change Boot Menu Timeout
There are multiple effective methods through which you can easily shorten or extend the boot menu timeout.
Via Settings App
The simplest way to modify the boot menu timeout is by using the Windows Settings app. Follow the instructions given below to do so:
-
Press Win + I to open the Settings app.
-
Click on “System” and then select “About” from the right pane.
-
Navigate to Related settings and choose “System protection”.

Open System Protection -
Switch to the “Advanced” tab and click on the “Settings” button under the “Startup and Recovery” section.

Click on Settings from the Advanced Tab -
A dialog box will appear. Click on the drop-down icon under the “Default Operating System” option and select your desired default operating system.
-
Check the box next to “Time to display list of operating systems” and choose the desired timeout value. You can set the timeout value to any number from 0 to 999.

Change the boot menu timer -
Click “OK” to save the changes.
Via System Configuration
Another easy way to change the boot menu timeout is through the system configuration settings. Here are the steps to follow:
-
Open the Start menu, search for “System Configuration” and click on the top result to open the MSConfig settings.

Open the MSConfig settings -
Click on the “Boot” tab.
-
In the text box labeled “Timeout,” enter the number of seconds you want the boot menu to stay on the screen. Also, tick the box that says “Make all boot settings permanent.”

Enter the value in the Timeout box -
Click on the “Apply” button to save the changes.
Via Command Prompt
Command Prompt offers a quick change to various settings and the boot menu timeout modification is one of them. To do so, follow the steps mentioned below:
-
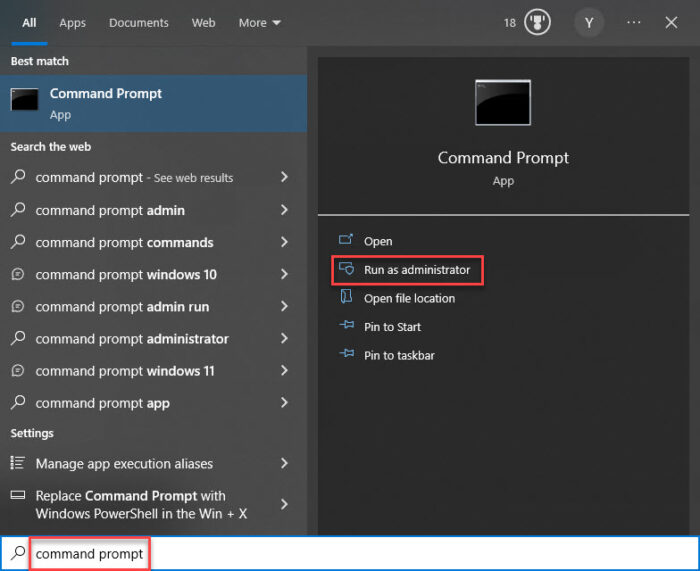
Type “Command Prompt” in the search menu, and click on “Run as administrator“.

Open Command Prompt as an administrator -
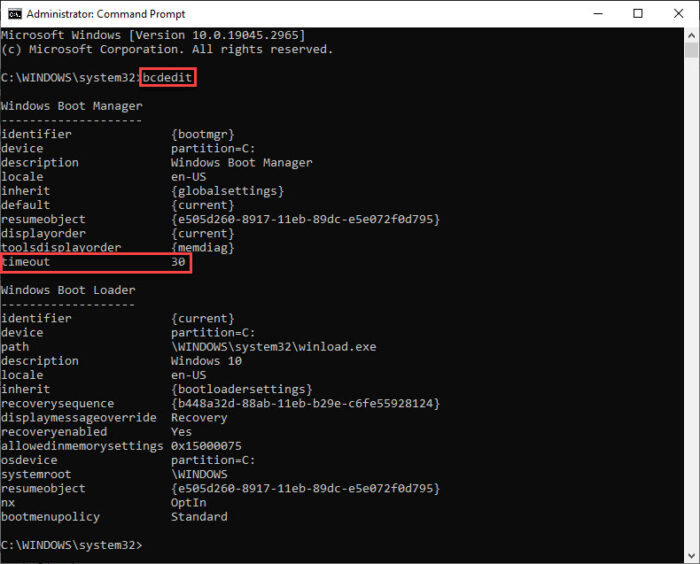
In the elevated Command Prompt window that opens, enter the following command:
bcdeditThis command will display the current time for which the boot menu appears.

Find the current boot menu timeout -
Next, enter the following command:
bcdedit /timeout SECONDSRemember to replace “SECONDS” with the desired timeout value you want.
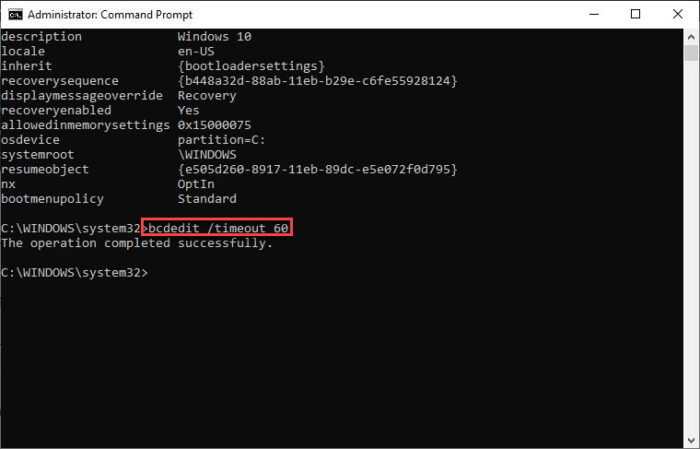
For example, if you want a 60-second timeout, the command would be:
bcdedit /timeout 60
Enter the timeout value
Conclusion
Modifying the boot menu timeout in Windows 10 is a simple, yet important step. When you adjust the timeout, it allows you to choose how long the boot menu appears before your computer automatically starts up. As a result, you get more time and control over the boot process.
This is helpful because it helps troubleshoot startup issues, select different operating systems and boot options, and reduces unnecessary waiting times. With just a few easy steps, you can customize your boot menu timeout according to your preference.
FAQs
Can changing the boot menu timeout cause any harm to my system?
No, changing the boot menu timeout is a safe operation that does not affect your system’s stability or security.
What is the default boot menu timeout on Windows?
For all Windows versions, from Windows XP to Windows 11 and even Windows Server, the default boot menu timeout is typically 30 seconds.
Can I set different timeouts for different operating systems installed on my computer?
By default, there is only one bootloader. The timeout is set in the bootloader and not for each Operating System. For Windows bootloader, it is 30 seconds, for Linux (Grub) it varies between 5 and 10 seconds depending upon the distribution. MacOS bootloader doesn’t have a timeout. It will only invoke the boot menu when the option key is pressed during booting.
