In the 21st century, almost everything is connected to the internet via Wi-Fi – A wireless network technology that grows each day to a new extent. But for an average everyday user, having Wi-Fi means they can work on the go while being mobile, resulting in productivity.
However, there are certain areas in your home or office that may have weak Wi-Fi signals. This can be due to objects blocking the signals, interference by other wireless devices, or simply because the access point/wireless router is just too far away to cover all of the areas.
Before we proceed to troubleshoot the issue or begin upgrading your Wi-Fi hardware, we suggest that you determine the signal strength you are currently getting on a Windows 10 machine.
This article discusses several ways you can check the signal strength on a Windows 10 PC. We suggest that you try these methods on a portable PC, such as a laptop, so you can check the different parts of your location for signal strength.
Table of Contents
What is Wi-Fi signal strength
Wi-Fi signal strength refers to the wireless signals your device is catching/receiving off of the wireless router. Originally, this strength can be measured and its unit is Decibels Milliwatts (dBm).
A wireless signal, such as Wi-Fi signals, is measured in negative numbers, which is the dBm. Decibels are given in negative numbers because a 0 Decibel means that the human ears can just begin to hear that noise. However, anything less than 0 indicates that there are waves physically present, but cannot be heard by the human ears.
Having said that, Windows 10 cannot measure the signal strength in dBm, but rather it gives the quality. Quality is a number between 0 and 100, which can also be called percentage. How to obtain Wi-Fi signal strength in terms of quality is discussed further ahead.
What is a good Wi-Fi signal
Wi-Fi signals are directly compared to their reliability. Having a reliable internet connection automatically means that the Wi-Fi signal strength on the device is good. A Wi-Fi signal strength ranges between -30dBm and -90dBm. The higher the number, the greater the signal strength. Which means -30dBm means maximum signal strength, and -90dBm means no Wi-Fi signals at all.
Here is a table of Wi-Fi signal strength and its quality expectations:
| SIGNAL STRENGTH (dBm) | Remarks |
|---|---|
| -30 | Maximum possible signal strength. |
| -50 | Excellent signal strength. |
| -60 | Good signal strength. |
| -67 | Reliable signal strength. |
| -70 | Relatively weak signal strength. |
| -80 | Unreliable. Most services will not work. |
| -90 | Possibility of disconnection. |
Let us now continue to see how you can obtain the quality of the Wi-Fi signal on your Windows 10 device. Once done, you can then convert that value to dBm by a process discussed later in the article.
How to check Wi-Fi signal strength on Windows 10
Good Wi-Fi signal strength will ensure that you experience a smooth internet connection rather than facing lag and significant loading times on websites. Here’s how you can determine the signal strength of your Windows 10 PC.
Check Wi-Fi strength from Taskbar
The quickest way to check the Wi-Fi signal strength is through the Wi-Fi icon in the Taskbar. The icon for the Wi-Fi network flyout in the Taskbar is dynamic and adjusts itself according to the Wi-Fi signal strength.

As in the image above, the greater the number of curvy lines, the greater the signal strength. Each line represents 25 percent Wi-Fi signal strength. This means that, in the image above, the device is getting maximum Wi-Fi signals somewhere between 75 and 100 percent. If these were just 2 lines, it would mean that the signal strength is somewhat between 25 and 50 percent.
Check Wi-Fi strength from the Settings app
Like the last 2 methods, you can also get a ballpark value of Wi-Fi signal strength using the Settings app in Windows 10. Open the network status page in the Settings app (Run -> ms-settings:network-status) and there you shall see the Wi-Fi strength indicator, which is very much similar to the one in the Taskbar.
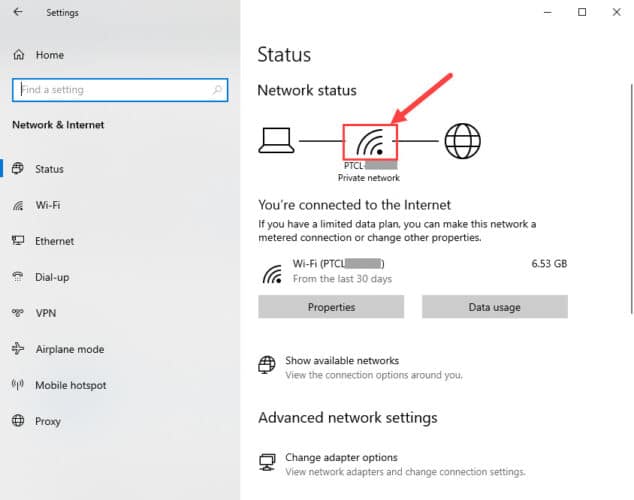
The bars in the image indicate the strength of the Wi-Fi signal. Each bar indicates 25 percent of the signal strength, meaning that in the image above, the Wi-Fi signal strength lies somewhere between 75 and 100 percent.
We understand that the 3 methods we have discussed up till now offer only ambiguous Wi-Fi signal strength details by giving only a range. The information is not very accurate. Therefore, we suggest that you have a look at the following 2 methods to obtain the exact quality of signal strength, as discussed earlier in the article.
Check Wi-Fi strength from the Control Panel
You can also check the Wi-Fi signal strength from the Control Panel. Navigate to the following location:
Control Panel -> network & Internet -> Network and Sharing Center
On this page, you will find a small Wi-Fi icon in the form of bars, as highlighted in the image below:
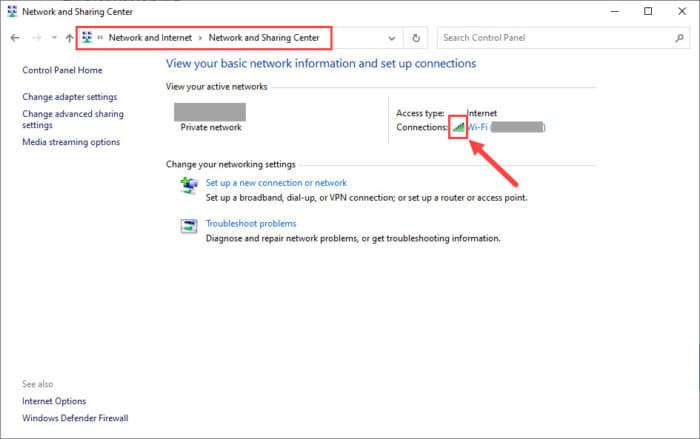
Despite a tiny representation of the Wi-Fi signals, this bar graph represents the signal strength your device is currently getting. Since it has 5 bars, each one represents 20 percent strength. Meaning, if you see 4 bars, it means that your current Wi-Fi signal strength is somewhere between 60 and 80 percent.
Check Wi-Fi strength using Command Prompt
You can also obtain an accurate Wi-Fi signal strength (quality) using the command line. A simple command in the Command Prompt will let you know exactly what percentage of signals your device is catching.
Launch the Command Prompt with administrative rights and then paste the following command to obtain the precise percentage of Wi-Fi signal strength:
netsh wlan show interfaces | find "Signal"
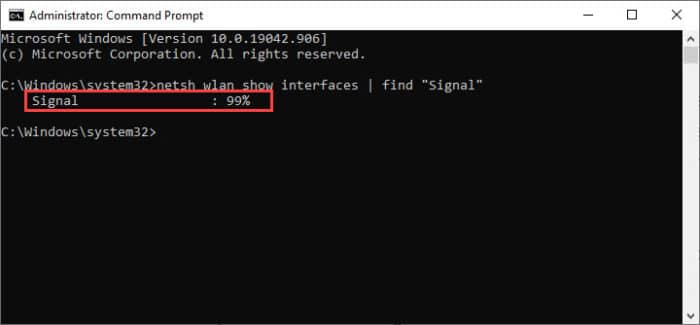
This cmdlet allows you to filter the “Signal” string and display only the Wi-Fi signal strength down to its precise percentage.
Check Wi-Fi strength using PowerShell
You can also obtain similar information using Windows PowerShell, which is a more advanced command-line version for the Windows environment.
Enter the following command to obtain Wi-Fi signal strength percentage within PowerShell:
(netsh wlan show interfaces) -Match '^\s+Signal' -Replace '^\s+Signal\s+:\s+',''
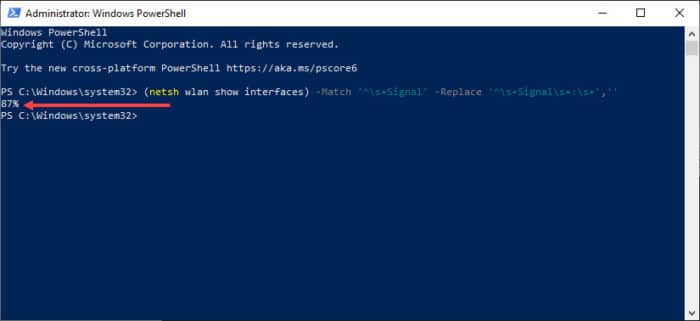
Now that you know the quality of the Wi-Fi signal strength, let us convert it to Decibels so that you can determine whether your device has a reliable internet connection or not.
Convert Wi-Fi signal strength from percentage to Decibels
Now that you know the quality of the signal strength your device is receiving, you can convert it to decibels and then determine whether it is an excellent, good, or weak signal strength using the table given above in the article.
Use the formula given below to convert your signal strength in percentage (quality) into decibels (dBm):
-dBm = (Quality/2) -100
For example, if the percentage of the signal strength you determined from the command-line is 80%, then you will use the formula as in the example below:
(80/2) -100 = -60 dBm
You can also invert the formula to convert Decibels into quality percentage if you are using a third-party application to determine Wi-Fi signal strength in Decibels.
Check Wi-Fi signal strength using third-party applications
You can also use third-party applications that are dedicated for the purpose of determining the Wi-Fi signal strength of the Wi-Fi your device is connected to, as well as those around you. Moreover, these apps give out other information as well, such as which Wi-Fi channels are being used, minimum and maximum Wi-Fi signal strength, frequency band, etc.
NetSpot
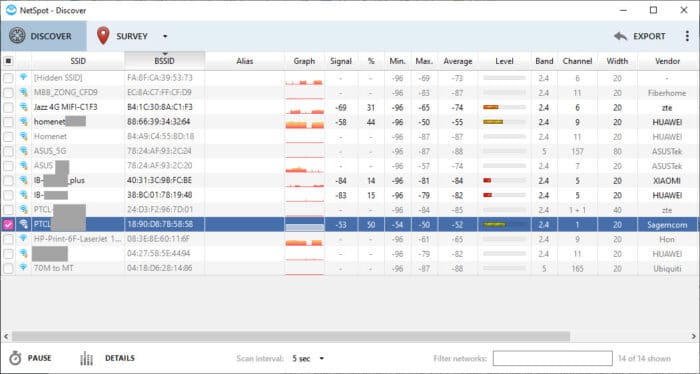
NetSpot is our number one pick of third-party applications for Wi-Fi signal strength information as it displays the values in Decibels as well as the quality percentage. Not only that, it also displays other useful information, such as a miniature graph to show signal stability of all Wi-Fi signals around the device.
The app also shows other useful information as you can see in the image above.
Acrylic Wi-Fi Home
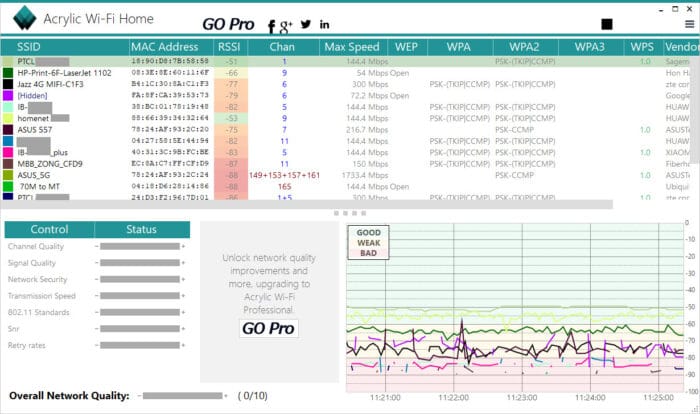
The Acrylic Wi-Fi Home application is just as good as our top pick. However, it does not display the Wi-Fi signal strength in terms of quality, but only in Decibels. Other than that, it displays almost the same information as NetSpot.
A graphical representation can also be seen at the bottom of the app of all Wi-Fi signals around the device for you to better understand which devices are sending out more reliable signals (that do not have a break in them).
Wi-Fi Analyzer

Microsoft Wi-Fi Analyzer is available for download from the Microsoft Store. Although the application also gives out the live signal strength of each Wi-Fi around the device, it does not give out much else. You can also see the channel for each Wi-Fi under the Analyze tab.
Since the Wi-Fi Analyzer application does not give out the same useful information as the other apps, it is our number 3 pick.
Improve Wi-Fi signal strength
If you are experiencing poor Wi-Fi signal strength around your device, here are a few things you can do to make it better.
Relocate router
The location of the router is very important. Make sure that it is not stuffed into a cupboard and is placed centrally in your environment to cover maximum space around it. Moreover, no other electronic or magnetic objects are surrounding the router as they add to the attenuation, which is the loss of signals.
Update router firmware
You can try and update the router’s firmware. Updates are essential to be installed as they ensure that the latest technology and drivers are supported and the device performs to its level best.
Minimize interfering objects
The best signal strength can be experienced when the router and the device are in each other’s line of sight, meaning no objects in the middle are interfering with the signals. The more objects, the greater the attenuation and signal loss. Therefore, make sure that a minimum number of objects are present to improve Wi-Fi signal strength.
Switch Wi-Fi channel
It may be possible that the channel within the Wi-Fi band is experiencing interference from other devices using the same channel. You should try and switch the channel of your device and check if the signal strength has improved.
To learn more about Wi-Fi channels, refer to our guide post.
Add range extender
A range extender is a device that re-strengthens the Wi-Fi signals from the original router and broadcasts the signals. If nothing else seems to work for you, you can use a range extender to amplify the signals of the router to obtain better Wi-Fi signal strength.
Final verdict
A reliable internet connection isn’t always the one with the greatest bandwidth. Other factors, such as signal strength and attenuation also contribute to the performance of the internet on each individual device.
Wireless technology is making a turn each day and advancing at an alarming scale. The examples of 5 and 6G technology are sufficient to make a statement. Therefore, we suggest that you use the latest-available wireless technology that is also economical and makes sense to use in your scenario, as opposed to using years-old technology and trying to improve its signal strength.

