Are you trying to plug in an external storage device on your Windows 11 PC but are unable to access it through File Explorer? It is very likely that your system has not assigned a drive letter to it and is therefore not visible in the Explorer.
Windows is supposed to assign drive letters to all internal and external storage devices. Storage partition cannot be detected by the system without an assigned letter.
However, the OS sometimes goes haywire and requires some extra help getting things back on track. This includes the normal functioning of certain services and functions of the Windows architecture, which needs to be redone to bring the operating system back to its normal state.
This article discusses various things you can check and perform so that your system automatically assigns drive letters from here on out. We will also be showing you how to assign or change drive letters manually in Windows.
Table of Contents
Fix USB flash drive not detected in Windows 11
You may see a prompt stating that a new device has been connected when you insert your USB flash drive. However, you are unable to access it through Explorer.
As we mentioned, the most likely reason your flash drive is not being detected by your Windows PC (other than physical damage) is that your system is unable to assign a drive letter to it.
Here’s what you can do to mitigate the issue:
Start Virtual Disk service
The Virtual Disk is a Windows service that is responsible for a wide range of storage functions, including the assignment of drive letters. If the service is malfunctioning or stopped, your system can likely run into multiple problems.
You may not have disabled Virtual Disk yourself, but occasionally some technical issues can prevent some services from starting. Therefore, you must manually enable the service.
- Launch the Services window by typing in services.msc in Run. Then, scroll down and double-click Virtual Disk.

- Now, in the Virtual Disk Properties window, select Automatic from the drop-down menu in front of Startup type, and then click Start. The service will now begin functioning. When done, click Apply and Ok to close the properties window.

Alternatively, you can also start the service through Command Prompt. To do so, launch the Command Prompt with administrative privileges and then first check the current status of the Virtual Disk service using the following command:
sc query vds
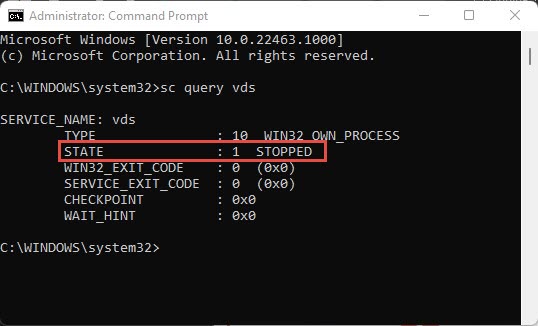
If the state shows stopped, you can start the service using the following command:
net start vds
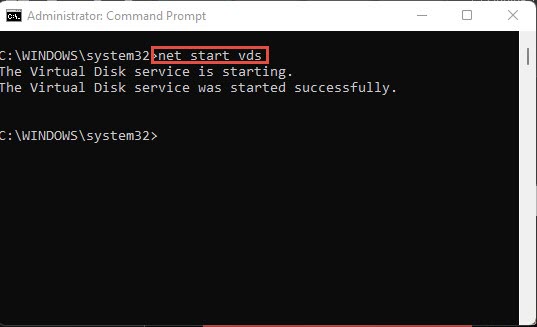
Once the service is enabled, you can try reconnecting the storage device to check if it is now accessible through File Explorer again.
If it is still not, you should continue down to perform the rest of the techniques.
Enable auto-mount
By default, storage partitions are meant to automatically mount themselves to your device, and assign a drive letter. This could be another reason why your device has not been assigned a drive letter yet.
- To check whether automount is enabled, launch Command Prompt with administrative privileges. Now, enter the following command to enter disk partition mode:
diskpart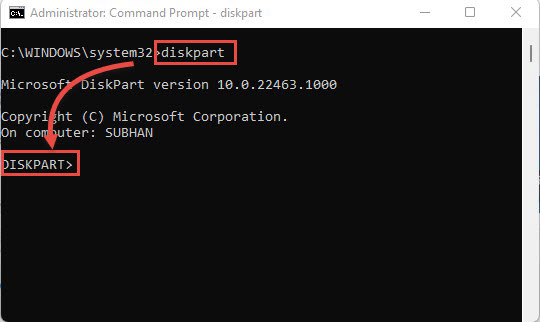
- Now, check the automount status by typing in the following command:
automount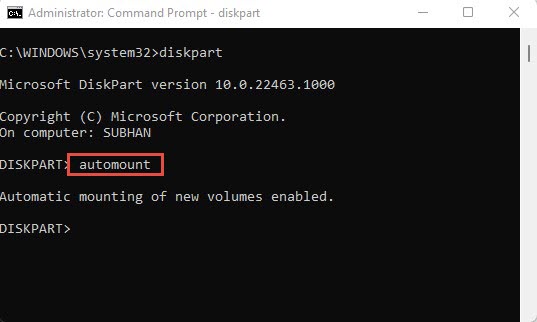
- Now, of the status comes back disabled, you need to enable the automount feature by entering the following command:
automount enable
- The automount feature is now enabled. You must now exit the disk partition mode. To do so, enter the following:
exit
You can now try reconnecting the storage device to check if a drive letter is assigned. If you still face any issues, continue to the next step.
Disable Hidden/No default drive letter attributes
Windows assigns attributes to each file, folder, and storage volume. If you are still unable to see your storage device in File Explorer, it is likely that its “Hidden” and/or “No default drive letter” attributes are enabled. This must be disabled to assign it a drive letter. Here is how to do so:
- Launch the Command Prompt with administrative privileges and type in diskpart. Then, while keeping your storage device connected, type in list disk to check its associated disk number, as in this example:

In the example above, the volume we are interested in is Disk 1. - Now use the command below to select that disk while using the appropriate disk number:
select disk <DiskNumber>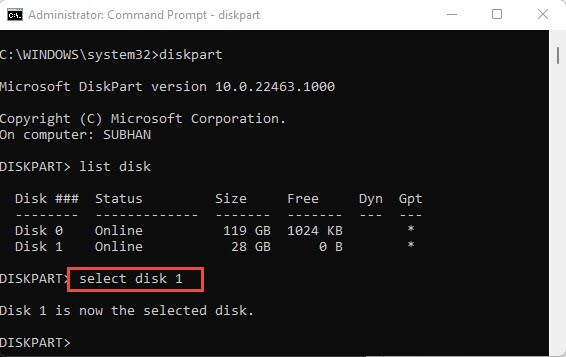
- Now, enter the following command to list the number of partitions within the volume and get its associated number:
list part
Since we are interested in the bigger partition, we will be using its number to select it in the next step. - Now, use the following command to select the partition:
select partition <PartitionNumber>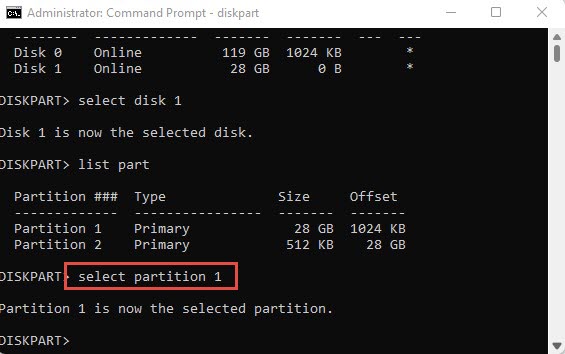
- Now, check the current attributes status of the partition using the following command:
attributes volume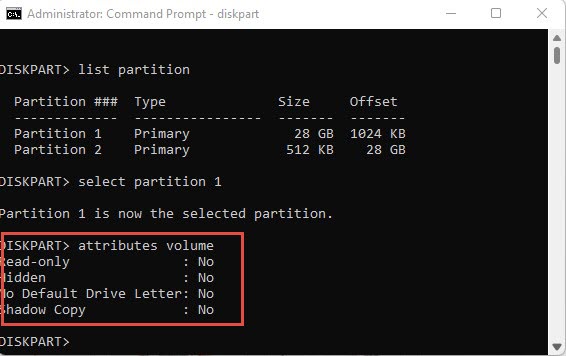
- If you find that “Hidden” and “No default drive letter” are configured to Yes, then disable them by running the following command one after the other:
attributes volume clear hidden<br>attributes volume clear nodefaultdriveletter
- Now, type exit to quit the disk partition mode and close the Command Prompt.
You should now try reconnecting the storage device to check if a drive letter has been assigned and whether it is accessible through Explorer. If not, you can still try and allocate a drive letter manually using the next approach.
Assign drive letter manually
If none of these methods work for you, you can manually assign a drive letter to your storage device so it can be detected by Explorer. This can be done through the Disk Management utility that comes preinstalled with Windows.
Launch the Disk Management utility by typing in diskmgmt.msc in Run while keeping your storage device connected. From there, right-click on the volume that you wish to assign a drive letter to and then click Change drive letter and paths from the context menu.

In the pop-up window, click Add. Then, select the “Assign the following drive letter” radio button and select a letter to assign from the drop-down menu in front of it. Click OK when done.
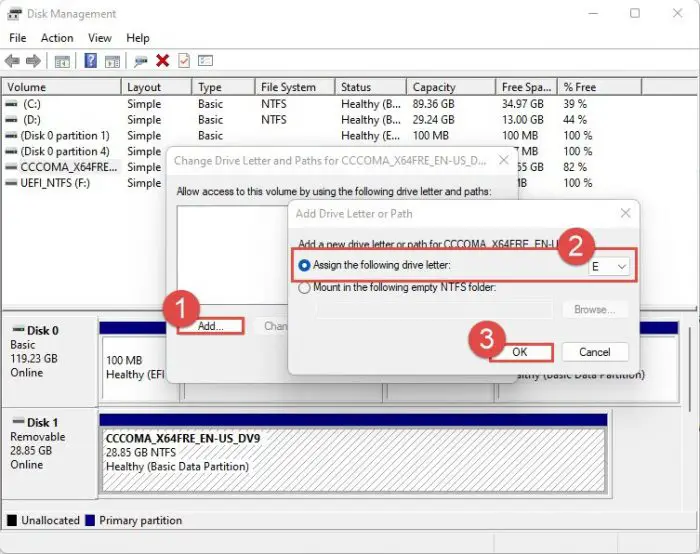
The drive letter should now be assigned to the storage drive and you ought to be able to access it through File Explorer.

Closing words
The drive letter differentiates between the different partitions attached to your device. These can be assigned to both internet and external storage devices, even those that are connected over the internet.
Partition not having a drive letter will always go undetected in File Explorer as well as to any regular computer user. However, the IT pros would know that there is something fishy with the volume, and would immediately recognize that all that is required to get the storage drive detected is to assign it a drive letter.
You do not need to be an IT pro to do so. Simply follow this guide to automatically assign drive letters to all future storage drives that connect to your computer.
