Key Points
- Windows Backup application is now available in Windows 11 Insider Preview Build 23466 (Dev channel).
- It backs up your files, folders, settings preferences, wi-fi SSIDs and passwords, and applications to the cloud using OneDrive.
- Backups can be created by accessing the Windows backup app, but need to be restored from the Windows OOBE screens during fresh installations or after a system reset.
The Windows 11 operating system already has several methods to back up your data, which include File History, Backup and Restore (Windows 7), and a system image backup. All of these are locally stored backups on hard drives, remote locations, or external USB drives.
Now, Microsoft has finally introduced the “Windows Backup app” which is a cloud-based backup software integrated directly into the Windows 11 operating system. At the moment, this app is available on Windows 11 Insider Preview Build 23466 available on the Dev channel or can be downloaded as a separate ISO image.
Using this app, you can backup your files, folders, account settings, apps and preferences, etc., directly onto the OneDrive cloud storage, and then restore them on another computer to begin right where you left off.
In this article, we show you how to use the Windows Backup app o backup and restore your data directly to the cloud.
Table of Contents
This Page Covers
What is the Windows Backup App
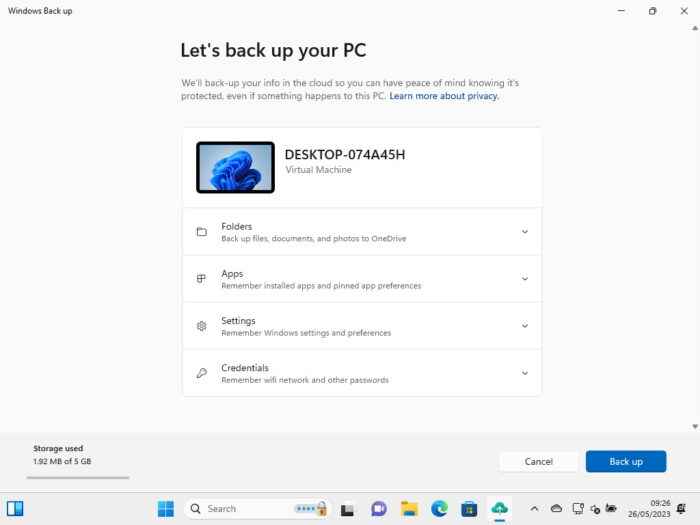
Windows Backup app is a new Microsoft application that lets you conveniently backup your data onto OneDrive cloud storage using your Microsoft account. This app is currently only available for Windows 11 and that too, on the Dev insider channel.
The Backup app uses your Microsoft account and the associated OneDrive account to back up your data onto the cloud storage. Once inside the Windows UI, all you need to do is launch the Windows Backup app and manage the items that you want to back up or skip.
The Windows Backup app has 4 sections; Folders, Apps, Settings, and Credentials.
-
Folders
The Folders section lists the folders you want to back up. The following folders are backed up:
- Desktop
- Documents
- Pictures
- Videos
- Music
-
Apps
Backing up application details not only remembers which apps were installed but also remembers the app preferences. For example, applications pinned to the Start menu or the taskbar will remain pinned when you restore the backup.
-
Settings
You can also back up your settings and preferences. So when you restore the backup to a new computer, you won’t feel a significant difference.
-
Credentials
All Wi-Fi SSIDs and passwords are backed up.
Download Windows 11 ISO Image with Windows Backup App
This Windows Backup app is installed through Windows Update and recently rolled out with Windows 11 Insider Preview Build 23466. To use this app today, you must either subscribe to the Dev channel or use the following steps to download the ISO and then use it to perform a fresh installation.
-
Open the Windows Insider Preview Downloads page.
-
Click on the sign-in button in the top-right corner.
-
Enter your Microsoft account credentials and log in.
-
Scroll down and select “Windows 11 Insider Preview (Dev Channel) – Build 23466” from the drop-down menu and click Confirm.
Note: The build number may be changed if you are downloading it at a later time.
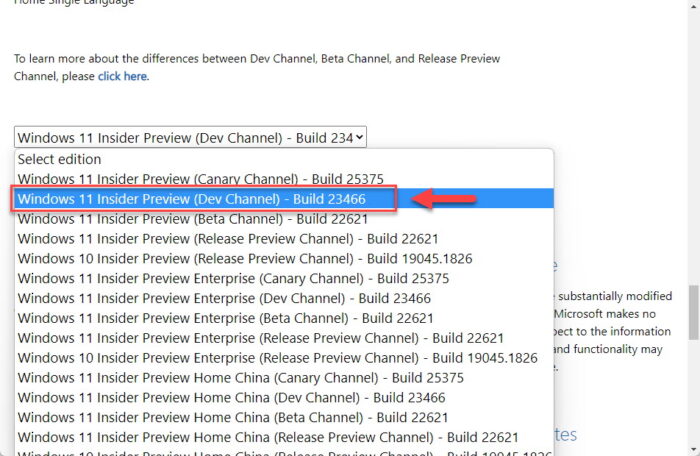
Select Windows 11 Insider Preview Build 23466 Dev -
Select a preferred language and click Confirm.
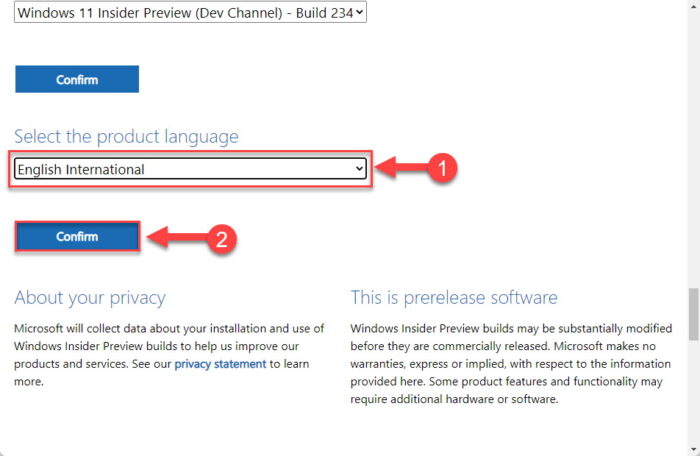
Select a language -
Now click “64-bit Download.”
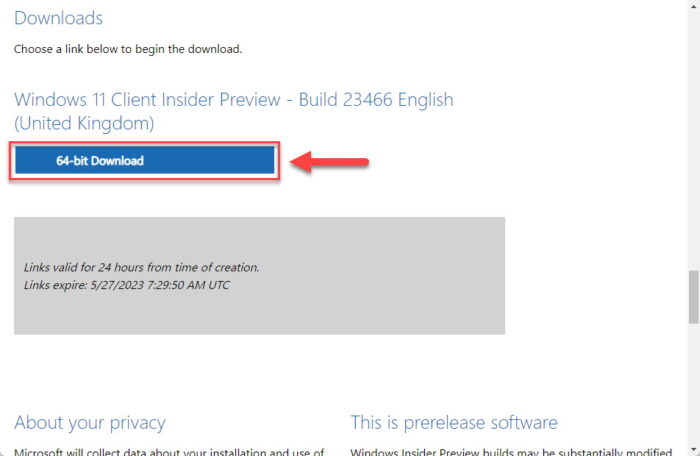
Begin download The ISO image will now begin to download.
Once downloaded, refer to this detailed guide on how to use ISO images to install Windows 11.
Once you are on the correct Windows 11 build, continue down below to learn how to use the Windows Backup application.
Backup with Windows Backup App
Here is how you can use the Windows backup application to backup your data onto the OneDrive cloud storage:
-
Search for “Windows Back up” in the Start menu or the search box and launch the app.
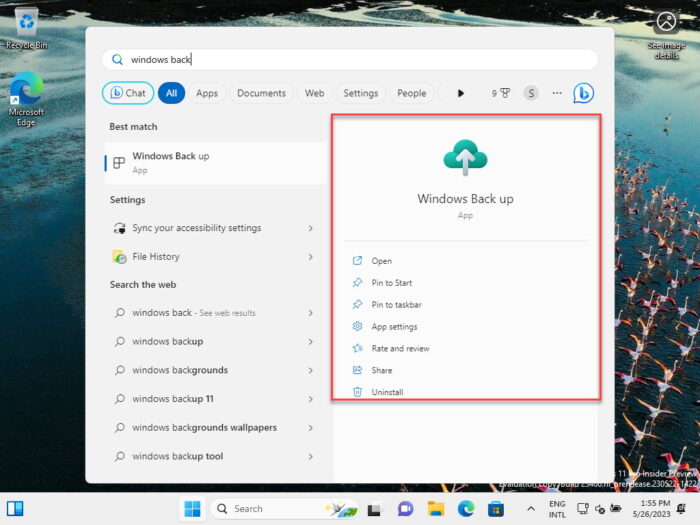
Open the Windows Backup app -
Click Backup.
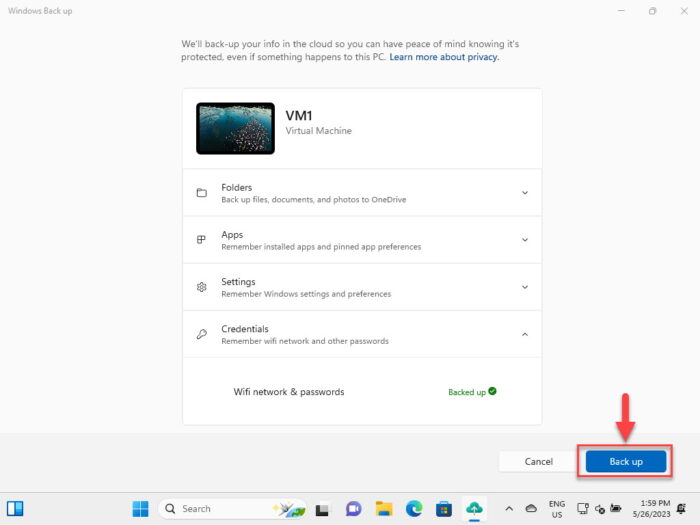
Backup all data using Windows Backup app The application will now begin backing up your data.
Once everything is backed up, you will see the status written in green, as in the image below.
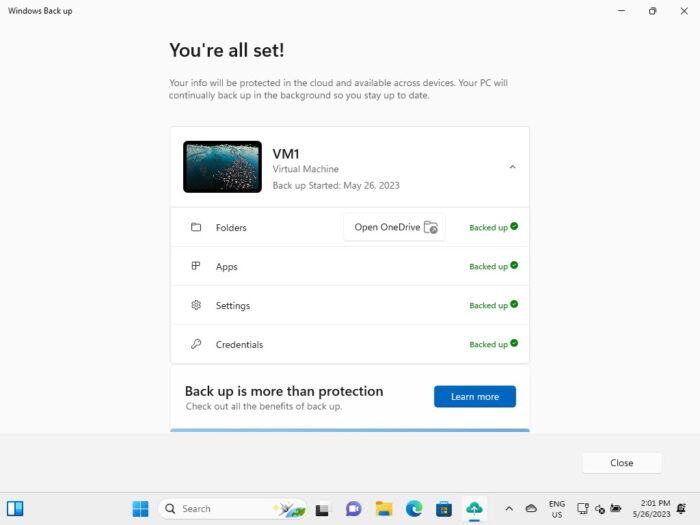
Note that you cannot select which items to back up – all mentioned items are pre-selected. However, you can unselect all of the apps (not selective apps) and select which settings to back up using these steps:
-
Press the Windows Key + i to open the Settings app.
-
Click Accounts on the left.
-
Scroll down and click “Windows back up.”
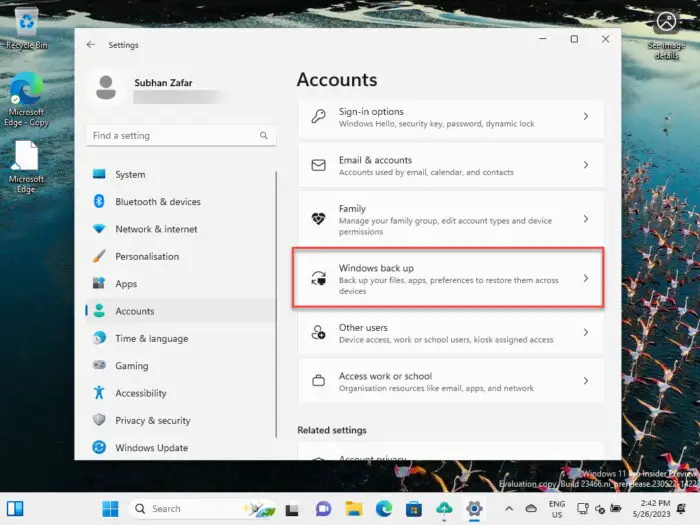
Open Windows backup settings -
Toggle the slider in front of “Remember my apps” into the Off position to de-synchronize applications.

Unsync apps from backup -
Click “Remember my preferences” to expand it.
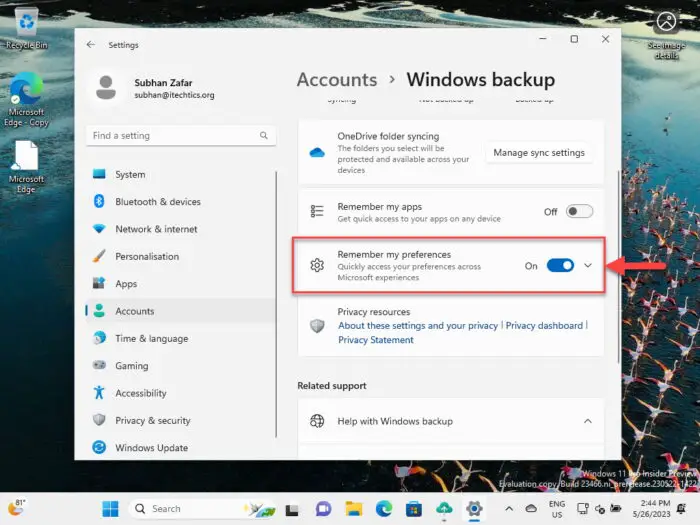
Expand preferences backup settings -
Uncheck the settings you do not want to back up.
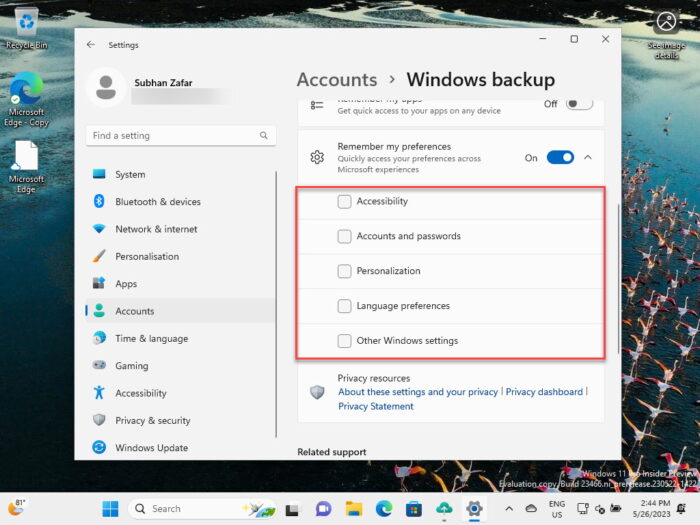
Unselect preferences settings from backup Alternatively, you can toggle the slider in front of “Remember my preferences” into the Off position to prevent all settings data from being backed up.
These are the steps to back up your data to OneDrive cloud storage.
However, if you are setting up the computer for the first time, you can also back up your data directly from the Out Of Box Experience (OOBE) screens by enabling OneDrive backups.
Once backed up, you can continue to restore your data using the steps in the next section below.
Restore using Windows Backup App
Use the following steps to restore your data onto a new computer using the new Windows Backup app.
Note that this is only possible when you are setting up a new PC, or had recently reset your current computer since the backups can only be restored from the OOBE screen. Of course, at the moment, you must have Windows 11 Build 23466.
You can check your OS version and build by typing in winver in the Run Command box.
-
While setting up the computer and logging in with your Microsoft account on the OOBE screens, on the “Select a device to store from” screen, select the backup you want to restore and click “Restore from this PC.”
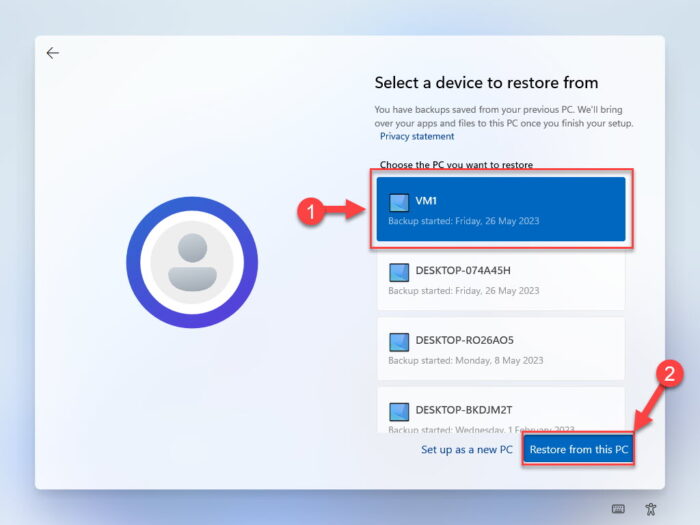
Select a backup to restore Windows will now begin restoring the synced data. Be patient during the restoration process.
-
Now, continue with the remaining OBE screen to set up your PC.
That’s it! Your selected back up through the new Windows Backup application will now be restored. You no longer have to go through the excruciating tasks of customizing your PC according to your preferences, re-install the same apps, or even connecting to each Wi-Fi SSID individually. All your data will already be available.
Caveats of Windows Backup Application
Although the Windows backup application is the first of its kind to back up data directly to the cloud using Microsoft-native services. However, the app is still in its developing stages. In fact, this is the first-ever public release of the app. Therefore, there are some limitations of the Windows backup application that you ought to know before you start using it.
For one, you cannot select the folders that you want to back up. All pre-selected items will be backed up, or you can choose not to back up anything at all – there is no in-between.
Secondly, once you back up your data on the OOBE screen, only then can you exclude the synchronization of apps and settings preferences. This means that they will first be backed up, and then removed.
Another thing that we noticed is that you cannot select specific items to restore; you can only select the machine that created the backup while performing a restore from the OOBE screens. This is another limitation for end-users, especially those who do not want to restore some of the data saved in the backup.
Moreover, the application does back up applications and app preferences, but it does not back up any application data that has been downloaded from the Microsoft Store.
Final Verdict
We at Itechtics are always for backups. You cannot create enough backups of your data to preserve it in case of hard drive failure, natural disaster, or for whatever reason. Microsoft has now taken the first step toward disaster prevention, which is both free and also available for regular users, who are not a part of any organization.
Windows Backup application lets you back up your files, folders, personal preferences, and applications directly to your OneDrive storage on the cloud. This ensures that no data will ever be lost again, and can be accessed on any computer in the world, as long as it has an active internet connection.
