

Windows Operating System is equipped with many addons and components which may extend the functionality of Windows without using any third party software. Some of these components are enabled or installed by default. But all features need not to be enabled because it will slow down the performance of your computer. Moreover all users do not require all that features to be enabled. Some components are also required by third party software to function correctly e.g., .NET Framework 3.5.
Table of Contents
We will discuss how to turn on/off those features using command prompt and manually. Moreover we will also describe how to find and open optional features using a command line. Further, we will briefly elaborate on how to install Windows features from the installation source using command prompt and PowerShell.
Explore Windows Features Using Command Prompt
To get a list of Windows Features using Command prompt, follow the steps below:
- Open command prompt in administrative mode.
- Type the following command
DISM /online /get-features /format:table | more
It will display all the list of features enabled or disabled on your computer. Here format:table and more are optional and are used to improve the readability of the features.

Keep on pressing Enter until you get the full list. You can remove more options if you don’t want to get the full list.
If you do not open it in administrative mode you will encounter the following error.
1- How to turn Windows features on or off?
You can enable any Windows feature or you can disable them. Some features are disabled by default.
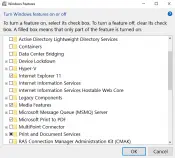
- To open the Windows Features screen, go to Run –> optionalfeatures (This can also be accessed by opening Start Menu –> Control Panel –> Programs and Features –> Turn Windows features on or off)
- To enable a feature, check the checkbox beside the component.
- To disable a feature, un-check the checkbox beside the component.

2- How to turn Windows features on or off using command line?
Windows Features can be enabled or disabled using command line. For checking the status of the features type the command mentioned above. In order to enable any feature, follow the steps below:
- Open command prompt in administrative mode and run the following command:
DISM /online /get-features /format:table | more - Copy the name of feature you want to enable.
- Now run the following command in command prompt:
DISM /online /enable-feature /featurename:[paste the feature name here] - For example, if you want to enable Hyper-V which provides services and tools for running and creating virtual machine type the following command
DISM /online /enable-feature /featurename:Microsoft-Hyper-V -All
This will install and enable all the components of Hyper-V - You may need to restart the computer to install some components.
Disabling Windows features is very similar to enabling them. Follow the steps below to disable any feature.
- Open command prompt in administrative mode and run the following command:
DISM /online /get-features /format:table | find “Enabled” | more
This command will list down all the enabled features in Windows. (You can also make use of Findstr command.) - Copy the name of the feature you want to disable.
- Now run the following command in command prompt:
DISM /online /disable-feature /featurename:[paste the feature name here] - For example, if you want to disable Hyper-V, type the following command
DISM /online /disable-feature /featurename:Microsoft-Hyper-V -All
To get detailed information about a specific component, run the following command:
DISM /online /get-featureinfo/featurename:[featurname]
You will get detailed information about the feature name, description, properties, status and whether it requires restart or not.
3- Enable or Disable Windows features using PowerShell
The benefit of PowerShell over using a command prompt is that PowerShell commands check if the feature is already enabled. If it is already enabled, the installation action is not performed saving computing time.
To get information about windows features through Powershell, open PowerShell in administrative mode and then type
Get-WindowsOptionalFeature -Online

If you want to get information regarding specific features, type
Get-WindowsOptionalFeature -Online -FeatureName *Type feature name*
In order to enable/disable any feature use the following commands.
Enable-WindowsOptionalFeature -Online -FeatureName “Type feature name” -all
Disable-WindowsOptionalFeature -Online -FeatureName “Type feature name”
4- Adding Windows features from a Windows installation source
If a feature is not available for installation in installed Windows, we will need to give external source address to install the feature. The external source can be Windows installation ISO or any drive. Make sure that the path should be given correctly and installation media should be correctly installed. Moreover, you need to know exactly the feature name you wan to add.
Using Command Prompt
To add any Windows feature, open the command prompt in administrator mode and run the following command:
Dism.exe /online /enable-feature /featurename:Type Feature name /All /Source:C:\Sources\sxs /LimitAccess
Here is the installation media is C drive. You should change the installation media according to the requirement you want to install the feature. Once successfully installed remove the installation media.
Using PowerShell
The window feature can be installed by PowerShell using the following command
Install-WindowsFeature Feature Name –Source “C:\Sources\sxs”
Enabling/Disabling features in Windows XP
All the above mentioned methods work in Windows Vista, Windows 7, Windows 8.1 and Windows 10. But if you want to use a command prompt for adding/removing features in Windows XP, you’ll need to follow the instructions below:
pkgmgr d/n
What are your favorite Windows features and which ones do you enable as essentials when you Install Windows?


2 comments
Nap Lee
I discovered that Run: optionalfeatures.exe ,will not work on Windows Server 2016 or 2019. The command will do Nothing.
I had to open a ticket with MSFT Support, for them to disclose this. It is limited to an internal document, and not on any public document by MSFT.
Instead I used AutoHotkey of run: appwiz.cpl with sending TABs and ENTER.
Regards, -Nap
Dr. dr. Fahreza Stuart Sp. CHA
Dude, thank you so much for this article, you save my life, before this i even unable or freeze to turn on manually windows features from control panel, but now it succesful using command prompt!! thanks a ton