When using externally-managed domains with third-party email service providers, email authentication becomes a necessity. It enhances your email deliverability so you can grow your business and keep your audience engaged.
SPF, DKIM, and DMARC are the three pillars for email authentication. There are others to further enhance email security and authentication, like BIMI and MTA-STS, but those are optional, and the former 3 are now a must. Even Google and Yahoo recently announced that bulk email senders will need to authenticate their emails.
When using external domains with third-party email service providers, they use their preconfigured servers and records for you to use to authenticate their email servers to send emails on your domain’s behalf. For this purpose, you must update your DNS records to include third-party servers.
If you are using MailChimp with an external domain, then you’ll need to authenticate your email as well. MailChimp is a widely-used marketing email service, and to authenticate their email servers to send emails from your domain, you must authorize them by updating your SPF and DKIM records.
In this post, I will show you how to add the SPF and DKIM records for the MailChimp service.
Set up email domain authentication with MailChimp
To use the email marketing tool “MailChimp”, you must first verify your domain. This would guarantee MailChimp that the domain belongs to you and that you are its manager/owner. Once the domain is verified, you can then access the information required to update/add your SPF and DKIM DNS records.
Verify external domain with MailChimp
Use the following steps to verify your domain with MailChimp. Note that you must create an account with MailChimp.
-
After logging into Mailchimp, click on your profile picture in the top-right corner and then click Profile.

Open MailChimp profile -
Switch to the Domains tab.

Manage MailChimp domains -
Click “Add and verify domain“.
If your domain is already added, then the button would say “Verify domain” only.

Add and verify domain on MailChimp -
Enter a domain email address and click “Send verification email“.

Send verification email -
You will now receive a verification code in your email. Copy it to your clipboard.
-
Paste the verification code in MailChimp and click Verify.

Verify the domain on MailChimp
After performing these steps, your domain will now be verified. It is now time to set up your SPF and DKIM records.
Set up DKIM and DMARC records for MailChimp
Once your domain is authenticated, you can now move on to setting up your DNS records. MailChimp provides a step by step guide for you to authenticate your domain with MailChimp servers. Here is what to do next:
-
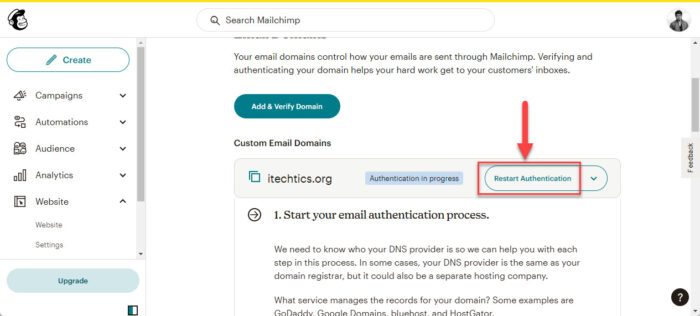
Click Authenticate in front of your domain name.
If you have already started the authentication process, then the button would say “Restart authentication“.

Begin the domain authentication process with MailChimp -
In Step 1, select your DNS provider from the drop-down menu. If they are not listed in the menu, select “Other” and then click Next.

Select your DNS provider -
Step 2 will guide you on what to do next, but you can skip it and move on to Step 3.
-
Open a new tab in the browser and log into your DNS server. Go to “Zone Management” and then click Manage in front of your domain name.
-
Expand the drop-down next to “Add record” and select “CNAME“.

Create a CNAME record -
Back on your MailChimp profile in Step 3, you will see 2 CNAME records. Copy the name and the value for “CNAME1” and paste it into the new CNAME record created on your DNS server.

Create a new CNAME with name and value from MailChimp -
Leave the default TTL and Type and save the record.
-
Create another CNAME for “CNAME2” and enter the other name and value.

Create another CNAME with the name and value from MailChimp These CNAMEs are created as an alias to for servers that contain the DKIM records required for MailChimp authentication.
-
On your MailChimp profile, click Next and proceed to Step 4.
-
Back on the DNS server, expand the drop-down next to “Add record” and select “TXT“.

Add a TXT record -
Copy and paste the DMARC name and value into the new TXT record on your DNS server.

Copy the DMARC name and value Note: The true syntax for a DMARC record’s name is “_dmarc.[domain.com]“. Therefore, I suggest that you change the name to such a format. You can also add and use the “rua” tag to send reports to an email address.
-
Once done, save the DMARC record.

Create a DMARC record for MailChimp authentication
After performing these steps, both DKIM and DMARC records that authenticate the MailChimp servers to send and receive emails on your domain’s behalf will be configured. However, since SPF records are not mandatory for DMARC alignment, they have not been configured here.
That said, I always recommend that you configure all 3 SPF, DKIM, and DMARC records for maximum authentication. For that reason, you can use the following MailChimp SPF server and add it to your domain’s SPF record:
servers.mcsv.net
With this server, your SPF TXT record will look like this:
v=spf1 a include:servers.mcsv.net -all
To learn how to create SPF records, use this detailed guide on SPF.
Confirming email authentication with MailChimp
After you are done with Steps 1 through 4 of the MailChimp guide, you are still left with Steps 5 & 6. Step 5 includes confirming whether your domain has been authenticated or not. It can take up to 48 hours for the updated DNS records to propagate. Once the records have been updated and propagated, you can click “Check status” if the tool can scan the updated CNAME and TXT records for DKIM and DMARC entries.

Alternatively, you can use our Email Security & Deliverability Checker to verify whether your SPF and DMARC records have been configured correctly and whether MailChimp servers are now authorized to handle the emails on your domain’s behalf.
Closing words
All email service providers have their own servers that handle emails, that too in large quantities. Therefore, the steps involved in authenticating emails using MailChimp may not apply to the rest of the service providers. Moreover, they won’t even have the same server names.
If you use MailChimp for your marketing email designs and publishing, then you can use this guide to authenticate your emails and increase the chances of them landing in the recipient’s inbox.


