Microsoft is making it more difficult to disable Windows 10 updates by the day. There is no easy way to disable Windows updates like it was an option in previous versions of Windows. Although this can be a good option for individual users, enterprises and businesses find it very difficult to cope with this setting due to various reasons.
In Windows 10, there is a schedule for updating windows. You may choose from a time range and only during that time may windows updates be installed on your system.
Let’s discuss some methods by which we can disable Windows updates in Windows 10.
Table of Contents
Disable Automatic Windows 10 Updates
From Services
There is a way through the Control Panel to directly stop updates from being installed, here is how:
- Open the Windows Services page by typing in services.msc in Run.

- From the list, look for “Windows Update,” right-click it and then click Properties from the context menu.

- From the Properties window, select Startup Type as Disabled, then click Apply and Ok.

Windows Updates will now no longer run in the background. However, if you want to re-enable them, simply select Startup Type as Automatic from the service “Windows Update.”
Furthermore, if you want to temporarily disable Windows updates in the background, you can run the following commands in Command Prompt with administrative privileges to disable the respective services:
net stop wuauserv
net stop bits
net stop dosvc
Note: Each of these commands can take a moment to take effect.

Negative Effects of Stopping Updates from Services
Disabling Windows Update may cause a negative impact on your PC. This means all updates will be blocked from being installed at all. There may be some important updates that are critical for your PC to be installed.
That is why we suggest that a user avoids blocking Windows updates entirely, or unblock them when the option is no longer required.
If your computer is functioning fine with background updates is not performing its performance. If it is creating an issue, then you can use the below alternative methods.
By Configuring Metered Network
You can also disable auto-updates by setting your connection as “metered.” Here is how:
- Navigate to the following:
Settings app >> Network and Internet >> Properties (Under current network)
- Now toggle the slider into On position under “Set as metered connection.”

This option will now not download Windows updates automatically and will help you if your data plan is limited.
From Group Policy
You can also prevent Windows updates from installing using the Group Policy Editor. Here is how:
- Open the Group Policy Editor by typing in gpedit.msc in Run.

- Navigate to the following through the left pane:
Computer Configuration >> Administrative Templates >> Windows Components >> Windows Update - Double-click “Configure Automatic Updates” from the right pane.

- From the popup, select Enabled, and then select “2 – Notify for download and auto install” from the drop-down menu under Options. Click Apply and Ok when done.

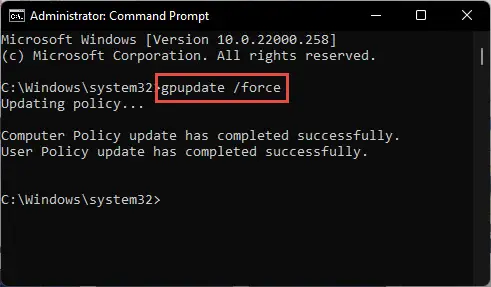
- Now launch Command Prompt with administrative rights and paste the following for the changes to take effect.
gpupdate /force
Windows Update will now check for any pending updates. However, these will not be downloaded nor installed unless you specifically do so through Settings app >> Windows Update.
Using Windows 10 Update Disabler
Note: This method no longer works on recent Windows 10 versions. Furthermore, the author of the tool has also removed it and is no longer available to download.
Window 10 Updater Disabler is a program that allows users to easily turn off or on Windows Update. This is a service that runs in the background and prevents updates from being installed.
Download Windows Updates Disabler for Windows 10
You’ll get a zip folder. Extract it to get the .exe file. Now open “cmd” and open that file path where you download the Updater Disabler.
E.g. cd c:\users\user name\downloads\updaterdisabler. When you reach into the required folder type the command “updaterdisabler.exe –install” .then you’ll get the following output. This will indicate the installation of “windows updater disabler”.

Go to the Services page by typing in services.msc in Run and check if the service “Update Disabler Service” exists.

Now your system won’t install any updates. If you try to do this, you’ll get an error.
Uninstall Windows Updates Disabler
In case you want to install any important updates, you can uninstall this by repeating the process of installation. Just simply open cmd and reach the path where “updater disabler” is placed.
Now write the command “updatedisabler.exe -remove”.

Now it is uninstalled from your system and you can download any required update.
Closing Words
We hope this article will provide you with complete guidance on how to stop windows 10 from getting auto updates. Just follow any given method above and you’ll have a smooth experience and should not get any difficulty regarding Windows 10 automatic updates.


3 comments
Tom Bartoffy
I disabled the Windows Update and Update Medic Service but when I try to Re-enable it I get the message that “access is denied”.
How can I reactivate Updating?
Usman Khurshid
Yes, you can certainly enable Windows Updates service. Have you tried restarting your system and then enable the service again?
Windows 10 Error code 0xc0000034
I have been tried a lot in Disable Windows Updates In Windows 10 but I failed. through this post, I can easily disable window updates. Nice ways mention in this post to disable this. keep posting such type information.