Key Points
- You may use the “/Source” parameter to define an alternate WIM file, SxS folder, or mapped running Windows drive to be used as an alternative Windows repair source, or to install optional features.
- To change the Windows repair source permanently, open the Group Policy Editor, navigate to Computer Configuration > Administrative Templates > System, enable the policy “Specify settings for optional component installation and component repair,” and specify the alternate path in the Options section.
By default, when attempting to repair a Windows image, the operating system will download fresh files from Windows Update. In case a Windows Server Update Services (WSUS) is deployed, then the default location will change to that server only. At times, either one of these options fails to successfully download the files needed to repair the image. So how can you repair the Windows image without performing a clean installation?
The solution to this problem is configuring an alternate Windows repair source. You can temporarily provide a path to an alternative source to use the files directly from the Command Prompt or configure a Group Policy to always use the alternative path.
This solution can be adopted in case your computer is offline, and you want to use an offline Windows ISO file to perform the repair. An alternative scenario is when your PC downloads the files from a dedicated WSUS server, but the files that you require are not yet deployed by your organization, in which case you will configure your PC to use Windows Update instead.
I would also like to add that you can also use an alternative source for Windows files when installing optional Windows features, or Features on Demand (FoD).
Features on Demand or those optional features that are installed from Settings > System > Optional features > View features.
When encountering errors while repairing the Windows image or installing optional features, you can use this guide to provide alternative sources for Windows files.
Table of Contents
How to repair Windows image?
If you detect any anomalies while using your Windows computer and find that something is not performing as it should, or encountering errors, maybe it is time to perform an image repair. This means that any system files that may have been corrupted will need to be replaced.
Usually, the Windows image is repaired using built-in tools like Deployment Image Servicing and Management (DISM) and System File Checker (SFC). DISM is also used to manage system components, like adding or removing Windows features.
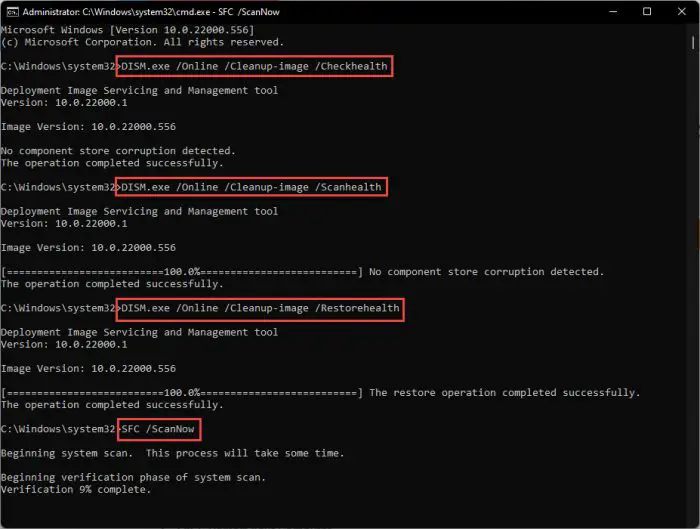
Normally, the following commands are used in Command Prompt, in the given order, to repair a Windows image:
DISM.exe /Online /Cleanup-image /Checkhealth
DISM.exe /Online /Cleanup-image /Scanhealth
DISM.exe /Online /Cleanup-image /Restorehealth
SFC /ScanNow
This is what these commands do:
- DISM CheckHealth: This command allows the system to scan for corrupted files within the system image. However, it only detects the issues and does not fix them.
- DISM ScanHealth: This command performs an advanced scan of the system image to check if there are any inconsistencies.
- DISM RestoreHealth: This command will now attempt to repair the system image by using the default repair path (Windows Update or WSUS) to download the required files.
- SFC ScanNow: This command will replace the corrupted files with the freshly downloaded ones.

After running these commands in the given order, the operating system will have downloaded the required files from the default repair path and used them to repair the Windows image. If your PC is a part of an organization with WSUS deployed, then that default path would be the WSUS server.
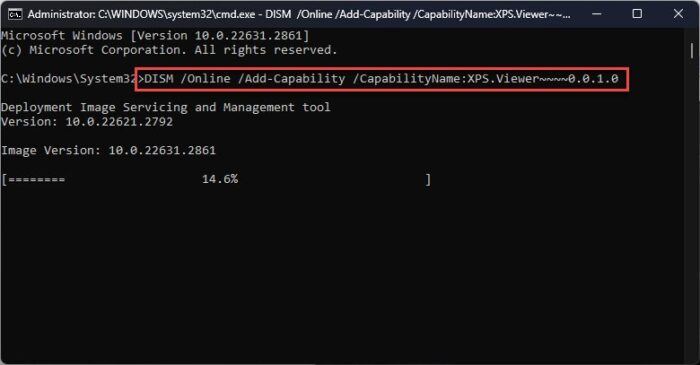
Additionally, using the following command, you can also install FoD on Windows, which also uses the default path for the files:
DISM /Online /Add-Capability /CapabilityName:[FeatuerName]
However, not everything may go as smoothly. You can encounter various errors while executing either one of these commands above. For example, a file could be missing from the WSUS server, or your PC may be offline and the DISM command is unable to download the required files. In this case, you can provide an alternative source for the Windows files.
Which alternative file sources can be used?
When encountering issues with the default source for Windows files, whether you are repairing a Windows image or installing optional features, you can use any of the following alternative sources:
- A mounted image: You can mount an ISO file to your PC and use the files inside as the primary source for system files. A .WIM file (Windows Imaging Format) or the Side by Side (SxS) folder inside the ISO image is used as the source.
- Side by Side (SxS) Folder: A standalone, or a shared SxS folder can be used as an alternative source for system files. The SxS folder can be from another computer on the network, a mounted image, or a removable media.
- Windows Imaging Format (WIM) File: A WIM file can also be used as an alternative source for system files. A WIM file can be from a mounted image, a removable media, or a shared network drive mounted on your PC. Note that when using a WIM file, you must also specify the index number (a number assigned to each edition of Windows) for the operating system inside the WIM file.
- Existing Windows installation: You can also use the “Windows” folder (C:\Windows\) from another PC on the network as an alternate source for system files. Of course, the path should be mapped as a network drive first.
You will now see how to use each of the source types to repair Windows from the Command Prompt using the DISM tool, and how to use the same alternative source paths to permanently configure an alternative repair path. Additionally, I will also demonstrate how you can configure Windows Update as a permanent source path even if a WSUS is deployed.
Repair Windows image using WIM file with DISM
One way to repair the Windows image while providing an alternate source path for Windows files is using the “DISM RestoreHealth” command with the /source parameter. This will allow you to temporarily change the default source for Windows files. The same applies to the /Add-Capability command when installing optional Windows features.
Note that the /source parameter does not apply to SFC, DISM CheckHealth, or DISM ScanHealth commands, as no source is required for these operations.
With a mounted ISO image file, you can use the “Install.wim” file to repair the Windows image. Here is how:
-
Start by downloading the ISO file for your Windows version.
-
Right-click on the ISO file and click Mount.

Mount the ISO image -
Note down the drive letter for the mounted image.

Note drive letter for mounted ISO image -
Press the Windows key + R to open the Run Command box.
-
Type in “cmd” and press CTRL + Shift + Enter to launch an elevated Command Prompt.
-
Use the following command to determine the index number for the image corresponding with your Windows edition, using the WIM file inside the mounted image:
DISM /Get-WimInfo /WimFile:[DriveLetter]:\sources\install.wim
Note down the index number for your OS edition Since I’m running Windows 11 Pro edition, I will be using the index “6” for repairing my Windows image.
-
Now run the following commands that will scan the computer for potential file damages:
DISM.exe /Online /Cleanup-image /Checkhealth
DISM.exe /Online /Cleanup-image /Scanhealth
Scan the computer for corruption with DISM -
Once scanned, use the following command to use the alternative WIM file as the repair source for your Windows image:
Replace the variables according to your scenario inside the square [] brackets.
DISM /Online /Cleanup-Image /RestoreHealth /source:WIM:[DriveLetter]:\sources\Install.wim:[Index] /LimitAccess
Repair Windows image using WIM file with DISM in Command Prompt The
/LimitAccessparameter ensures that the command does not go online, specifically Windows Update, to download any system files. -
Now, run the following command to replace any corrupted system files:
SFC /ScanNow
Repair Windows image using WIM file with SFC
After performing these steps, your system image should be restored to its original state.
Note that you can also use a standalone WIM file, extracted from an ISO image, and use its path as an alternative repair source for Windows.
Repair Windows image using existing Windows installation with DISM
Alternative to the method above, if you do not have an ISO image or a WIM file, you can use an existing Windows installation, which is primarily another PC on your network running the same Windows version and edition. For this to work, you must first map the C drive of the remote PC onto your own computer so that a drive letter can be assigned. Therefore, I have divided this method into a total of three sections:
- Configuring remote PC to allow a remote connection
- Mapping a drive from a remote PC
- Repairing Windows images using running Windows installation as an alternate source
Configure remote PC for connection
The following steps need to be performed on the remote computer which will be used as an alternative image-repairing source:
Note: These steps involve making manual changes to the Windows Registry. Misconfiguration of critical values in the system’s registry could be fatal for your operating system. Therefore, we insist that you create a system restore point or a complete system image backup before proceeding forward with the process.
You can also use our top selection of disk imaging and backup software so you never lose your data or operating system again.
-
Press the Windows key + i to open the Settings app.
-
Go to System.
-
Scroll down and click “Remote Desktop.”

Open Remote Desktop settings -
Toggle the slider in front of “Remote Desktop” into the On position.

Allow Remote Desktop connection -
Note down the name of the PC as it will be needed later.

Note the PC name -
Press the Windows key + E to open File Explorer.
-
Click “This PC” in the left navigation pane.
-
Right-click the C drive and open Properties.

Open C drive properties -
Switch to the Sharing tab and click “Advanced Sharing.”

Open advanced sharing -
Check the box for “Share this folder” and then click Permissions.

View sharing permissions -
Select Everyone, check the box in front of “Full Control” under the Allow column, and then click Apply and OK.

Allow full control to everyone -
Click Apply and OK on the remaining windows to close them.
-
Now press the Windows key + R to open the Run Command box.
-
Type in “regedit” and press Enter to open the Registry editor.
-
Navigate to the following path from the left pane:
Computer\HKEY_LOCAL_MACHINE\SOFTWARE\Microsoft\Windows\CurrentVersion\Policies\System
-
Right-click the System key, expand New, and click “DWORD (32-bit) Value.” Name this DWORD “LocalAccountTokenFilterPolicy“.

Create the LocalAccountTokenFilterPolicy DWORD -
Double-click the LocalAccountTokenFilterPolicy DWORD, set its Value Data to 1, and click OK.

Change Value Data for LocalAccountTokenFilterPolicy to 1 -
Restart the computer for the changes to take effect.
After performing the steps above, you are now ready to map the C drive of this PC onto your own computer and use it as an alternative source for system files.
Map network drive on Windows
Perform the following steps on your own computer to map the network drive:
-
Press the Windows key + E to open the File Explorer.
-
Click on the 3 dots in the top menu and then click “Map network drive.”

Map network drive -
[Optional] Check the box with “Reconnect at sign-in.” this is recommended if you are planning on using this remote Windows installation as the alternate image-repairing source permanently.
-
In the “Folder” field, use the name of the remote PC (as noted earlier) and use the following syntax to map its C drive:
\\[PCName]\C$

Provide path to network drive to map -
Click Finish.
-
Enter the username and password for the user account of the remote PC to authorize the mapping.

Authorize network drive mapping using account credentials The network drive should now be mapped successfully.
-
Note down the drive letter assigned to the network drive using File Explorer.

Note the assigned drive letter for the mapped drive
Now that the existing Windows installation is mapped successfully, you can use its “Windows” folder as an alternate source to repair your damaged Windows image.
Repair Windows image using running installation as source
Now all you need to do is use the DISM tool with the running Windows installation as the alternative source. For that, follow these steps:
-
Press the Windows key + R to open the Run Command box.
-
Type in “cmd” and press CTRL + Shift + Enter to launch an elevated Command Prompt.
-
Run the following commands to scan the system for potentially damaged files (as we did with the WIM file):
DISM.exe /Online /Cleanup-image /Checkhealth
DISM.exe /Online /Cleanup-image /Scanhealth
Scan the computer for corrupted files with DISM -
Now use the following command while entering the assigned drive letter for the mapped network drive to repair the Windows image using files from an already-running Windows installation:
DISM /Online /Cleanup-Image /RestoreHealth /source:[DriveLetter]:\Windows /LimitAccess
Repair Windows image using running Windows installation source with DISM -
Once the system files have been downloaded from the alternate running Windows installation, run the following command to replace the corrupted ones:
SFC /ScanNow
Performing all of the steps above will have the same effect as using the Install.WIM file to repair the system image.
Install Windows Features on Demand using SxS as alternate source
As mentioned earlier in the article, you can also provide an alternate file source when installing the Windows optional Features on Demand from the Command Prompt. For this purpose, the Side by Side (SxS) folder is used, which contains files for all of the Windows system components.
You can mount a Windows ISO image and use the SxS folder within, or extract the folder and use it as a standalone source for installing the components – it all falls to the path for the provided source.
Like DISM, you can use the following command to install FoD on Windows using an SxS folder:
DISM /Online /Add-Capability /CapabilityName:[FeatuerName] /Source:[PathToSxSFolder]
In the example above, I used the SxS folder inside a mounted Windows ISO image. Optionally, you can also extract a copy of the SxS folder and use it as a standalone folder.
Configure a Windows repair source from Group Policy
Up until now, all the methods we have discussed to provide an alternate source for Windows repair have been temporary. If you removed the /Source parameter from the command, the repairing, and the installation of FoD components, would automatically use the default source location, which is Windows Update, unless you have a WSUS deployed.
You can also permanently change the default repair source using the Group Policy. This way, you would not have to repeatedly input the repair path in every command. Running the basic commands to repair Windows or install optional features would automatically use the preset path.
Here are the steps to configure a Windows repair source permanently:
Note: In the case you are planning to use a mapped network drive, make sure that it automatically connects to it and is available when needed. Moreover, the assigned drive letter must also remain the same, and this is also true if you are planning to use a mounted ISO image.
-
Press the Windows key + R to open the Run Command box.
-
Type in “gpedit.msc” and press Enter to open the Group Policy Editor.
-
Navigate to the following path from the left pane:
Local Computer Policy > Computer Configuration > Administrative Templates > System
-
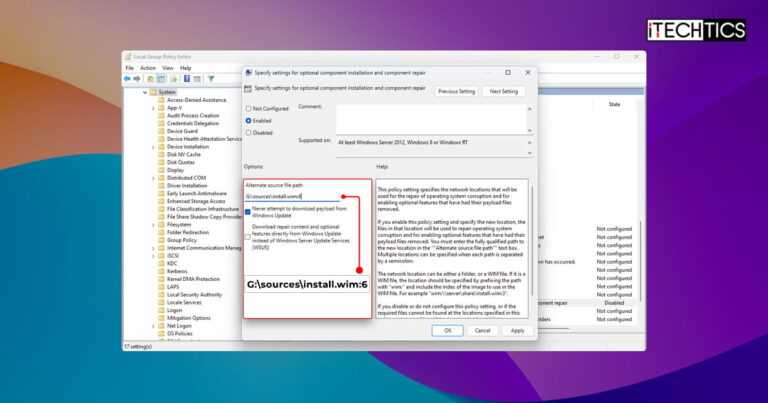
Double-click the policy “Specify settings for optional component installation and component repair.”

Open the Group Policy -
Select Enabled.
-
In the Options section, in the “Alternative source file path” field, input the path to the source that you want to use.
Note: This can be a path to a WIM file, an SxS folder, or a running Windows installation path. We have discussed all three of these above.
-
[Optional] Select “Never attempt to download payload from Windows Update” if you only want your OS to use the provided path.
-
Click Apply and OK.

Configure alternate Windows repair source file path from Group Policy -
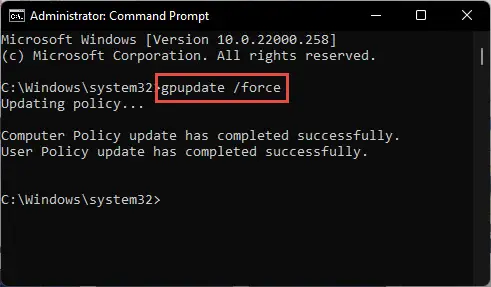
For the changes to take effect, run the following command in an elevated Command Prompt.
GPUpdate /Force
Enforce Group Policy update
After performing the steps above, while installing FoD or repairing Windows, you no longer need to use the /Source parameter explicitly. Windows will now automatically use the provided alternate path as the source for performing the task. For example, running the following command will now use the “install.wim” file located in “G:\sources\” to repair the Windows image:
DISM /Online /Cleanup-Image /RestoreHealthUse Windows Update instead of WSUS as repair source
In the case you have a WSUS deployed and repairing the Windows image has no effect, it may be possible that the required files are absent from the WSUS as well. Or, if you want to install a Windows Feature on Demand that is not available on WSUS, then you can point your alternate path to Windows Update instead.
For both of these instances, you can use either of the following methods to direct Windows to download the required files from Windows Update instead of WSUS
From Group Policy
-
Press the Windows key + R to open the Run Command box.
-
Type in “gpedit.msc” and press Enter to open the Group Policy Editor.
-
Navigate to the following path from the left pane:
Local Computer Policy > Computer Configuration > Administrative Templates > System
-
Double-click the policy “Specify settings for optional component installation and component repair.”

Open the Group Policy -
Select Enabled.
-
In the Options section, select the option “Download repair content and optional features directly from Windows Update instead of Windows Server Update Services (WSUS).”
-
Click Apply and OK.

Configure Windows Update as primary source to download repair and optional update content -
For the changes to take effect, run the following command in an elevated Command Prompt.
GPUpdate /Force
Enforce Group Policy update
From Registry Editor
Note: Caution is advised while using the Registry editor since unwanted accidental changes can often turn fatal for the operating system and can permanently damage it.
-
Press the Windows key + R to open the Run Command box.
-
Type in “regedit” and press Enter to launch the Registry Editor.
-
Navigate to the following path from the left pane:
Computer\HKEY_LOCAL_MACHINE\SOFTWARE\Microsoft\Windows\CurrentVersion\Policies\Servicing
-
Right-click the “Servicing” key, expand New, and click “DWORD (32-bit) Value.” name this DWORD “RepairContentServerSource“.

Create the RepairContentServerSource DWORD -
Double-click the DWORD “RepairContentServerSource,” set its Value Data to 2, and click OK.

Use Windows Update as primary Windows repair source path from Windows Registry -
Restart the computer for the changes to take effect.
After performing the steps above, your operating system will only use Windows Update as its primary source for downloading files when repairing the Windows image, or when installing Windows optional features.
In case you want to revert the changes, simply delete the “RepairContentServerSource” DWORD. If you configured it from the Group Policy, then simply change it back to “Not configured.”
Closing thoughts
Requiring to use an alternate source for Windows image repair or installing Windows optional features is often needed. Take Indiana University as an example. In a post, they explain to their students how to install the Remote Server Administration Tools (RSAT) from Windows Update, since their WSUS no longer has a downloadable package for it.
Since all of their students’ computers were a part of the domain with a WSUS deployed, they weren’t able to install the RSAT directly. Therefore, they were instructed to use the respective Group Policy to configure an alternate repair path for their systems.
You can come across a similar scenario where you must use Windows Update as the primary source instead of the WSUS, or vice versa, where this guide will come in handy in using a WIM file, the SxS folder, an ISO image, and an active Windows installation on the network as an alternative Windows repairing source.


