

Key Points
- To disable, enable, and restart a network adapter on Windows 11, go to Settings > Network & internet > Advanced network settings.
- You can also disable, enable, or restart a network adapter from the Command Prompt, PowerShell, Device Manager, and the Control Panel on Windows 10 and 11.
All modern computers come with network adapters today so you can connect to the internet and communicate with other devices. However, even the most sophisticated network adapters, whether wired (ethernet) or wireless (wi-fi), can run into issues and not perform as they are supposed to. At this point, a simple restart of the network adapter usually fixes the issues.
By restarting the network adapter, you avoid rebooting the complete computer, and the basic connectivity issues are also resolved.
You may want to restart your network adapter if your computer hasn’t had downtime in quite some time and the internet speed isn’t optimized when you are having trouble connecting to the wireless SSID, or if you are experiencing any sort of issues with network connectivity. Restarting the network adapter should be the first of many steps for troubleshooting.
On Windows 11, restarting the ethernet, wi-fi, or virtual network adapter involves turning it off and then on again. Therefore, the methods discussed in this post to restart any network adapter first let you disable the adapter, and then re-enable it. In case you want to simply disable or enable a network adapter on your Windows PC, you can use the same methods discussed below.
Note: Restarting and resetting the network adapter are two different things. When you reset the network settings, all configurations are lost and need to be redone.
Table of Contents
Restart the network adapter from Settings in Windows 11
Microsoft has introduced the ability to disable and enable any network adapter on your computer directly from the Settings app. You no longer have to open the Control Panel to do it.
Unfortunately, this option is not available in Windows 10.
Use the following steps to restart the ethernet or the Wi-Fi network adapter from the Windows 11 Settings app:
-
Press the Windows Key + i to open the Settings app.
-
Switch to the “Network & internet” tab from the left.
-
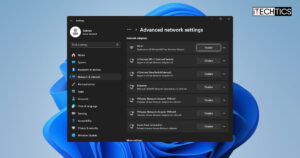
Scroll down and click “Advanced network settings.”
 1")
Open advanced network settings -
Click Disable in front of the network adapter that you want to disable or restart.
 2")
Disable the network adapter from Settings -
In case you want to restart the adapter, click Enable in front of it.
 3")
Enable the network adapter from Settings
 1")
 2")
 3")
If you re-enable the network adapter, you have successfully restarted it. If you were encountering issues with the adapter, check to see if they have been resolved.
Restart the network adapter from Control Panel
Traditionally, you can also restart the network adapter from the Control Panel. This method (and the methods below) also works for Windows 10.
-
Press the Windows Key + R to open the Run Command box.
-
Type in “ncpa.cpl” and press Enter to open the Network Connections applet.
-
Right-click on the adapter that you want to disable/restart and click Disable.
 4")
Disable network adapter from the Control Panel -
To re-enable the adapter, right-click the adapter again and click Enable.
 5")
Re-enable the network adapter from the Control Panel
 4")
 5")
Restart the network adapter from Device Manager
To enable, disable, or restart any network adapter of your computer from the Device Manager, use these steps:
-
Press the Windows Key + R to open the Run Command box.
-
Type in “devmgmt.msc” and press Enter to open the Device Manager.
-
Click on “Network adapters” to expand it.
 6")
Expand Network Adapters in the Device Manager -
Right-click on the adapter that you want to disable/restart and click “Disable device.”
 7")
Disable network adapter from the Device Manager -
If asked for a confirmation, click Yes.
 8")
Confirm action -
To re-enable the adapter, right-click the adapter again and click “Enable device.”
 9")
Enable the network adapter from the Device Manager
 6")
 7")
 8")
 9")
After performing the steps above, the selected network adapter will be restarted and should perform optimally now.
Restart the network adapter from PowerShell
If you prefer using the Windows command line instead, then you can use the steps below to disable, enable, or restart the ethernet or the wireless network adapter using Windows PowerShell:
-
Open an elevated PowerShell instance.
-
Run the following command to list all the network adapters:
Get-NetAdapter | format-table 10")
List all network adapter details in PowerShell -
Note down the name of the network adapter that you want to restart/disable.
-
Now use this command while entering your adapter’s name in place of [NetworkAdapterName] to disable it:
Disable-NetAdapter -Name “[NetworkAdapterName]” -Confirm:$false 11")
Disable network adapter from PowerShell -
To re-enable the adapter, use this command:
Enable-NetAdapter -Name “[NetworkAdapterName]” -Confirm:$false 12")
Enable/restart network adapter from PowerShell
 10")
 11")
 12")
Restart the network adapter from Command Prompt
You can also use the Command Prompt to restart any connected network adapter. Here is how:
-
List all the network adapter details with this command:
netsh interface show interface 13")
List all network adapter details in Command Prompt -
Note down the name of the network adapter that you want to restart/disable.
-
Now use this command while entering your adapter’s name in place of [NetworkAdapterName] to disable it:
netsh interface set interface “[NetworkAdapterName]” disable 14")
Disable network adapter from Command Prompt -
To re-enable the adapter, use this command:
netsh interface set interface “[NetworkAdapterName]” enable 15")
Enable/restart network adapter from Command Prompt
 13")
 14")
 15")
Ending words
Restarting the network adapters on Windows was already an easy task. However, Windows 11 has made it even more convenient.
Although the Settings app was supposed to replace the Control Panel, Microsoft still hasn’t entirely accomplished the task. They are gradually shifting the controls from the Control Panel over to the Settings app, and the addition of the ability to disable and enable the network adapters from the Settings app is part of that ongoing agenda.


