Key Points
- Windows 11 23H2 has been made available for the public on 31st October 2023.
- You can upgrade to Windows 11 23H2 from Windows Update or Upgrade Assistant, or download it directly from Microsoft or the Media Creation tool.
- The size of the Windows 11 23H2 ISO is a whopping 6.2 GB.
Windows 11 is the latest stable operating system from Microsoft for the general consumer. On 31st October 2023, Microsoft released Windows 11 23H2, better known as “Windows 11 version 2023,” which includes some significant new features and improvements over its last versions.
This release has been anticipated for a long since Microsoft has shifted to annual feature releases, rather than their previous model of releasing 2 updates per annum.
You can upgrade to the latest Windows 11 version 23H2 from the Windows Update Settings page, or using the Upgrade Assistant application. If you want to download the ISO image file, then that can be downloaded directly from Microsoft, or using the Media Creation Tool (MCT).
In this guide, we will give a step-by-step guide on how to upgrade your systems to Windows 11 23H2, what it includes, and how to check whether or not it can be installed.
Table of Contents
What the Windows 11 23H2 ISO entails
Before downloading the ISO, here are a few details that you should be familiar with which the Windows 11 23H2 ISO offers.
To begin, the ISO file contains the following Windows editions with the associated index numbers:
| Index No. | Windows Edition |
| 1 | Windows 11 Home |
| 2 | Windows 11 Home N |
| 3 | Windows 11 Home Single Language |
| 4 | Windows 11 Education |
| 5 | Windows 11 Education N |
| 6 | Windows 11 Pro |
| 7 | Windows 11 Pro N |
| 8 | Windows 11 Pro Education |
| 9 | Windows 11 Pro Education N |
| 10 | Windows 11 Pro for Workstations |
| 11 | Windows 11 Pro N for Workstations |
When you download the Windows 11 23H2 ISO using any one of the methods below, it should have the following details:
- File name: Win11_23H2_English_x64.iso
- Windows 11 Build No.: 10.0.22621.2428
- File size: 6.24GB
- Hase SHA-1: 9D18F7814564421381C94E13C09A9C427BAF8018
- Hash SHA-256: 71A7AE6974866603D366A911B0C00EACE476E0B49D12205D7529765CC50B4B39
Hence, when performing the download, make sure that you have ample storage space, and are downloading the right version with the correct name.
Download Windows 11 23H2 (version 2023)
Download Windows 11 23H2 ISO from Microsoft
One way to upgrade to Windows 11 23H2 is to download the ISO file directly from Microsoft, and then use it to either upgrade the current OS or perform a clean install. Here are the steps to download Windows 11 23H2 directly from Microsoft:
Note: This method will download the latest version of Windows 11 available.
-
Open Microsoft’s Windows 11 download page in any web browser.
-
Scroll down to the page and select “Windows 11 (multi-edition ISO)” from the drop-down menu under “Download Windows 11 Disk Image (ISO)” and then click Download.

Select ISO to download -
Next, select the language you wish to download Windows 11 from the drop-down menu and then click Confirm.

Select language -
Now, click the 64-bit download button, and your Windows 11 ISO download should begin.

Begin downloading
Download Windows 11 23H2 ISO using Media Creation Tool
Microsoft’s Media Creation Tool allows you to create bootable devices and download standalone ISO images of their operating systems. Microsoft has also introduced a Media Creation Tool for Windows 11 that you can use to download a Windows 11 23H2 ISO file. Here is how:
Note: This method will automatically download the latest version of Windows 11 available at the time.
-
Download the Windows 11 Media Creation tool and then run the file.
-
You will now see a new window for MCT. Accept the license terms.

Accept licensing terms -
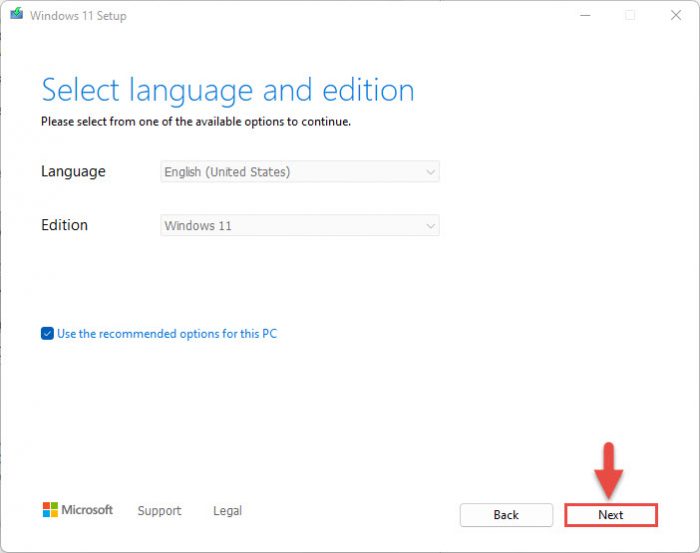
Check the pre-selected ISO details and click Next.
If you are downloading the ISO file to another computer, uncheck the box next to “Use the recommended options for this PC” and select the language you wish to download Windows 11 23H2 in.
Proceed by clicking Next -
Select the “ISO file” radio button to download the file and then click Next.

Select ISO and proceed -
You will now need to choose where you wish to download the ISO image. Select a volume with ample free/available space and click Save.
The Media Creation Tool will now begin your download.

ISO downloading -
Once the download finishes, click Finish to close the tool.
You may find that the software then performs a setup cleanup. You can ignore this and let it run in the background.

Close the tool
Now that you have downloaded the Windows 11 23H2 ISO image, you may proceed to the next phase: Creating a bootable device.
If you do not want to use an ISO image and perform an in-place upgrade, continue to use the following 2 methods.
Upgrade to Windows 11 23H2
If you do not wish to perform a clean installation of Windows 11 23H2 and download the ISO, you can also upgrade your current OS to the latest Windows 11 version available through Windows Update or the Installation Assistant.
Upgrade to Windows 11 23H2 using Windows Update
If you want to upgrade your device to Windows 11 from a Windows 10 PC, you must first meet the minimum system requirements. If your device does qualify, you can then check if you have received a Windows 11 upgrade option by navigating to the following (in Windows 10):
Settings app >> Update & Security >> Windows Update
If you are already on an older Windows 11 version and want to update to a newer version, navigate to the following:
Settings app >> Windows Update
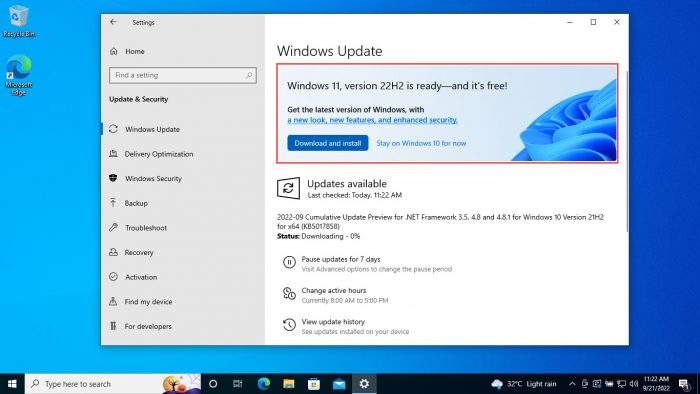
Here, select the option “Get the latest updates as soon as they’re available” and then click “Check for updates.” When the scan finishes, check to see if you have a notification at the top saying that Windows 11 version 23H2 is ready to be installed. Click “Download and install” below it.
Upgrade to Windows 11 23H2 using Installation Assistant
Another way to upgrade your current OS is through the Installation Assistant. This tool needs to be run on the PC you want to upgrade.
Please note that the Windows 11 Installation Assistant does not work with ARM-based PCs. For ARM-based devices, you can use the manual download and installation method discussed above.
Follow these steps to upgrade your current OS to Windows 11 23H2:
-
Download Windows 11 Installation Assistant and execute the package.
-
First, you will need to download and install the PC Health Check app regardless if you are already running Windows 11. Click “Get PC Health Check app.”

Get PC Health Check app -
The app will now download. Install the PC Health Check app and see if your system meets the requirements.
-
Once done, return to the Installation Assistant and click Refresh.

Refresh the app -
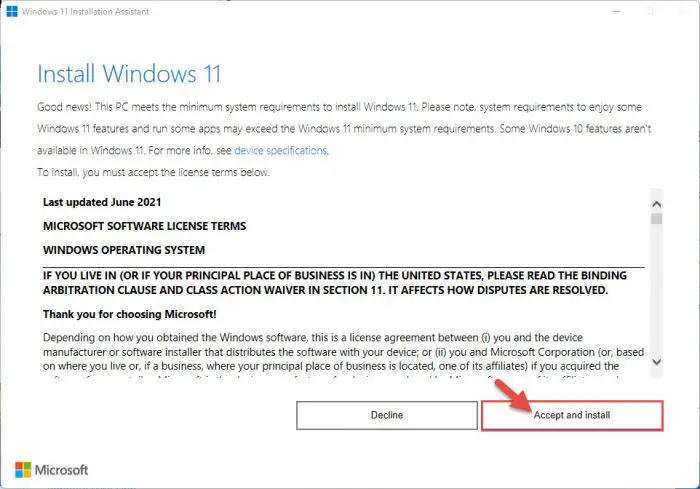
Now click “Accept and install.”
Accept terms and begin download -
The tool will now begin to download Windows 11 23H2.
Once finished, restart your computer so it can upgrade to the latest version available.
Create Bootable Windows 11 23H2 USB Drive
Create Windows 11 23H2 bootable USB using Rufus
If you downloaded an ISO image using any of the methods above, you can create a bootable USB flash drive with it, as well as a DVD. However, we suggest that you create a USB drive as it is more convenient.
You can use Rufus or Ventoy to create a bootable USB flash drive using the ISO image. Let us show you how to create a bootable USB flash drive for Windows 11 23H2:
-
Plug in a USB flash drive (at least 8GB) to your computer.
Make sure that all your data on the USB is backed up since it requires formatting where all stored data on the USB flash drive is lost.
-
Download Rufus from its website and run it.

Download the latest Rufus version -
In Rufus, make sure that the USB drive is selected from the drop-down menu under Device.

Select the USB flash drive -
Click Select and then select the Windows 11 23H2 ISO file.

Choose the Windows 11 23H2 ISO file -
Leave the rest of the settings to their default values and click Start.

Click Start -
Select the Windows 11 customization options and click Ok.

Select Windows 11 customization options Your Windows 11 bootable USB drive will now be in the making. This step may take a few minutes to complete.
-
In the warning popup box, click Ok.
-
Once it is finished, “Ready” will be displayed with a green bar. You may then Close the app.
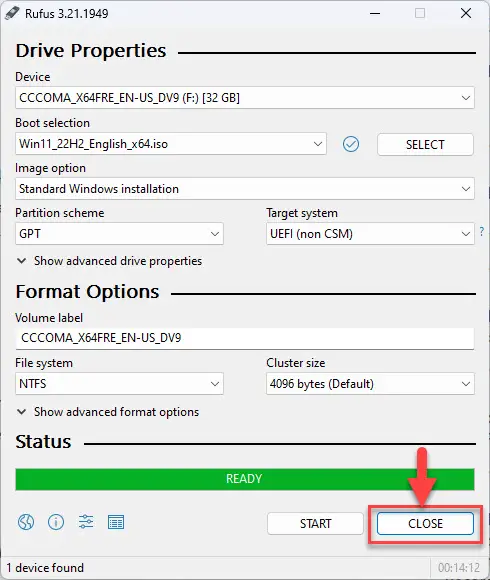
Close Rufus
Create Windows 11 23H2 bootable USB using Media Creation Tool
Note: At the moment, the MCT downloads Windows 11 version 22H2, instead of 23H2. Therefore, we recommend that you download the ISO directly from Microsoft, and then use Rufus or Ventoy to create a bootable USB drive.
The Media Creation Tool cannot only be used to download the Windows 11 23H2 ISO but also to create a bootable USB flash drive directly. Here is how:
-
Plug in the USB drive.
-
Download the Windows 11 Media Creation Tool and then run the setup.
-
Accept the licensing terms.

Agree to the licensing terms -
Uncheck the box with “Use the recommended options for this PC,” select the preferred language and Windows version from the drop-down menus, and click Next.

Select Windows version and edition -
Select “USB flash drive” and click Next.

Select the USB media -
Confirm that the correct USB drive is selected and click Next.

Confirm the attached USB The Media Creation Tool will now begin downloading and creating the bootable USB drive. You can see the progress percentage on the MCT wizard.
-
When done, click Finish.

Close the Media Creation Tool
Create Windows 11 23H2 bootable media using Command Prompt
You can also use the Command Prompt to create a bootable USB flash drive. All you need is a plugged-in USB drive and a Windows ISO image file.
-
Plug in the USB drive.
-
Press the Windows Key + R shortcut keys to open the Run Command box.
-
Type in “cmd” and press CTRL + Shift + Enter to run the Command Prompt as an administrator.
-
Now run this command to mount the Windows 11 ISO image file:
Replace [PathToISO] with the complete path to the Windows 11 ISO file.
PowerShell Mount-DiskImage -ImagePath "[PathToISO].iso"
Mount ISO -
Run the following command to enter the Disk Partition mode:
Diskpart -
Run the following command to view the associated drive letter for the mounted Windows 11 ISO file, and note it down.
List Volume
Find drive letter for mounted Windows 11 ISO -
Now run the following command to determine the USB flash drive:
list disk -
Now run this command while replacing [DiskNo] with the associated disk number for the USB drive.
select disk [DiskNo] -
Now run this command to delete everything from the USB flash drive:
Clean -
Now run this command to create the primary partition:
Create Partition Primary
List, select, clean USB disk, and create primary partition -
When prompted to perform a format, select Cancel.

Cancel automatic formatting -
Now select the partition with this command:
Select Partition 1 -
Now quick-format the USB drive into the FAT 32 file system with this command:
format FS=FAT32 quick -
Now assign an available drive letter using this command. Pick a drive letter of your choice and insert it into the variable.
Assign Letter=[USBDriveLetter] -
Exit the Diskpart mode with this command:
Exit
Select and format partition, assign drive letter and exit Diskpart -
Now, access the directory for the mounted Windows 11 ISO using its drive letter (as noted in Step 6 above).
[ISODriveLetter]: -
Now enter the “boot” folder with this command:
cd boot
Change directory to the boot folder -
Update the volume boot code for the USB flash drive with this command:
bootsect /nt60 [USBDriveLetter]:
Update the volume boot code -
Now copy all the Windows 11 installation files to the USB flash drive from the mounted ISO file with this command:
xcopy [ISODriveLetter]:\*.* [USBDriveLetter]:\ /e /f /hNote: The switches “e”, “f”, and “h” copy all subdirectories (even if empty), displays source and destination file names, and copy files with hidden and system file attributes, respectively. Moreover, this step can take some time depending on the size of the ISO file and the system’s performance.

Copy the ISO to the USB drive
Your bootable drive is now ready and you may proceed to the installation phase using the guide given below.
Install Windows 11 23H2 from bootable USB
Now that you have created a bootable drive using the ISO file, you can begin installing Windows 11 23H2. Here is how:
-
Confirm that the target PC meets the minimum Windows 11 requirements.
You can also install Windows 11 23H2 while bypassing the TPM and Secure Boot requirements or without an internet connection.
-
Plug in the bootable Windows 11 USB flash drive in the target computer.
-
Turn on/reboot the computer and open its One Time Boot Menu (Usually through the F12, F10, or Esc button).
-
Select the external USB drive to boot from the USB.
-
You will now see a menu such as the one below. Click “Next.”

Proceed with installation -
Click “Install Now.”
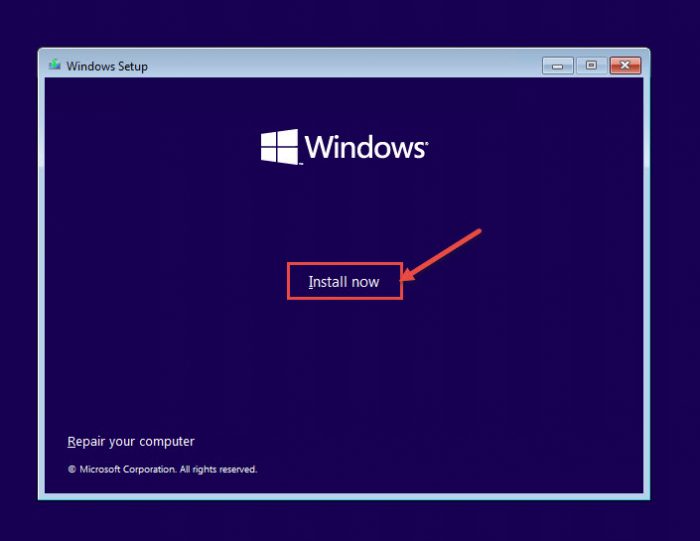
Install Windows -
On the next screen, click “I don’t have a product key.”
Even if you do have one, you can activate the product later after installation.

Proceed without entering key -
Select the Windows 11 edition that you want to install on this device from the list. When selected, click Next.

Select Windows 11 edition to install -
Check the box to accept the license agreement and click Next.

Accept terms -
Select “Custom: Install Windows only (advanced).”
You will now be asked if you want to upgrade your existing OS or perform a custom installation. Since this is a clean and fresh Windows 11 installation, we will be selecting “Custom.

Custom installation -
Click “New” and create the disk partitions as you want them. Remember to have at least 40GB of space in the primary (C) drive for Windows installation.
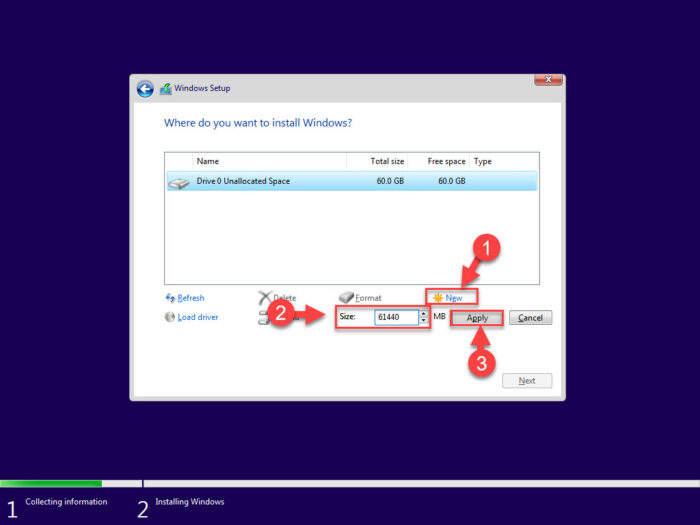
Create disk partitions Click “New,” enter the size of the partition to create (in MBs), then click Apply.
-
If intimated about additional partition creation, click Ok.
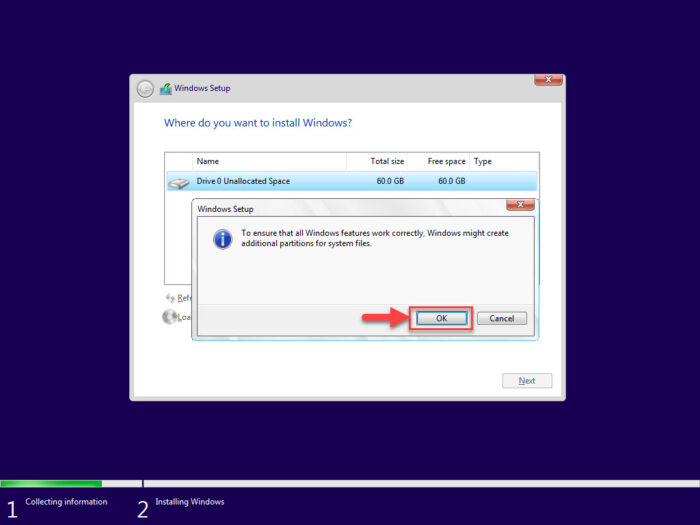
Automatic creation of additional partitions prompt -
Select the partition you wish to install the operating system on and click Next.
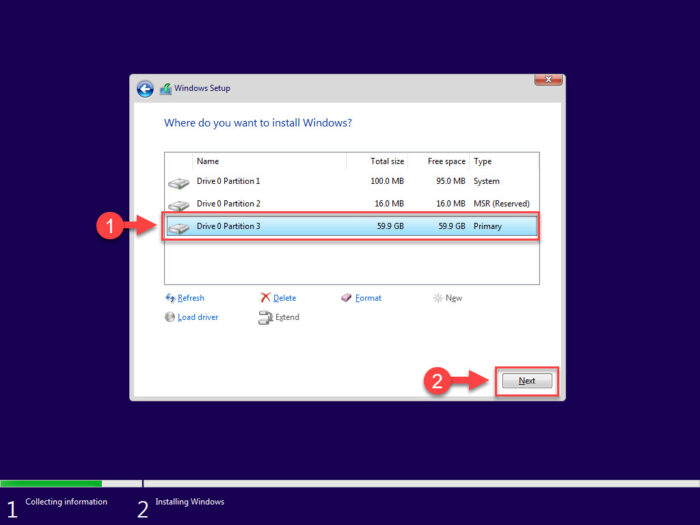
Select the primary partition to install Windows Windows 11 will now begin installing on your device. This step may take a few minutes and your device may reboot a few times.
Further ahead in the process, you will be asked to configure your PC through several Out Of Box Experience (OOBE) screens. Proceed with the on-screen instructions and configure your PC, and you will have successfully installed Windows 11 version 2023.
Once it finishes, you will be logged into your user account on the all-new Windows 11 PC! You can now begin installing the relevant software and customizing it according to your liking.
What’s new in Windows 11 23H2
Windows 11 23H2 has been released via an enablement package through the Windows Update channel. This means that the features had already been placed, and only needed enablement. Also, as we have seen in the recent past, some updates that already included 23H2 features, like the Moment 4 update, enabled certain features beforehand.
The early experience was made available for the users who had enabled the “Get the latest updates as soon as they’re available” option, while they remained on Windows 11 22H2. If you did not toggle that option, then you may receive several surprises after upgrading to Windows 11 23H2.
Here is a list of the new features you can expect with Windows 11 23H2:
-
Chat is now Microsoft Teams
The Chat icon in the taskbar is now Microsoft Teams again. When Windows 11 was first launched, Microsoft Teams was part of it and pinned to the taskbar. But this was later changed and Microsoft Teams was changed to Chat.
However, with Windows 11 23H2, Microsoft has reverted it had changed the Microsoft Teams icon back to the Chat icon. It is also pinned in the taskbar by default.
-
Manage apps with System Components Settings page
Microsoft has introduced a dedicated “System Components” Settings page that allows you to manage the apps that are shown within the Start menu under the System label. This new section can be found at the following path:
Settings > System > System components
-
Windows Copilot

Windows Copilot Microsoft has introduced the Windows Copilot as your Artificial Intelligence (AI) assistant through the Windows operating system. Windows Copilot is an AI-enabled feature in Windows 11 that converts your text-based input into commands, For example, you can use it to change your computer’s theme from light to dark simply by writing in “Change theme to dark mode.” Now, this feature can be enabled as soon as you sign in.
It uses the ChatGPT AI language model to provide assistance with your daily tasks and increase your productivity. For example, you can type in “Lower the brightness” and Windows will adjust your screen’s brightness accordingly.
To run Copilot, you can use the pinned button in the taskbar, or use the Windows Key + C shortcut keys.
Paint Cocreator

Paint Cocreator in Windows 11 23H2 Paint Cocreator is an AI-based text-to-image generator introduced to the Paint application in Windows 11 23H2. Using this feature, you can create any image simply by describing what you want to create. It even offers different variants of the described image, from which you can select.
Redesigned File Explorer

Updated File Explorer The File Explorer has been updated to include new features and improvements. Its header has been redesigned, and a new details pane has been introduced to the right side of Explorer. Additionally, Explorer now also includes a Gallery page to manage your media.
The Home page has been improved, and the sharing experience has also been enhanced.
-
Dynamic lighting

Manage dynamic lighting in Windows 11 23H2 If you have an RGB device, then you can take your lighting experience to a whole other level with natively controlled dynamic lights.
With Windows 11 23H2, you now get a dedicated Dynamic Lighting page to control how your light behaves from Settings > Personalization
-
Snipping Tool recognizes text
The Snipping Tool can now recognize text in the screenshots that you take, which you can then copy right out of the image without having to type them in.
-
Improved volume mixer in Quick Settings
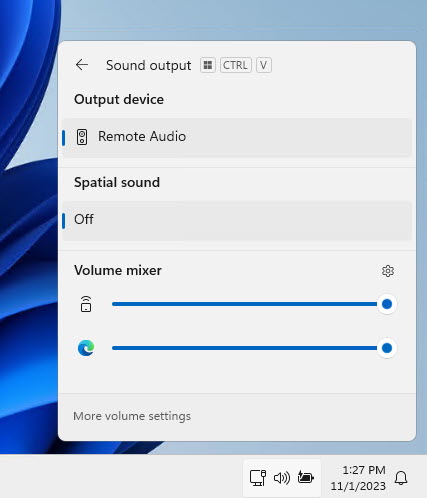
Improved Volume Mixer in Quick Settings in Windows 11 23H2 The volume mixer inside the Quick Settings has been revamped to offer more options. You can now enable and disable Spatial Sound directly from here as well.
-
Passkeys

Manage passkey on Windows 11 23H2 A passkey is a key you need to get past something, like a door. In the digital world, this refers to the digital token you need to get past any screen that may require a password or any sort of credentials. passkeys have been around for some time and were created in collaboration between Microsoft, Google, and Apple, but consumerized recently.
Windows 11 23H2 now stores a passkey that you can manage from Settings > Accounts > Passkeys.
-
Warnings for Unsafe Password Copy and Paste
The Enhanced Phishing Protection in Microsoft Defender Smart Screen will now protect school and work passwords against phishing and unsafe usage on the internet.
-
Natural voices for Narrator
Microsoft has also introduced more natural voices for the Narrator. This includes Chinese, Spanish (Spain and Mexico), Japanese, and English (United Kingdom).
-
Never Combine for taskbar icons

Never combine taskbar icons from Settings The “Never combine taskbar” feature has been introduced that allows you to ungroup the taskbar icons for quick and convenient accessibility. It not only does that but also shows the titles of the windows, as in this image:

Ungrouped taskbar icons with labels Even if you have multiple windows open from the same app, they will be displayed individually. Of course, these settings can be managed from Settings > Personalization > Taskbar > Taskbar behavior > Combine taskbar buttons and hide labels.
-
Other features and enhancements
Other minor changes have also been made with Windows 11 23H2, which include the following:
- Alerts for detected camera streaming issues, with recommendations to launch the “Get Help” troubleshooter.
- Important or urgent notifications display a “view notification” button for privacy when using full-screen apps.
- Task ending option when right-clicking an app on the taskbar, managed under Settings > System > For developers.
- Labels and sliding animations when switching between desktops in Task View.
- Accessibility flyout on the Lock screen.
- Energy-saving recommendation for adjusting refresh rate in Settings > System > Power & battery > Energy recommendations.
- Updated design for lists under Settings > Apps > Startup Apps and Settings > Apps > Advanced App Settings > App Execution Alias.
How to roll back Windows 11 23H2 to 22H2
If you do not wish to keep the installed update for some reason, you can always roll back to the previous build of the OS. Use the following steps to roll back your Windows 11 23H2 to the previous OS version.
Note: The following steps can only be performed within the next 10 days after installing the new update. To be able to roll back the Windows version after 10 days, you will need to apply this trick before the 10 days are over.
-
Press the Windows Key + i to open the Settings app.
-
Go to the following from the left pane:
System > Recovery
-
Click “Go back” under “Recovery options.”
Note: If the option is grayed out, it means that either the 10 days have passed and you are unable to roll back, or that you performed a clean install and the older version of Windows does not exist on your PC.

Go back to previous OS version -
In the pop-up dialog box, select the reason for rolling back and then click Next.

Provide a reason for the rollback -
Click “No thanks.”

Skip checking for Windows updates -
Click Next.

Understand the consequences of a rollback -
Click “Go back to earlier build.”

Confirm rollback
The computer will now restart and begin the rollback process. This may take some time.
When the computer restarts, you will have returned to the older OS version that was before you upgraded to Windows 11 23H2.
Takeaway
The Windows 11 23H2 has been released for the public you can now either download an ISO for or upgrade to it, as long as your computer meets the minimum requirements. However, should you update?
Windows 11 version 2023 is the latest version for the general Windows consumer. It has been in production since last year in the Insider channels and has been thoroughly tested by Microsoft as well as the end users, which makes this release relatively stable and error-free. Therefore, considering what Windows 11 23H2 introduces and the risk factors, we suggest upgrading to 23H2.


