Windows 10 makes it harder to edit Hosts file by making it read-only. We can edit Hosts file easily using Notepad or even from command-line or remotely. We will discuss all these methods in this article, so stay tuned.
Table of Contents
What is a Hosts file?
The hosts file serves as a local DNS server for the computer and is used to map IP addresses to domain names.
The hosts file is essentially the first place your computer looks for an IP address when you are browsing through the internet. It is a file found on your computer that contains the name of a website and its corresponding IP address.
When you type in “itechtics.com” on your web browser, your computer goes to find the corresponding IP address in the hosts file. If the entry is not found there, it then goes to the Domain Name Server (DNS) associated with your computer.
This file can be edited for each computer for multiple benefits. Users can use this file to block specific websites, or developers could modify the hosts file to test-run their websites locally on their machine.
Let us show you how you can modify the hosts file on your computer and any other computer on your network remotely.
Why you might need to modify the hosts file
When a user opens up a web browser and searches for something or enters a website URL, the computer needs to contact the corresponding IP address to be able to communicate with the website.
However, since the computer’s networking system’s primary point of contact is the local hosts file, settings a different IP address for the domain name can trick the computer to transfer to a different IP.
This technique is often used by individuals to block certain websites on computers. However, it is not the most optimized way to do so, as the users can change or remove the entry in the hosts file to revert their networking settings.
Another reason one might need to consider manipulating the hosts file is to run their own website deployed on the computer and then test it out. Other devices on the same network could then use the local IP address corresponding to the domain name to test their website without going over the internet.
How to edit hosts file on a local computer
The hosts file is a basic system file that can be edited with the built-in Notepad in Windows and is present in plain text. However, to edit it, one needs administrative privileges. A standard user or user account with privileges any lower than an administrator would not be able to edit the file and will be given the following error when trying to save any changes made to it.

Let us show you how you can modify the hosts file successfully, without any errors, that is located at the following location:
C:\Windows\System32\drivers\etc\hosts
The following method is true for user accounts having Administrative privileges, as well as for the standard users.
- Search for Notepad in the Windows Search Box and then use the shortcut keys Ctrl + Shift + Enter to launch it as an Administrator.
- Now click on File in the top-left corner of Notepad, and then click Open.

- Navigate to the hosts file location shared above. If the window does not display any items, select All files from the file type drop-down menu. Select hosts, and then click Open.

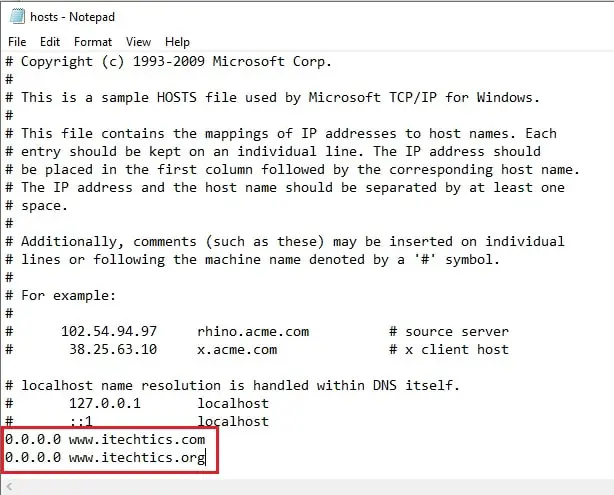
- You can now make the desired changes to the file, as in the example below, and then use the shortcut keys Ctrl + S to save it.

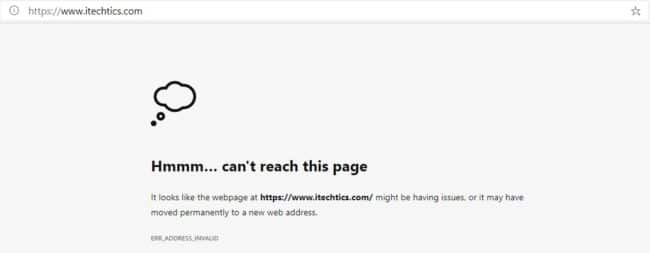
You can now check that the URL you have entered in the hosts file will now redirect to the corresponding IP. Since we entered 0.0.0.0 in our example, the website www.itechtics.com is no longer accessible.

How to edit hosts file using the Command-line
Alternatively, you can also use the Command Prompt to edit the hosts file in a few easy steps. However, the Command Prompt must be opened as an administrator.
- Open Command Prompt as an Administrator.
- Enter the following command to add a new entry to the hosts file:
echo <IPAddress> <websiteURL> >> %WINDIR%\System32\Drivers\Etc\Hosts
This will instantaneously add the IP address and the corresponding domain name to the hosts file. However, if you want to delete it, you will need to use the conventional way by opening up the hosts file in the Notepad and removing the entries manually.
How to edit hosts file on a remote computer
Manually modifying the hosts file on a large number of PCs can be hectic. You can use the following method to remotely edit the hosts file on another computer and make the necessary changes for such a scenario.
This part involves some additional steps. However, it is still beneficial and better than going to each computer physically and altering the hosts file. Nonetheless, you will need to perform a small task on the remote computer(s) that will need to be done through physical presence.
The following is valid for computers that are on the same network/domain as the source computer.
On the remote computer, enter the following command in Run and then reboot the computer:
reg add HKLM\SOFTWARE\Microsoft\Windows\CurrentVersion\Policies\system /v LocalAccountTokenFilterPolicy /t REG_DWORD /d 1 /f
This will add a new DWORD to the Windows Registry that will allow you to access the computer remotely through PsExec.
PsExec is a utility created to allow remote access to other computers. This enables users to perform tasks remotely on distant computers without being physically present on-site.
When the DWORD has been added to the computer(s) you want to modify the hosts file on, perform the following tasks on the source computer (from where you will be working).
- Download the PsExec utility package. Once downloaded, extract it into a single folder.
- Now launch Command Prompt with Administrative privileges.
- Navigate to the extracted PsExec folder from within the Command Prompt, as in the example below:

- Enter the following command to launch the remote computer’s Command Prompt:
psexec \\10.0.0.172 -u administrator -p admin123 cmd
Replace the IP address with the name or IP address of the remote computer, and the username and password after -u and -p, respectively.
- You have now successfully executed the remote Command Prompt. Use the following command to add an entry to the remote PC’s hosts file while replacing the IP address and the corresponding URL of your choice:
echo 0.0.0.0 www.itechtics.com >> %WINDIR%\System32\Drivers\Etc\Hosts
You may now press the shortcut keys Ctrl + C to log out of the remote computer’s Command Prompt and proceed to connect to the next PC.
Closing words
Although the hosts file is of significance to the Windows system, it does not affect it in any way if you decide to delete the file voluntarily or involuntarily. Unless you have made certain changes to the file, nothing drastic happens if you remove the entire file. It can always be replaced with a blank file with the name “hosts”.
Moreover, any changes made to the file can also be reverted whenever you’d like. Hence, playing around with the file cannot be deemed dangerous for the system. However, it would be wise to create a backup of the original file just in case.


1 comment
Roger
Thank you, great article. Much appreciated.