SafeSearch is a feature offered by search engines and several devices that can either allow or block explicit content flagged by them. When enabled, SafeSearch blocks lewd content from showing, and when disabled, any relevant content can come up in your searches, regardless of its sensitivity.
Today we are going to show you how to enable or disable SafeSearch across multiple platforms and search engines. The processes are pretty simple, only if you know where to look for these settings. But before we do, there are some misconceptions and details we’d like to shed some light on.
Table of Contents
How does SafeSearch Work?
SafeSearch works by blocking out the content which has been flagged as inappropriate by the search engine provider. This includes any text, images, or videos that have explicit content and may not be age-appropriate for the user.
That said, when the feature is enabled, any content which has been cataloged by the search engine and marked as explicit or vulgar is automatically filtered out in the search results.
Enable/Disable SafeSearch in Web Browsers
This section addresses the misconception many users may have about SafeSearch and a browser’s ability to enable/disable it.
Web browsers, such as Google Chrome, Firefox, or Microsoft Edge, do not provide the SafeSearch feature. Instead, it is the search engine working behind these browsers which have the ability to filter the search content.
Therefore, no web browser directly has any links with Safesearch. However, they do provide low-level filtration such as age-appropriate content in Microsoft Edge, and safe browsing in Chrome for more security, etc.
Similarly, the devices, like a Windows computer or an Android device, do not directly provide SafeSearch functionalities, yet you can still control the content on some devices. This is because these devices have integrated search engines that you can manage from the device’s settings. For example, Windows uses Bing.com to provide search results, and Android devices use Google.com.
Now that this misconception is cleared, let us show you how to turn SafeSearch on or off on various platforms.
Enable/Disable SafeSearch on Windows 11/10
The Windows operating system allows you to control SafeSearch directly from the Settings app. It offers you 3 levels:
- Strict
- Moderate
- Off
Moderate is selected by default. However, you can change this through the Settings app, or adopt more aggressive approaches if that doesn’t work.
From Settings App
-
Navigate to the following:
-
In Windows 11:
Settings app >> Privacy & security >> Search permissions
-
In Windows 10:
Settings app >> Search
-
-
Here, select one of the options under SafeSearch.
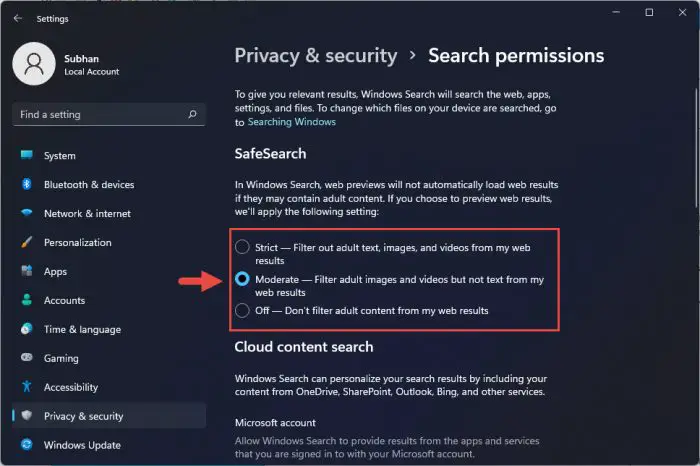
Set SafeSearch intensity
This is perhaps the most convenient method to configure SafeSearch on a Windows computer. Note that this won’t affect your search results when using Bing.com or Google.com on a web browser. For that, you can refer to the relevant sections below.
From Group Policy
-
Open the Group Policy editor by typing in gpedit.msc in the Run Command box.

Open Group Policy editor -
Now navigate to the following from the left pane:
Computer Configuration >> Administrative Templates >> Windows Components >> Search
-
In the right pane, double-click “Set the SafeSearch setting for Search.”

Open Group Policy -
From the popup, select Enabled, and then set the intensity from the drop-down menu in the Options section. When done, click Apply and Ok.
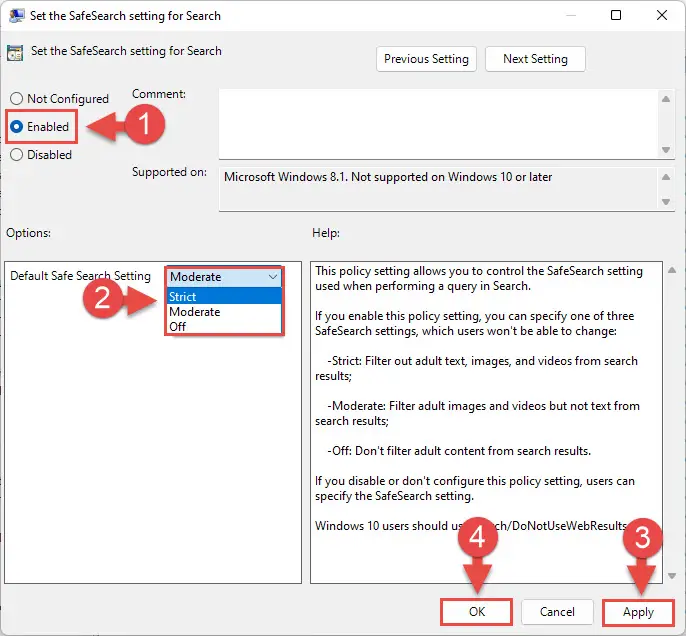
Configure and save the policy -
To implement the changes, run the following cmdlet in an elevated Command Prompt:
gpupdate /force
Implement policies
From Windows Registry
Another way to go about it is by making manual changes to the Windows Registry. Here is how:
Misconfiguration of critical values in the system’s registry could be fatal for your operating system. Therefore, we insist that you create a system restore point before proceeding forward with the process.
-
Open the Registry Editor by typing in regedit in the Run Command box.

Open Registry Editor -
Now paste the following in the navigation bar at the top for quick navigation:
Computer\HKEY_CURRENT_USER\Software\Microsoft\Windows\CurrentVersion\SearchSettings

Quick navigation -
You will now see the DWORD “SafeSearchMode” in the right pane. Double-click it and change its Value Data to one of the following options:
- 0 – Disable SafeSearch.
- 1 – Moderate
- 2 – Strict
When done, click Ok.

Set value data -
Now reboot your computer for the changes to take effect.
When the system restarts, the changes you made will now reflect the search results when you perform a search in the search box in the taskbar and the Start menu.
If you are unable to disable SafeSearch, try these fixes.
Enable/Disable SafeSearch on Android
If you have an Android device, then you can configure SafeSearch using this guide:
-
Open the Google app.
-
Click on your profile icon in the top-right corner and then click Settings.
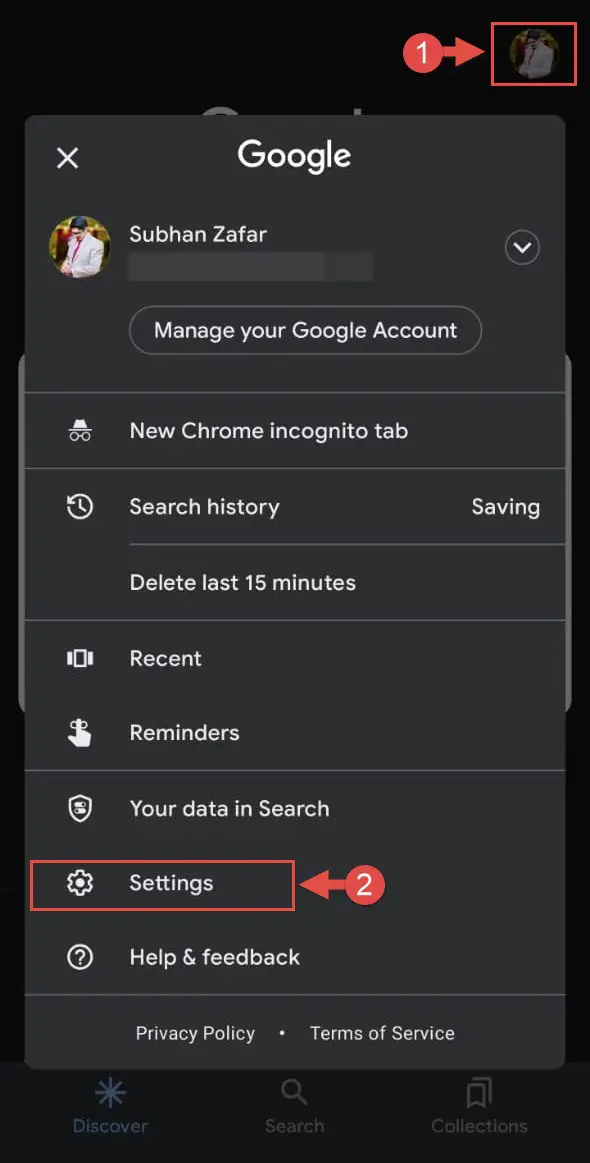
Open settings -
Now click Hide Explicit results.
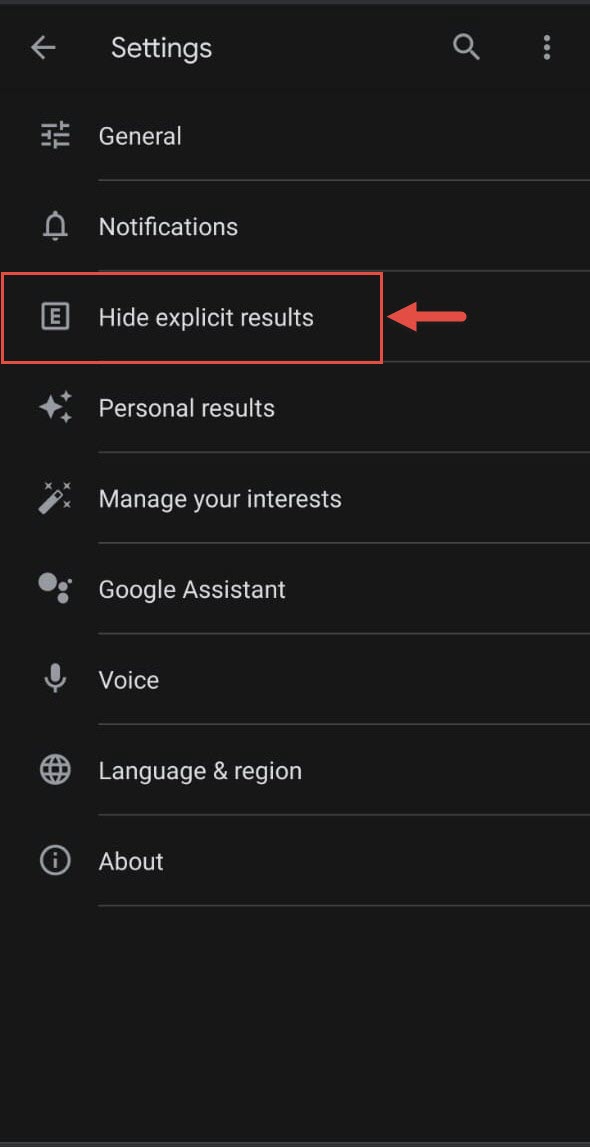
Hide explicit results -
Now toggle the slider in front of the “Explicit results filter” to enable or disable SafeSearch.
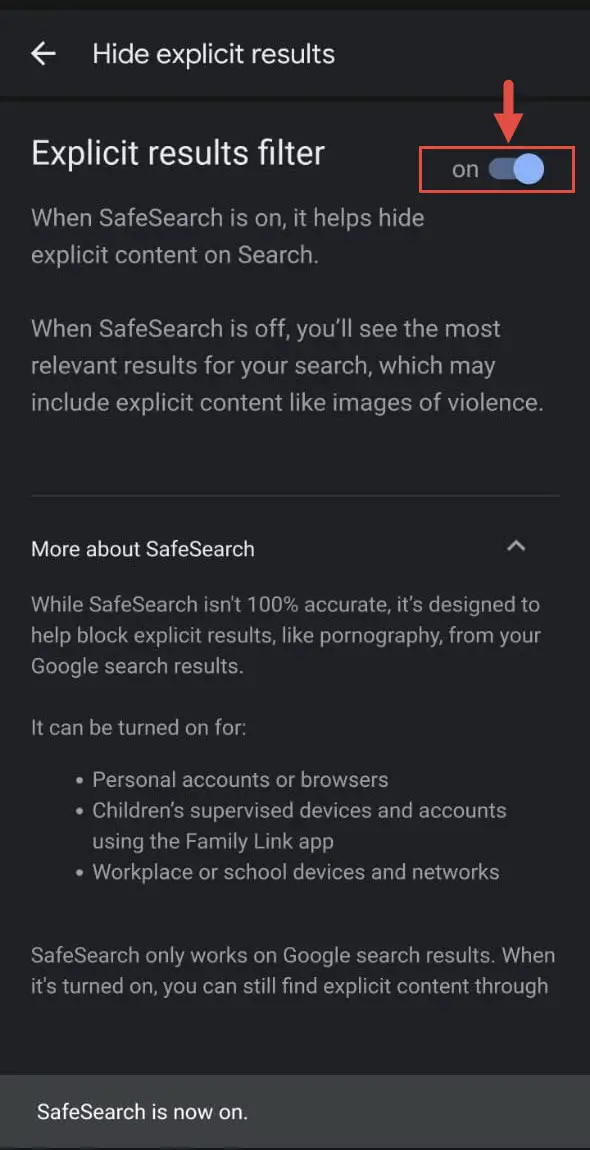
Enable or disable the filter
That’s it! It is that easy to turn off or on SafeSearch on an Android device.
Enable/Disable SafeSearch on MacOS/iOS
On Apple devices running macOS or iOS, the operating system itself does not provide a way to enable or disable SafeSearch.
However, since it also uses the Google search engine by default, you can use the Safari web browser to turn SafeSearch on or off using the method given below or use the Google app on an iOS device to enable/disable explicit content, as explained above.
Enable/Disable SafeSearch On Google
There are multiple ways to enable or disable SafeSearch on the Google search engine. These methods can be applied on both Windows and macOS devices using any web browser.
From the Google SafeSearch Page
You can toggle SafeSearch for the Google search engine through their dedicated SafeSearch page. Here is how:
-
Open the Google SafeSearch Page in any web browser.
-
Here, toggle the slider in front of “Explicit results filter” into the On or Off position to enable or disable the feature.
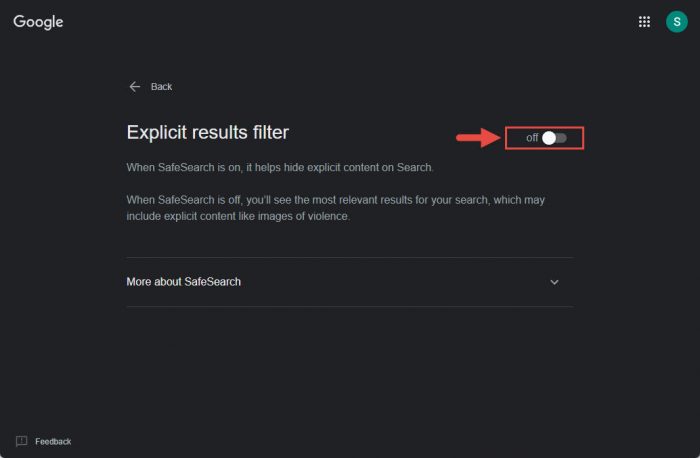
Toggle SafeSearch from Google SafeSearch Page
From Google Preferences
Another way to enable or disable SafeSearch is through Google Preferences. These preferences are linked with your Google account, therefore the settings are applied to your account and wherever you are logged in.
Follow these steps to enable or disable SafeSearch via Google Preferences:
-
Log in to your Google account using any web browser.
-
Open Google Preferences.
-
Now toggle the checkbox next to “Turn on SafeSearch” to enable or disable the feature.
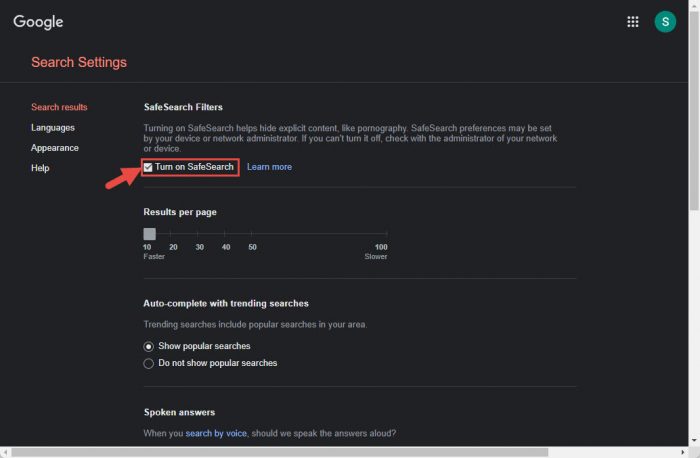
Toggle SafeSearch from Google Preferences
From Quick Settings
Another way to turn SafeSearch on or off is directly and during a search. You can also change the settings from the search results page. Here is how:
-
Perform a search using the Google search engine in any web browser.
-
Click the gear icon in the top-right corner of the page to open quick settings

Open settings -
Now toggle the slider in front of “Explicit results filter” to enable or disable SafeSearch.
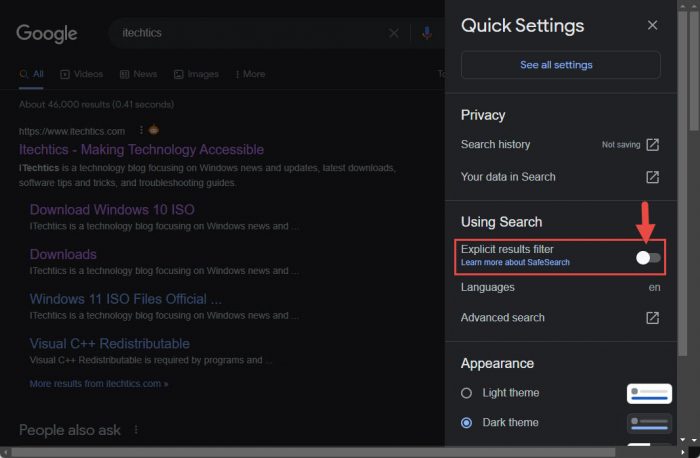
Toggle SafeSearch from Quick Settings
You can toggle SafeSearch at any moment during your searches directly from the search page.
Enable/Disable SafeSearch On Bing
Similar to Google, you can also control your SafeSearch settings on the Bing search engine, which is also the default search engine for the Windows operating system. This does not necessarily mean that you need to use Microsoft Edge to configure it and can be done using any web browser. Here is how:
-
Open the Bing search engine in any web browser.
-
Click on the 3 lines in the top-right corner of the page to expand the menu and then click SafeSearch.
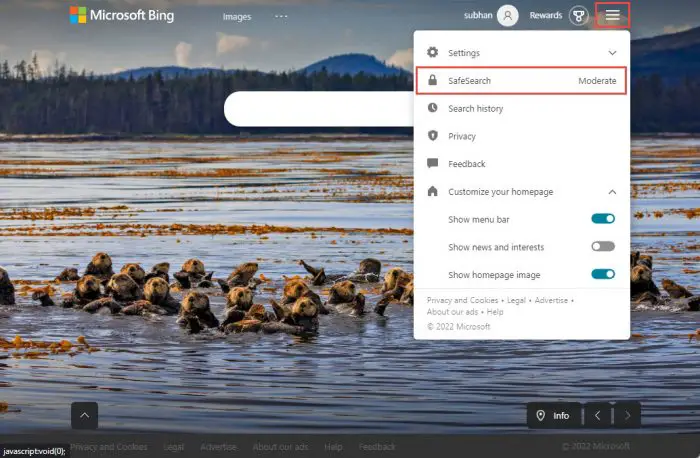
Open SafeSearch settings in Bing -
Now select the intensity of SafeSearch from one of the following options:
- Strict
- Moderate (default Bing setting)
- Off
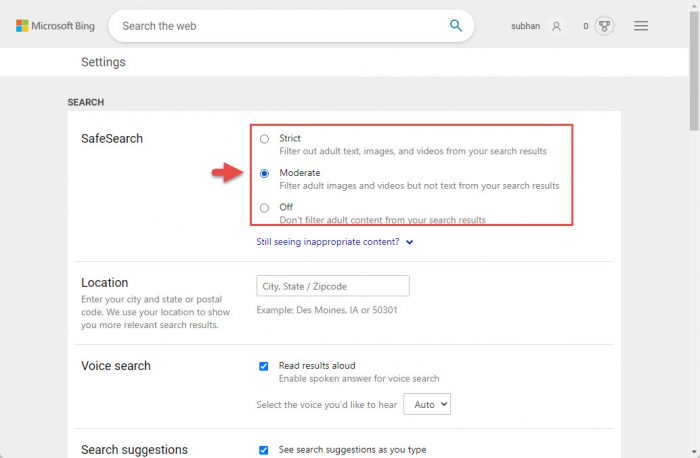
Configure Bings SafeSearch settings
That is all you need to do to enable, disable, or change SafeSearch settings for the Bing search engine.
Enable/Disable SafeSearch On DuckDuckGo
Follow these steps to change the SafeSearch settings on the DuckDuckGo search engine:
-
Open the DuckDuckGo search engine on any web browser.
-
Click on the 3 lines in the top-right corner of the page.

Expand the menu -
Click All Settings.

Open all settings -
Now expand the drop-down menu in front of Safe Search and select one of the following options:
- Strict
- Moderate (Default)
- Off
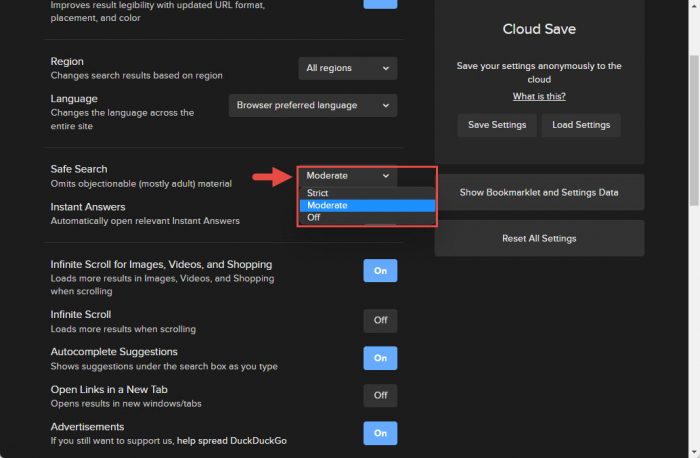
Set SafeSearch setting for DuckDuckGo
Closing Words
SafeSearch is a feature many of us might not be familiar with since most of the search engines already have it set to “Moderate.” However, some might need to change it to “Strict” in case they want more filtration for when their children are using the devices.
In contrast, one might need to disable SafeSearch to view some contents which previously weren’t available to them.
That said, even Google claims that its SafeSearch feature is not 100% accurate and may sometimes slip in inappropriate content even when the feature is enabled. Therefore, we believe that this feature still has a long way to go till the time it can automatically detect and block explicit content using Artificial Intelligence.


