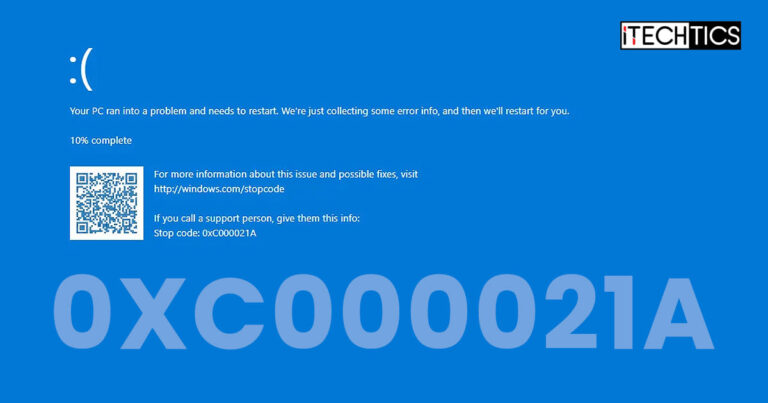
The 0xC000021A is a Blue Screen of Death error (BSoD) stop code that causes your computer to crash immediately. This error code can occur on any version of Windows including Windows 11, Windows 10, Windows 8, Windows 8.1, Windows 7, Windows Vista and even Windows XP. This occurs when one or more critical system files are corrupted.
This error code is also known as:
- STOP Error 0xC000021A
- STATUS_SYSTEM_PROCESS_TERMINATED (Status System Process Terminated)
- HALT: C000021A {Fatal System Error}
- STOP c000021A
If you are experiencing any of these stop codes on your Windows PC, then this article is for you. Here, we discuss all of the possible solutions that may fix the error on your PC without having to reinstall the OS.
Table of Contents
What Causes Error with Stop Code 0xC000021A?
0xC000021A blue screen error occurs for multiple reasons. Most commonly, it has to do with the “Winlogon.exe” file, which is responsible for handling and loading the user profile on the logon (among other responsibilities), or the “CSRSS.exe” file, which is responsible for managing the graphical instruction sets on the Windows OS.
However, other factors like a corrupted or malfunctioning driver, malware, or improperly-installed software also contribute to prompting this error code.
Let us now discuss the various techniques you can adapt to address the issue.
Fix Windows Error 0xC000021A
Perform the following solutions to fix the stop code 0xC000021A in the given chronological order, which begins with a less-aggressive approach to a more aggressive one.
Before going through the list of solutions to fix windows stop code 0xc000021a, make sure to unplug all external devices like printers, scanners, USB drives etc. and make sure this issue is not related to any external device.
Disable Driver Signature Enforcement
By default, Windows is only configured to run signed drivers to ensure that a driver is authentic and not malware disguised as a driver. If you install unsigned drivers, it may trigger a fatal system error causing an error with stop code 0xC000021A.
However, you can disable this signed-driver enforcement directly from the Windows Recovery Environment (WinRE). Here is how:
-
Hold down the power button for about 10 seconds to switch the machine off forcefully.
-
Once off, turn it back on again, and then repeat the process 3 times.
-
On the 4th bootup, Windows will boot into WindowsRE. From there, navigate to the following:
Troubleshoot >> Advanced Options >> Startup Settings >> Restart
-
The device will now restart again. This time, you will be presented with a list of options you can choose from by using the function keys on the keyboard (F1-F9). Press the one that says “Disable drive signature enforcement.”

Disable driver signature enforcement
Windows will now automatically restart and try to boot normally. Check if you still experience bsod error 0xc000021a. If you do, there are other solutions to fix this problem.
However, if you don’t, there is an unsigned driver on your computer. To ensure it is completely harmless, we suggest you run a deep malware scan.
Boot into Safe Mode
Since you encounter the stop code 0xc000021a error message, it is unlikely that you can boot into Windows normally. Hence, many of the solutions would need to be performed after booting into safe mode.
To boot into safe mode, hold down the power button for about 10 seconds to switch the machine off forcefully. Once off, turn it back on again. Repeat the process 3 times and Windows will automatically boot into Windows Recovery (WinRe). From there, navigate to the following:
Troubleshoot >> Advanced Options >> Startup Settings >> Restart
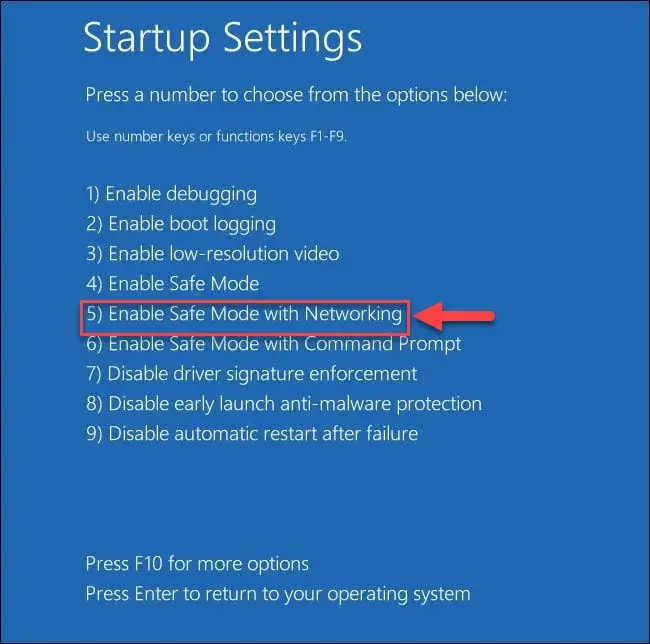
The device will now restart again. This time, you will be presented with a list of options you can choose from by using the function keys on the keyboard (F1-F9). Press the one that says “Enable Safe Mode with Networking.”

Now that your computer has entered safe mode, you can perform the majority of the solutions from there.
Fix Corrupted Files with DISM and SFC
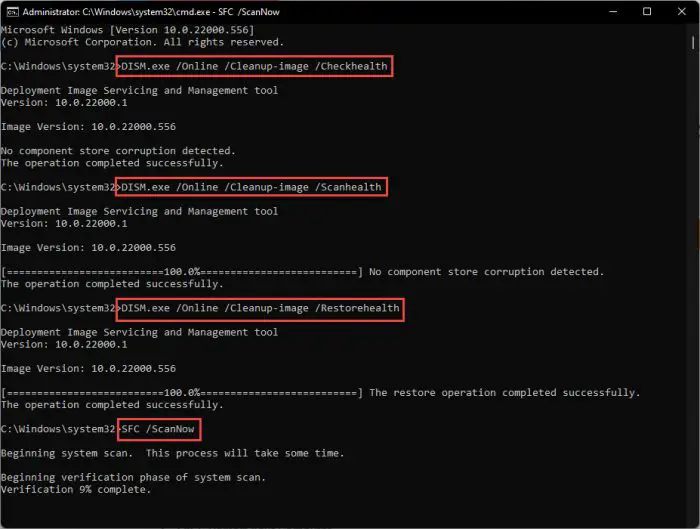
Deployment Image Servicing and Management (DISM) and System File Checker (SFC) are built-in tools in Windows that can scan and repair system files. Once you can boot into Windows (normally or through Safe Mode), use the following steps to run the DISM and SFC scans in an attempt to repair the critical system files:
Note: Safe Mode with Networking also has Command Prompt available.
-
Launch an elevated Command Prompt.
-
Now execute the following commands one after the other. Note that each of these can take a few moments to complete.
DISM.exe /Online /Cleanup-image /Checkhealth DISM.exe /Online /Cleanup-image /Scanhealth DISM.exe /Online /Cleanup-image /Restorehealth -
Once the DISM scan is completed, run the SFC scan using this cmdlet:
SFC /ScanNow
Execute DISM and SFC cmdlets to repair system files
Please make sure you have Windows installation media with you before running sfc scan otherwise you’ll have problems completing the scan.
Once the scans have been run successfully and all files have been repaired, boot normally again and check to see if the error is gone.
Repair BCD files
BCD files are important for the system to run and boot up smoothly. These files may have been damaged causing a blue screen error 0xc000021a. You can repair these by following the guide given below.
-
Start by making a bootable USB drive and boot from it using the boot menu at startup. From there, click Repair your computer.

Repair your computer -
Now, navigate to the following location to launch the Command Prompt in WindowsRE:
Troubleshoot >> Advanced options >> Command Prompt

Open Command Prompt in WinRE -
Now run the following cmdlets in Command Prompt one after the other to repair the BCD files.
bootrec /rebuildbcd
bootrec /scanos
bootrec /fixmbr
Repair startup issues -
Now type in exit to leave the Command Prompt and then reboot the computer.
Now check to see if you can now boot Windows into normal mode.
If these repair attempts haven’t worked for you yet, let us try running a startup repair from WinPE.
Run Startup Repair
Startup Repair is another Windows OS automatic repair tool that resolves common Windows issues when your OS cannot boot. Here is how you can run the Startup Repair tool:
-
Start by making a bootable USB drive and boot from it using the boot menu at startup. From there, click Repair your computer.

Repair your computer -
Now, navigate to the following location to launch the Startup Repair in WindowsRE:
Troubleshoot >> Advanced options >> Startup Repair

Open Startup Repair in Windows Recovery Environment -
On the next screen, select the OS you want to fix.

Select OS to repair -
Your PC will now begin scanning itself. Please complete the scan while ensuring that it doesn’t lose power and follow any on-screen instructions. Once the scan is complete, Windows will attempt to boot normally again.
Once it reboots, check to see if the issue has been resolved.
Update/Reinstall Drivers
As we mentioned earlier, the “0xC000021A” stop code can also occur due to outdated or faulty drivers. In that case, you must either update the driver or reinstall the current driver.
Follow these steps to update your driver:
-
Open the Device Manager by typing in devmgmt.msc in the Run Command box.

Open Device Manager -
Click on the category to expand it and then right-click on the device you want to update the driver of.

Update driver -
From the Driver Update Wizard, click Search automatically for drivers.

Search for drivers automatically -
The wizard will now search for new drivers using Windows Update. After the scan is complete, close the wizard.
It is also possible that it states “The best drivers for your device are already installed.” In this case, you can attempt to install the driver manually.
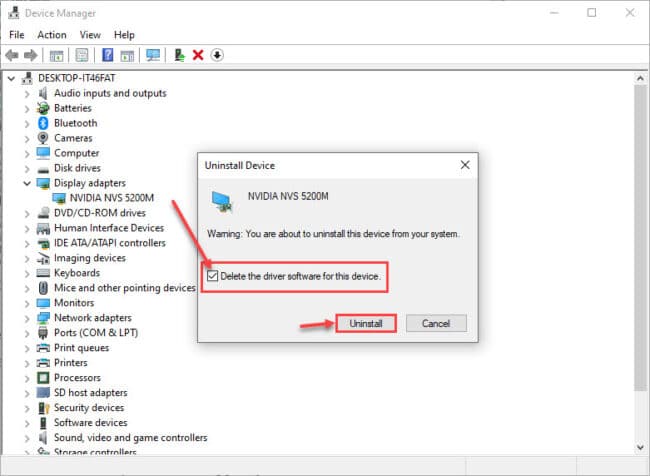
If the driver cannot be updated, we suggest that you uninstall the device and then reinstall the driver. To do so, open the Device Manager again, right-click the device with the faulty driver and click Uninstall device from the context menu. You will then be asked if you want to remove the driver as well. Check the box and click Uninstall.

Once removed, reinstall the driver using the manufacturer’s website and you will have a fresh version of the file causing the problem.
Set Fastboot to Thorough
Fastboot is a BIOS feature that allows your computer to boot up quickly while bypassing certain unnecessary booting procedures. This can occasionally cause an improper system boot resulting in a Windows error. Therefore, we suggest that you disable Fastboot, which means changing its settings from “Minimal” to “Thorough.”
-
Now look for the “Power-on self-test” (POST) settings, and then access the Fastboot menu.
-
Here, change the settings to “Thorough” and then exit the BIOS while saving the changes.

Set Fastboot to “Thorough”
Now check to see if the issue has been resolved.
Run the CHKDSK Utility
CHKDSK is a command-line utility that scans your hard drives for damaged system files, bad sectors and attempts to repair them. If it fails to repair any discovered bad sectors, it informs the operating system not to use them.
Either way, it makes the hard drive usable again, if the issue rose because of bad sectors in the first place.
-
Run the following cmdlet in an elevated Command Prompt:
Chkdsk C: /f /r /x
Run the CHKDSK utility -
You will be asked to schedule the CHKDSK utility the next time the computer reboots. Enter Y for yes.

Check the disk next time the computer restarts -
Now restart your computer.
Once it reboots, the Check Disk utility will run and scan your hard drive. This can take a while, in some cases, hours. Let the scan finish and reboot into Windows.
Once it reboots, check if the error is gone.
Scan Computer for Malware
A virus may be infecting your PC and affecting the Winlogon.exe or CSRSS.exe files, resulting in the 0xC000021A error code. If so, you must run a deep malware scan of your PC and remove/quarantine any anomalies.
Use the built-in Windows Security Antivirus (formerly Windows Defender) to scan your computer for malware. Here is how to do it:
-
Navigate to the following:
Settings app >> Privacy and security >> Windows Security >> Virus and threat protection
-
Here, click Scan Options.

Open scan options -
Now select Full scan and then click Scan now from the bottom of the page.

Perform a full scan
You can also perform a scan using a third-party antivirus. Here is a list of the top antivirus software to use to perform the scan. If you are proceeding to purchase antivirus software, here are the 17 aspects you should always consider.
Once the virus is removed/quarantined, check to see if you can now boot into Windows normally without seeing the BSoD.
Restore PC to Earlier State
Restoring a PC refers to taking your Windows to a state it was earlier captured in. It means all system configuration, network settings, and files and folders will revert to a point in time as if nothing ever happened after that.
Of course, there needs to be a restore point in the history of the PC to revert it to. This can be enabled by using Backup & Restore. If you have already created a restore point in the past that you can revert to, follow these steps:
-
Boot into Windows Recovery Environment as discussed in the section above and then click Troubleshoot.

Windows Startup Options -
Now click System Restore.

System Restore -
Now select the operating system to restore.

Select OS -
You will now see the System Restore wizard. Click Next.

Proceed with System Restore -
Now select the restore point by clicking on it, and then click Next.

Select restore point -
Now click Finish.

Finish restore -
You will now be asked for confirmation. Click Yes.

Confirm restore Windows will now restore to a previous restore point. This step can take some time to complete. Do not reboot or turn off your computer during this point and wait for the restoration to complete.
-
When finished, click Restart.

Restart computer
This should take your PC back to when the restore point was created. If the “0xC000021A” BSoD issue did not exist back then, then it should be resolved.
At this point, we suggest that you do not perform the same tasks which lead to the BSoD in the first place.
Reset Windows
Resetting the computer brings all configurations back to their factory default settings and values. If the solutions discussed above did not work for you, then you must now reset your PC. Here is how:
-
Boot into WindowsRE using bootable media and click Troubleshoot.

Windows Boot Options -
Now click Reset this PC.

Reset this PC -
You will now be asked if you want to keep your files or delete everything. We suggest that you click Keep My Files.

Keep files -
You will now be asked to reinstall Windows. Click Local reinstall.

Local reinstall -
Finally, click Reset to begin the process.

Confirm reset -
Windows will now begin to reset itself. This step can take a while.
Final Verdict
The solutions provided above should fix error code 0xC000021A. These solutions are also recommended by Microsoft Experts.
However, in case you are still experiencing the same problem, then the only solution might be to perform a clean Windows installation as we have already tried pretty much everything else at this point.


