
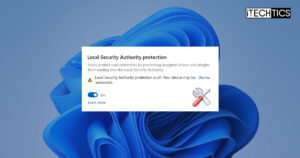

Recently, there have been several reports by Windows 11 users that they keep seeing the “Local Security Authority protection is off. Your device may be vulnerable” error notification on their computer, even when Local Security Authority protection is enabled.
This error has been circulating on the internet but users cannot find a prompt solution. This is why we are writing this post to guide you through fixing the error once and for all, so you won’t keep seeing the notification every few seconds, even after restarting the device!
Before we get into the troubleshooting phase, let’s see what this error message means.
Table of Contents
On This Page
What is Local Security Authority Protection
The Local Security Authority (LSA) is Microsoft’s feature for the Windows operating system, responsible for, but not limited to, managing and authorizing interactive logons to the computer. This feature was first introduced in Windows 8.1 and has been included in all the following Windows operating systems, and is enabled by default.
LSA is also responsible for managing and enforcing local security policies on the computer, such as the maximum number of allowed attempts, lockout timing, etc. It also manages the audit policies and logs the events. With this, one of the important responsibilities of the Local Security Authority is to generate and grant access tokens.
In simpler words, LSA protection secures the system by allowing authorized access and fends off credential theft by blocking unauthorized code injection into the “LSASS.exe” process – which is the process responsible for running the Local Security Authority protection feature inside the Windows OS.
How Local Security Authority Works
When a user enters their credentials on the Windows lock screen, the information is passed using the LSA to the Security Accounts Manager (SAM). SAM manages the SAM database, which stores the actual and correct user credentials for cross-referencing.
SAM compares the provided credentials with those stored in the SAM database, and if the credentials match, SAM creates a logon session and returns a Security Identifier (SID) against the user account to the LSA. The LSA, in turn, grants an Access Token containing information about the user account, including the group(s) they are part of, and its rights and permissions.
This is the level of involvement of the Local Security Authority while logging into the system.
Why is my Local Security Authority Protection Off?
As mentioned earlier, the Local Security Authority Protection feature is enabled by default on Windows OS. However, an error can disable it, even when it is showing as “enabled” in the Windows Security application.
As per Microsoft documentation, a security update “KB5007651” released in March 2023 introduced the error to Windows 11 v22H2. At the time, the only workaround for this issue was to restart the computer and ignore the notification prompts if they still occurred. However, the issue was later fixed, for which we have provided a solution below.
But that is not the only reason for this error to occur. Other issues like corrupted system files or malware can also cause the Local Security Authority protection to be disabled.
Let us now continue to see how to fix the “Local Security Authority protection is off” error message from appearing and enabling the feature to protect your device.
Fix “Local Security Authority Protection is Off. Your Device may be Vulnerable” Error
Install Windows Security Update KB5007651
When Microsoft first released KB5007651 in March 2023, it introduced the aforementioned issue and Windows continued to show the “Local Security Authority protection is off” notification without mercy. However, this issue is now fixed when Microsoft republished KB5007651 for Windows 11 on 3rd May 2023.
Note: Since this is a mandatory security update, the only way to install it is through Windows Update.
Use the following steps to install KB5007651 and resolve the “Local Security Authority protection is off. Your device may be vulnerable” error once and for all:
-
Go to the following:
Settings app >> Windows Update
-
Click “Check for updates.”

Check for pending Windows updates -
Now download and install the following available update:
Update for Windows Security platform antimalware platform - KB5007651 (Version 1.0.2302.28002)

Download and install KB5007651


Since it is a small update, it should be installed almost instantly without the need for a system restart. However, to get rid of the “Local Security Authority protection is off” prompt, we advise that you restart your computer.
The issue should likely be resolved by installing KB5007651. However, if the problem remains, continue to perform the remaining fixes below.
Restart Local Security Authority Protection
One solution is to disable the Local Security Authority Protection feature and then re-enable it. There are several ways to do this. Use any of the following methods to restart the Local Security Authority Protection feature.
Restart Local Security Authority Protection from Windows Security
Note: Microsoft has temporarily removed the Local Security Authority UI from the Windows Security app, but the feature is supported on Windows 11. Therefore, the ability to disable or enable Local Security Authority Protection from Windows Security is currently not available. However, you can still do it from the Group Policy or the Windows Registry (discussed below).
-
Go to the following:
Settings app >> Privacy & security >> Windows Security >> Device Security
-
Click on “Core isolation details“

Open Core Isolation details -
Toggle the slider below “Local Security Authority protection” into the Off position.
-
Restart the computer.
-
Return to the Core Isolation details page and re-enable the feature.
-
Restart the computer again and check if the issue is resolved.

Restart Local Security Authority Protection using Group Policy
You can also disable and then re-enable LSA protection from the Group Policy Editor. Here is how:
-
Open the Group Policy Editor by typing in “gpedit.msc” in the Run Command box.

Open the Group Policy Editor -
Navigate to the following from the left pane:
Computer Configuration >> Administrative Templates >> System >> Local Security Authority
-
Double-click the policy “Configure LSASS to run as a protected process” on the right.

Configure LSASS from Group Policy -
Select the “Enabled” radio button, and then select “Disabled” from the drop-down menu under “Configure LSA to run as a protected process” in the Options section.

Disable LSA protection from Group Policy -
Click Apply and OK.
-
Now restart the computer.
-
Once restarted, navigate to the “Local Security Authority” Group Policy folder inside the Group Policy Editor again.
gpedit.msc (Run) >> Computer Configuration >> Administrative Templates >> System >> Local Security Authority
-
Open the “Configure LSASS to run as a protected process” policy.
-
Select the “Enabled” radio button and then select either “Enabled with UEFI lock” or “Enabled without UEFI lock” from the drop-down menu under “Configure LSA to run as a protected process” in the Options section.

Enable LSA protection from Group Policy -
Click Apply and OK.
-
Restart the computer again.

When the computer reboots, check if the error message has gone away and the issue has been resolved. If the issue persists, then you can restart the Local Security Authority protection feature from the Windows Registry.
Restart Local Security Authority Protection from Windows Registry
Note: Misconfiguration of critical values in the system’s registry could be fatal for your operating system. Therefore, we insist that you create a system restore point or a complete system image backup before proceeding forward with the process.
You can also use our top selection of disk imaging and backup software so you never lose your data or operating system again.
Follow the steps below to disable and then re-enable the LSA protection feature from the Windows Registry. This process has proven to work for many users and eliminates the repeated notification prompt of “Local Security Authority protection is off.”
Note: To avoid performing all of these steps manually, skip to the next section and use the command line or the .REG files to restart the LSA protection feature.
-
Open the Registry Editor by typing in “regedit” in the Run Command box.

Open the Registry Editor -
Paste the following into the navigation bar for quick navigation:
Computer\HKEY_LOCAL_MACHINE\SYSTEM\CurrentControlSet\Control\Lsa

Navigate to the LSA key in Windows Registry -
Right-click the “LSA” key, expand New, and then click DWORD (32-bit) Value. Name this DWORD “RunAsPPL“.

Create the RunAsPPL DWORD -
Repeat Step 3 and name this DWORD “RunAsPPLBoot“.

Create the RunAsPPLBoot DWORD -
Double-click the “RunAsPPL” DWORD and change its Value Data to 0.

Set Value Data for RunAsPPL to 0 -
Now set the Value Data for “RunAsPPLBoot” to 0.

Set Value Data for RunAsPPLBoot to 0 -
Now restart your computer for the changes to take effect.
This will disable the Local Security Authority protection feature.
-
When the PC reboots, open the Registry Editor and navigate to the “LSA” key again.
-
Change the Value Data for both “RunAsPPL” and “RunAsPPLBoot” to 2.

Enable LSA protection from Windows Registry -
Restart the computer again.


Restart Local Security Authority Protection using Command Line
Alternative to the steps in the section above, you can also restart the LSA protection feature using the Command Line. This includes Windows PowerShell, Command Prompt, and the Run Command box.
-
Open either PowerShell, Command Prompt or the Run Command box.
-
Run the following commands to disable the Local Security Authority protection feature:
reg add HKLM\SYSTEM\CurrentControlSet\Control\Lsa /v RunAsPPL /t REG_DWORD /d 0 /f
reg add HKLM\SYSTEM\CurrentControlSet\Control\Lsa /v RunAsPPLBoot /t REG_DWORD /d 0 /f
Disable LSA protection using the command line -
Restart the computer.
-
Now run the following two commands to enable the feature:
reg add HKLM\SYSTEM\CurrentControlSet\Control\Lsa /v RunAsPPL /t REG_DWORD /d 2 /f
reg add HKLM\SYSTEM\CurrentControlSet\Control\Lsa /v RunAsPPLBoot /t REG_DWORD /d 2 /f
Enable LSA protection using the command line -
Restart the computer again.


Restart Local Security Authority Protection using .REG Files
You can also start the LSA protection feature by simply executing only 2 .REG files. Here is how:
-
First, download and extract the compressed files by clicking on the links below:
 Turn off Local Security Authority Protection (362 bytes, 346 hits) Turn on Local Security Authority Protection (364 bytes, 321 hits)
 -
Run the “Turn Off Local Security Authority Protection.reg” file.
-
Restart the computer.
-
After the restart, run the “Turn On Local Security Authority Protection.reg” file.
-
Restart the computer again.
This should restart the LSA protection feature on your Windows PC. Now, check to see if the issue has been resolved.
If you still see the same error message even when LSA protection is enabled, then there are a few other things you can do to fix it.
Repair Windows
Windows comes with preinstalled tools to help fix the OS. Apart from the built-in troubleshooter, you can find in the Settings app, Windows also comes with a Deployment Image Servicing and Management (DISM) tool, System File Checker (SFC), and a Check Disk (CHKDSK) utility, where each performs a different scan and attempts to automatically fix any glitches in the OS.
Since the issue might be with a corrupted or missing system file, let us try repairing it.
Run the following cmdlets in the given order in an elevated Command Prompt to attempt and repair the Windows operating system and fix corrupted files:
DISM.exe /Online /Cleanup-image /Checkhealth
DISM.exe /Online /Cleanup-image /Scanhealth
DISM.exe /Online /Cleanup-image /Restorehealth
sfc /scannow
Final Thoughts
This article lists all of the methods to fix the “Local Security Authority protection is off. Your device may be vulnerable” error notification you keep seeing, or a prompt inside the Windows Security application.
Additionally, Microsoft has removed the UI to enable or disable the Local Security Authority protection feature from inside the Windows Security app, but we have covered all the alternatives to restart it or enable it if already disabled.
It is advisable to keep the LSA protection feature enabled, as it prevents unauthorized code injection into the LSASS.exe process and keeps your login credentials safe from being compromised.
Let us know which solution worked for you in the comments below and let other readers get a head start on applying the same fix and resolving the problem.


