

You may have experienced a black monitor with nothing to display even when the attached computer or laptop is powered on and connected. This usually happens after the monitor displays “No signal input detected” and shortly after it states “Monitor is going to sleep,” after which the screen goes dark.
This happens when the monitor is not receiving a signal from the computer to put on a display, which can be due to many reasons, or one of the many associated hardware has malfunctioned. You may also be experiencing a display for a short while, but then the monitor goes to sleep.
If you are experiencing such problems with your computer, no need to panic (just yet). There are a bunch of mitigation methods using which you can resolve the problem and restore your screen’s display.
Table of Contents
Stop Display from Going to Sleep
As we mentioned, there are a bunch of fixes you can try to restore your system’s display. We suggest that you perform all the tasks given in the order mentioned before you resort to an extreme solution.
Wake Up PC
It may be possible that your computer has entered Sleep Mode where it turns off all display devices. To confirm this, try waking up your computer by clicking your mouse buttons or pressing some keys on your keyboard.
If your computer is in Sleep Mode, doing the above will wake it up. If this does not fix your problem, proceed with performing the following methods:
Check All Cable Connections
It may be possible that your display cable has become loose, or signal transmission is being interrupted by the carbon buildup at the connection ports.
To rule out this possibility, we suggest that you disconnect your display cable from both ends, clean out the ports, and then try reconnecting it.
If the problem persists, you can also try replacing the cable with another to check if the display cable is faulty.
Clean RAM Modules
Damp or dusty RAM module contacts to the motherboard are often found to be the reasons a computer is unable to forward the display signals to the display device. In fact, in our personal experience, this happens at least once every two years when using a desktop computer at a location with dust particles in the air.
Therefore, we suggest that you try cleaning out your RAM module (gold) contacts. We have summarized the process in a few easy steps.
- Shut down your computer and unplug any power cords.
- Open the computer and remove the RAM module(s).
- Blow air into the desktop computer using a leaf-blower to clear out any dust.
- Gently, the RAM contacts the tip of an eraser to remove any dust or carbon buildup.
- Blow gently onto the RAM modules to remove any eraser leftovers.
- Place the modules back into the computer and close it.
- Power on your PC to check if the issue has been resolved.
If you find that your display is still entering Sleep Mode, continue performing the following methods:
Replace Display Device
If none of the methods have worked thus far, we suggest that you try replacing your display device since it can be faulty. We do not recommend that you go ahead and purchase a new one, just simply replace it with a display device lying around your office or home.
If the same issue occurs on a new monitor as well, then this will confirm that the original display device was not at fault and can be reinstalled.
So far, the steps we have discussed can be performed even while there is no display on the monitor, and it is fast asleep. However, the methods we will discuss are those which require the screen to display. These can be used if your monitor falls asleep a short while after giving out a display.
Update Monitor Driver
The problem may be caused by an outdated monitor driver. You can try and update it to see if it resolves the problem.
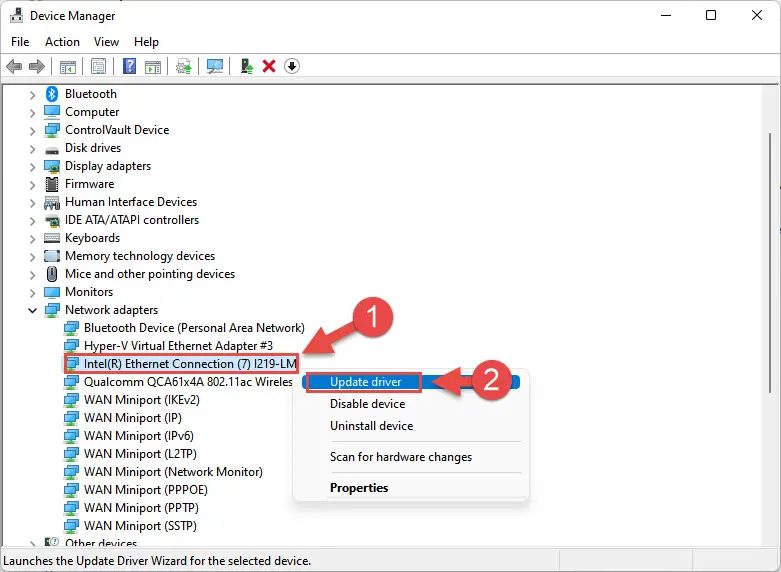
- Open the Device Manager console by typing in devmgmt.msc in Run.

- Now expand Monitor and right-click on the display device which is falling asleep. Then click Update Driver from the context menu.

- From the pop-up window, click Search automatically for drivers.

- The wizard will now start searching for an update for the driver on the internet through Windows Update. Once found, it will automatically install the update. If not, you will be prompted with “The best drivers for your device are already installed.” Either way, close the wizard.
Set Computer to Never Sleep
By default, Windows computers are set to go to sleep mode after a certain time in case they are left idle/inactive. Once they fall asleep, so do the monitor(s). This can be disabled using one of the following means.
From Settings App
Perform the following steps to prevent your computer from going into sleep mode from the built-in Settings app:
- Navigate to:
Settings app >> System >> Power & sleep - Now select Never from the drop-down menus under “On battery power” and “When plugged in” in the Sleep section.

Your computer will now never go into sleep mode.
From the Control Panel
You can solve the problem of the computer entering sleep mode by performing the following steps through the control panel:
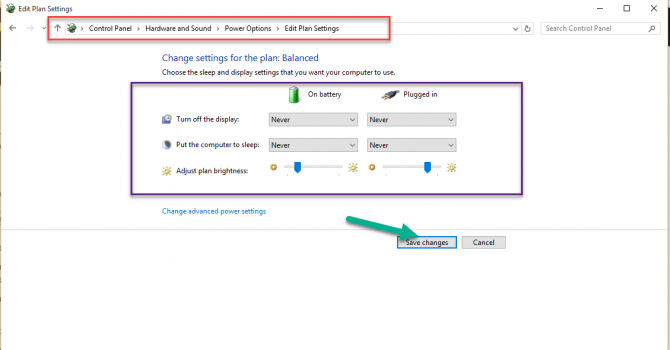
- Open Power Options in the Control Panel by typing in powercfg.cpl in Run.

- Now click Change plan settings under Selected Plan.

- On the next page, click Change settings that are currently unavailable to unlock the grayed-out settings below.

- Now select Never from the drop-down menus in front of “Put the computer to sleep” as well as “Turn off the display” under On Battery as well as Plugged in. Click Save changes when done.

You have just changed the settings for only one plan, if you have more than one power plan, you need to change the settings for each plan when you are selected as the current plan.
From Screen Saver Settings
If the above configurations have not worked for you, you can also perform the steps given below that will turn off sleep mode on your PC.
- Open the Screen Saver Settings by navigating to:
Settings app >> Personlization >> Lock Screen >> Screen saver - From the pop-up Screen Saver Settings window, select None from the drop-down menu under Screen saver, and uncheck the box next to “On resume, display logon screen.” Once done, click Apply and Ok to save the configuration.

This will prevent the screen saver from appearing when the computer goes to sleep mode, which it no longer should.
Increase System Unattended Sleep Timeout
A hidden setting in Windows allows your computer to sleep when it has been left unattended. However, this hidden setting can be unhidden using a simple Windows Registry trick, after which you can increase your sleep timeout.
Note: Misconfiguration of critical values in the system’s registry could be fatal for your operating system. Therefore, we insist that you create a system restore point before proceeding forward with the process.
Perform the following steps to increase the sleep timeout in Windows:
- Open the Registry Editor by typing in regedit in Run.

- Now paste the following into the address bar for quick navigation:
Computer\HKEY_LOCAL_MACHINE\SYSTEM\CurrentControlSet\Control\Power\PowerSettings
- Now expand PowerSettings from the left, then expand “238c9fa8-0aad-41ed-83f4-97be242c8f20” under it. After that, click “7bc4a2f9-d8fc-4469-b07b-33eb785aaca0” under the parent Key.

- Here, double-click Attributes in the right pane and set its Value Data to 2. Click Ok when done.

- Now restart your computer for the changes to take effect.
- When the computer reboots, open the Power Options in the Control Panel by typing in powercfg.cpl in Run.
- Click Change plan settings, and then click Change settings that are currently unavailable on the next page.
- Then click Change advanced power settings.
- From the popup Power Options window, expand Sleep and then expand “System unattended sleep timeout.”

- Now increase the minutes in front of On battery and Plugged in to a maximum. Click Apply and Ok when done.

Final Thoughts
We certainly hope that this detailed guide has solved your problem with the monitor falling asleep. If it has not, then it may be possible that one or more hardware is faulty and needs to be replaced. Since we have already tested the display device and the display cable, it may be possible that your motherboard or the GPU may be faulty and needs to be replaced.
Let us know which solution worked for you in the comments section, as it may help our future audience solve their problem.


