
Key Points
- Use the “Net Share” command to view the shared resources on a computer, or “Net Share [ShareName]=[PathToFolder] /Grant:[Username],[Permissions]” to create a shared network folder.
- To delete a shared folder, use the command “Net Share [ShareName] /Delete“.
A shared folder on a computer allows other devices on the network to access it and the content within the folder. Using the Windows graphical user interface (GUI) to create and manage shared folders is a streamlined process. With that method, you can also assign permissions and specify the user accounts to grant access to. But can you do the same using the Command Prompt?
The answer is “yes” – you can create a shared folder, specify the user account and the maximum number of concurrent users that can access it, and delete a shared folder, all from the Command Prompt.
Even though the task can be achieved using the Windows GUI, using the Command Prompt sometimes becomes necessary and is especially convenient for the sysadmins. Rather than performing the same task with a plethora of clicks, you can create a shared folder with just one command in the Command Prompt.
This guide will show you how to view, create, and delete shared folders on a Windows computer.
Table of Contents
How to view network shared folders in Command Prompt
To check whether there are any shared folders or directories on your PC, you can use the following command in the Command Prompt:
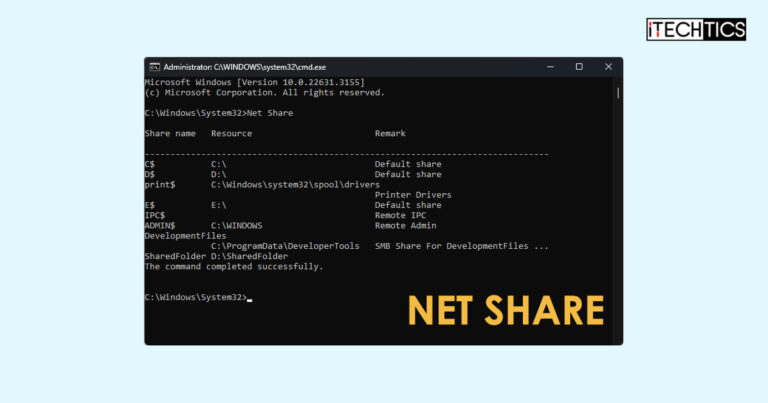
Net Share
The “Net Share” command is used to manage shared resources on the PC. It can be used without any parameters to display the shared resources on the PC, or with parameters that allow you to manage the shared resources, such as files, folders, and directories.
In the example above, the Net Share command displays all the shared resources and their information within the Command Prompt. It also shows remarks, that tell us which resources were shared by default, or other associated information.
How to create network shared folder in Command Prompt
You can also create shared network folders directly from the Command Prompt using the Net Share command. Here is the syntax for creating a shared folder:
Net Share [ShareName]=[PathToFolder] /Grant:[Username],[Permissions]In the command above, the elements inside the square brackets [] are variables and will need to be changed. This is what these variables mean:
- [ShareName]: Assign a name to the share to create.
- [PathToFolder]: Provide the complete path to the folder that you want to share. The folder should already exist.
- [Username]: User account of the person you want to share the folder with.
- [Permissions]: Choose from “Read“, “Change“, or “Full” – defines the permissions granted to the user account.
Here is an example of this syntax to create a shared folder from Command Prompt:
Net Share ShareOne=D:\Shared /Grant:Subhan,FULL
After this step, if I go on to the Sharing properties of the folder using the Windows GUI, I will find that Full permissions have been granted to the user “Subhan” for the folder “Shared” in the D drive.

As mentioned earlier, you can also specify how many users have access to the shared folder simultaneously. This can be done with the following command:
Net Share [ShareName]=[PathToFolder] /Grant:[Username],[Permissions] /Users:[NumberOfUsers]In this command, you must also replace the [NumberOfUsers] variable and enter the number of concurrent users that will be allowed to access the shared folder. Here is an example of this command:
Net Share ShareOne=D:\Shared /Grant:Subhan,FULL \Users:5
How to delete network shared folder using Command Prompt
You can also delete a network share on the computer using the Net Share command. Note that it does not delete the folder itself, but only the file share that you created. This means that its sharing will be disabled, but the folder and its contents will remain.
You can use the name of this share and the complete path of the folder to delete its network sharing, which makes both of the following syntaxes valid:
Net Share [ShareName] /Delete
Net Share [PathToFolder] /Delete
Therefore, I can use both of the following commands to delete the network sharing of the folder that I created earlier:
Net Share ShareOne /Delete
Net Share D:\Shared /Delete
Additionally, you can also delete a shared folder on a remote computer with the following command, provided you have sufficient rights:
Net Share [ShareName] \\[RemotePCName] /DeleteConclusion
This post shares the methods to view, create, and delete network-shared folders using the Command Prompt. These methods work for Windows 7 operating systems and above.
Unfortunately, you cannot create a shared folder on a remote computer using the Command Prompt. For that purpose, you will need to use other commands like “WinRS“.


