

People have often complained that some specific application(s) are not making the sound loud enough whilst other applications are seemingly working fine, or that one app’s volume is much lower than the others. This usually happens because the volume level for those particular applications is set lower than the others.
If you are using a Windows computer and experience a similar problem, the volume level for that app is likely set lower from the “Volume Mixer.” Volume Mixer is a control applet that lets you control the overall system volume and volumes for individual applications.
This means that you can allow one app’s sound to be louder than the others. A perfect example of this is while you’re gaming. You can allow a game’s sound effects to be louder and subdue the voices from a chatting app (like Discord), or vice versa.
Today we are going to discuss several methods to access Volume Mixer on a Windows 11 or Windows 10 computer.
Table of Contents
Volume Mixer Features

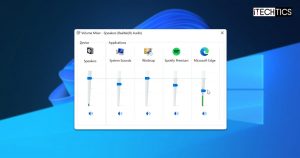
The Volume Mixer allows you to adjust the output volume levels of the different devices, such as the built-in speakers, connected headphones, etc. The sliders you see in the image above can be adjusted to set those levels.
Moreover, you can also adjust the volume levels different applications emit. For example, you can turn off system sounds entirely and increase the volume for other applications so they won’t be interrupted by background noises.
Applications that are making any sound automatically appear in the Volume Mixer. If you have already opened the Volume Mixer and a new app starts making sounds, it will automatically appear in the Volume Mixer without having to restart it.
Here is a summary of the features and use-cases of Volume Mixer:
- Adjust different volume levels for different apps.
- Muting or soloing an application.
- Adjust system volume levels.
- Adjust the output volume level for different devices connected.
Let us now see the different methods to access Volume Mixer.
How to Open Volume Mixer
From Quick Access Menu
Perhaps the most convenient way to open Volume Mixer is through the Quick Access menu in the taskbar.
The methods to open Volume Mixer in Windows 11 and Windows 10 through the Quick Access menu are the same. However, in Windows 11, you are taken to the Settings app, whereas in Windows 10, you see the Volume Mixer flyout.
Follow these easy steps to open Volume Mixer:
-
Right-click on the speaker icon in the taskbar.

Speaker icon in Quick Access -
Now click Open Volume Mixer.

Open Volume Mixer
That’s it! You will now see the Volume Mixer in front of you with sliders for different devices and apps that you can adjust.
From Settings App
If you are already using the Windows Settings app, you can open the Volume Mixer by navigating to the following:
-
In Windows 11:
Settings app >> System >> Sound >> Volume mixer

Volume Mixer in Settings app – Windows 11 -
In Windows 10:
Settings app >> System >> Sound >> App vlume and devices preferences

Volume Mixer in Settings app – Windows 10


From Control Panel
Here is a short guide to opening the Volume Mixer window from the Control Panel:
-
Open the Control Panel by typing in control in the Run Command box.

Open Control Panel -
Now navigate to the following:
Hardware and sound >> Adjust system volume (under Sound)
This will open the Volume Mixer for you to adjust the volume levels of the different sound sources on your computer as well as the apps. The method is the same for both Windows 11 and 10.
Using Command Line
The Volume Mixer can also be accessed using a simple cmdlet. This cmdlet can be entered in either the Command Prompt, Windows PowerShell, or the Run Command box.
To open Volume Mixer using either of the Command Line Interfaces (CLIs), enter the following cmdlet:
sndvol
Using EarTrumpet
If these methods do not work for you, you can also use third-party applications specifically designed to provide the same volume controls as the Volume Mixer. One such application is EarTrumpet.
This application is automatically pinned to the Quick Access menu, using which you can control the sound volumes of individual apps through its flyout. Follow these steps to install and use Ear Trumpet on a Windows computer:
Note: An active internet connection is required to download the app.
-
Open EarTrumpet’s website and click Get it from Microsoft.

Get Ear Trumpet -
Next, click Get in Store app.

Get in Microsoft Store -
Now confirm the action by clicking Open Microsoft Store from the top of the web browser.

Open Microsoft Store -
The Microsoft Store app will now launch. Here, click Get.

Begin download The application will now be downloaded and installed on your computer.
-
Once it is installed, expand the Quick Access menu and you will see another speaker icon. Click on it to open EarTrumpet.

Expand from Quick Access


You will now see a flyout next to the taskbar which will allow you to manage and adjust the volume levels from different apps, just like the one in the image below.

There are plenty of other third-party applications that you can choose to provide the same functionality as the Volume Mixer. However, we chose EarTrumpet as it works seamlessly and its UI is in tune with Windows 11.
Closing Words
Many Windows users do not use Volume Mixer in their daily lives as there isn’t much use for it for our day-to-day tasks. However, for those who are gaming, listening to music, or watching YouTube videos, this can be a useful feature to suppress some of the application’s sounds while focusing on the one they need.
This is why we recommend that users who have audio-oriented work use this applet to get the best sound experience from their computer. You can also enhance your audio using built-in enhancement tools if the current audio quality is not up to standard.


