Key Points
- Windows 11 23H2 has been released by Microsoft on 31st October 2023.
- To download Windows 11 23H2 ISO image, you can use the Direct Download method or the MCT.
- To perform in-place upgrades, you can use the Installation Assistant, or upgrade to Windows 11 23H2 from the Windows Update Settings page.
Windows 11 is the latest client operating system from Microsoft at the time of writing this post. However, Microsoft annually rolls out newer versions of the same OS, and this year, it is time for Windows 11 version 23H2, although Microsoft likes calling it “Windows 11 version 2023.”
If you are on an older version of Windows 11, like 22H2 or the original release, or Windows 10, or any older Windows OS, you can upgrade to Windows 11 23H2 provided that your PC meets the minimum hardware requirements.
You can also install Windows 11 23H2 while bypassing the TPM 2.0, Secure Boot, and 4 GB RAM requirements.
Windows 11 23H2 release is just around the corner, and if you are an enthusiast, then you ought to learn all the possible ways to upgrade your system to the latest version as soon as it is available. This article shows you four methods to upgrade to Windows 11 23H2.
Table of Contents
Download Windows 11 23H2 ISO directly from Microsoft
One way to upgrade to Windows 11 23H2 is to download the ISO file directly from Microsoft, and then use it to either upgrade the current OS or perform a clean install. Here are the steps to download Windows 11 23H2 directly from Microsoft:
Note: This method will download the latest version of Windows 11 available.
-
Open Microsoft’s Windows 11 download page in any web browser.
-
Scroll down to the page and select “Windows 11 (multi-edition ISO)” from the drop-down menu under Download Windows 11 Disk Image (ISO) and then click Download.

Select ISO to download -
Next, select the language you wish to download Windows 11 from the drop-down menu and then click Confirm.

Select language -
Now, click the 64-bit download button, and your Windows 11 ISO download should begin.

Begin downloading
You can download the operating system in any of the following 37 languages:
- Arabic
- Brazilian Portuguese
- Bulgarian
- Chinese Simplified
- Chinese Traditional
- Croatian
- Czech
- Danish
- Dutch
- English
- English International
- Estonian
- Finnish
- French Canadian
- German
- Greek
- Hebrew
- Hungarian
- Italian
- Japanese
- Korean
- Latvian
- Lithuanian
- Norwegian
- Polish
- Portuguese
- Romanian
- Russian
- Serbian Latin
- Slovak
- Slovenian
- Spanish
- Spanish (Mexico)
- Swedish
- Thai
- Turkish
- Ukrainian
Use Media Creation Tool to download Windows 11 23H2 ISO
Microsoft’s Media Creation Tool (MCT) allows you to create bootable devices and download standalone ISO images of their operating systems. Microsoft has also introduced a Media Creation Tool for Windows 11 that you can use to download a Windows 11 23H2 ISO file. Here is how:
Note: This method will automatically download the latest version of Windows 11 available at the time.
-
Download the Windows 11 Media Creation tool and then run the file.
-
You will now see a new window for MCT. Accept the license terms.

Accept licensing terms -
Check the pre-selected ISO details and click Next.
If you are downloading the ISO file to another computer, uncheck the box next to “Use the recommended options for this PC” and select the language you wish to download Windows 11 23H2 in.
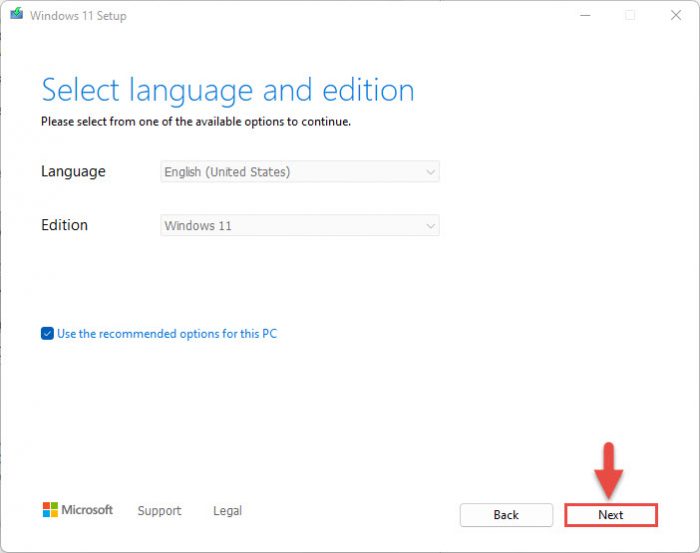
Proceed by clicking Next -
Select the ISO file radio button to download the file and then click Next.

Select ISO and proceed -
You will now need to choose where you wish to download the ISO image. Select a volume with ample free/available space and click Save.
The Media Creation Tool will now begin your download.

ISO downloading -
Once the download finishes, click Finish to close the tool.
You may find that the software then performs a setup cleanup. You can ignore this and let it run in the background.

Close the tool
Now that you have downloaded the Windows 11 23H2 ISO image, you may proceed to the next phase: Creating a bootable device.
If you do not want to use an ISO image and perform an in-place upgrade, continue to use the following 2 methods.
Upgrade to Windows 11 23H2
If you do not wish to perform a clean installation of Windows 11 23H2 and download the ISO, you can also upgrade your current OS to the latest Windows 11 version available through Windows Update or through the Installation Assistant.
Upgrade to Windows 11 23H2 using Windows Update
If you want to upgrade your device to Windows 11 from a Windows 10 PC, you must first meet the minimum system requirements. If your device does qualify, you can then check if you have received a Windows 11 upgrade option by navigating to the following (in Windows 10):
Settings app >> Update & Security >> Windows Update
If you are already on an older Windows 11 version and want to update to a newer version, navigate to the following:
Settings app >> Windows Update
Here, click “Check for updates.” When the scan finishes, check to see if you have a notification at the top saying that Windows 11 version 23H2 is ready to be installed. Click “Download and install” below it.
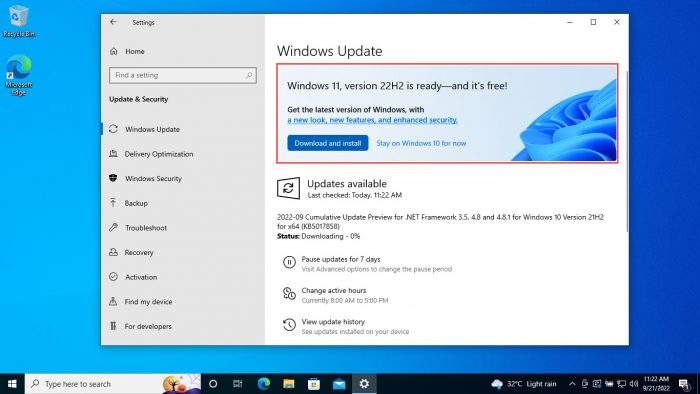
Upgrade to Windows 11 23H2 using Installation Assistant
Another way to upgrade your current OS is through the Installation Assistant. This tool needs to be run on the PC you want to upgrade. Please note that the Windows 11 Installation Assistant does not work with ARM-based PCs. For ARM-based devices, you can use the manual download and installation method discussed above.
Follow these steps to upgrade your current OS to Windows 11 23H2:
-
Download Windows 11 Installation Assistant and execute the package.
-
First, you will need to download and install the PC Health Check app regardless if you are already running Windows 11. Click “Get PC Health Check app.”

Get PC Health Check app -
The app will now download. Install the PC Health Check app and see if your system meets the requirements.
-
Once done, return to the Installation Assistant and click Refresh.

Refresh the app -
Now click “Accept and install.”
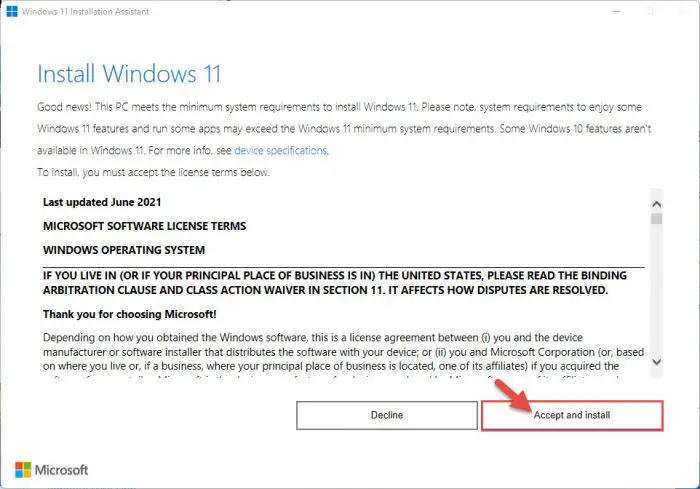
Accept terms and begin download -
The tool will now begin to download Windows 11 23H2.
Once finished, restart your computer so it can upgrade to the latest version available.
Create Bootable Windows 11 23H2 USB Drive
If you downloaded an ISO image using any of the methods above, you can create a bootable USB flash drive with it, as well as a DVD. However, we suggest that you create a USB drive as it is more convenient.
You can use Rufus or Ventoy to create a bootable USB flash drive using the ISO image. Let us show you how to create a bootable USB flash drive for Windows 11 23H2:
-
Plug in a USB flash drive (at least 8GB) to your computer.
Make sure that all your data on the USB is backed up since it requires formatting where all stored data on the USB flash drive is lost.
-
Download Rufus from its website and run it.

Download the latest Rufus version -
In Rufus, make sure that the USB drive is selected from the drop-down menu under Device.

Select the USB flash drive -
Click Select and then select the Windows 11 23H2 ISO file.

Choose the Windows 11 23H2 ISO file -
Leave the rest of the settings to their default values and click Start.

Click Start -
Select the Windows 11 customization options and click Ok.

Select Windows 11 customization options Your Windows 11 bootable USB drive will now be in the making. This step may take a few minutes to complete.
-
In the warning popup box, click Ok.
-
Once it is finished, “Ready” will be displayed with a green bar. You may then Close the app.
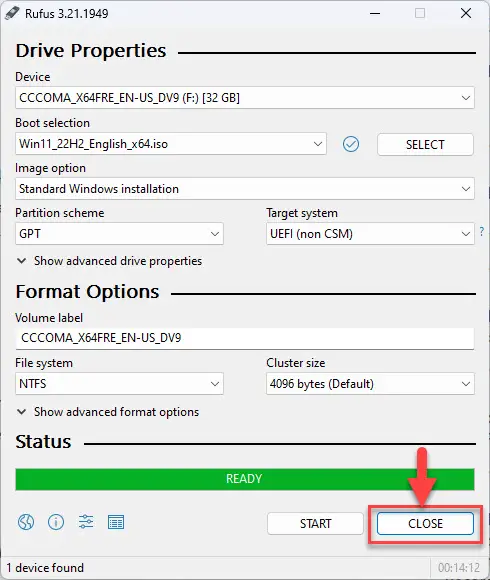
Close Rufus
Your bootable drive is now ready and you may proceed to the installation phase using the guide given below.
Install Windows 11 23H2 from bootable USB
Now that you have created a bootable drive using the ISO file, you can now begin installing Windows 11 23H2. Here is how:
-
Confirm that the target PC meets the minimum Windows 11 requirements.
-
Plug in the bootable Windows 11 USB flash drive in the target computer.
-
Turn on/reboot the computer and open its One Time Boot Menu (Usually through the F12, F10, or Esc button).
-
Select the external USB drive to boot from the USB.
-
You will now see a menu such as the one below. Click “Next.”

Proceed with installation -
Click “Install Now.”
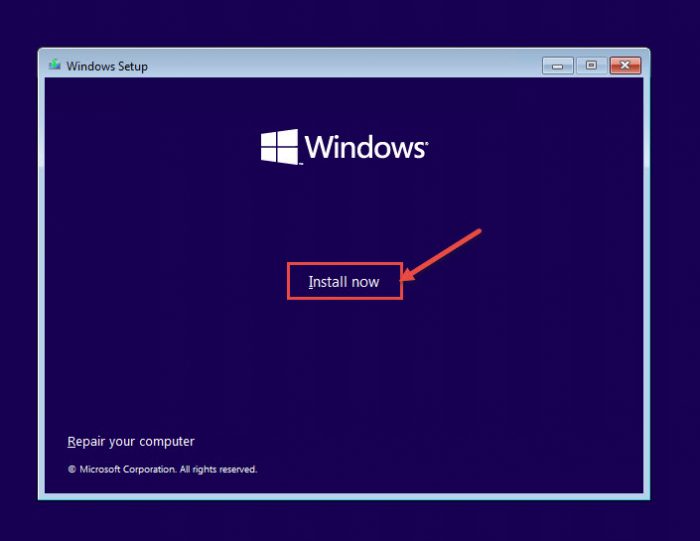
Install Windows -
On the next screen, click “I don’t have a product key.”
Even if you do have one, you can activate the product later after installation.

Proceed without entering key -
Select the Windows 11 edition that you want to install on this device from the list. When selected, click Next.

Select Windows 11 edition to install -
Check the box to accept the license agreement and click Next.

Accept terms -
Select “Custom: Install Windows only (advanced).”
You will now be asked if you want to upgrade your existing OS or perform a custom installation. Since this is a clean and fresh Windows 11 installation, we will be selecting “Custom.

Custom installation -
Click “New” and create the disk partitions as you want them. Remember to have at least 40GB of space in the primary (C) drive for Windows installation.
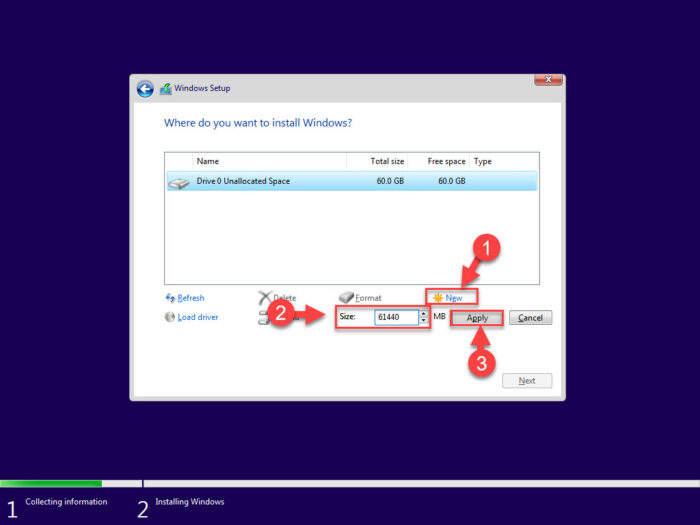
Create disk partitions Click “New,” enter the size of the partition to create (in MBs), then click Apply.
-
If intimated about additional partition creation, click Ok.
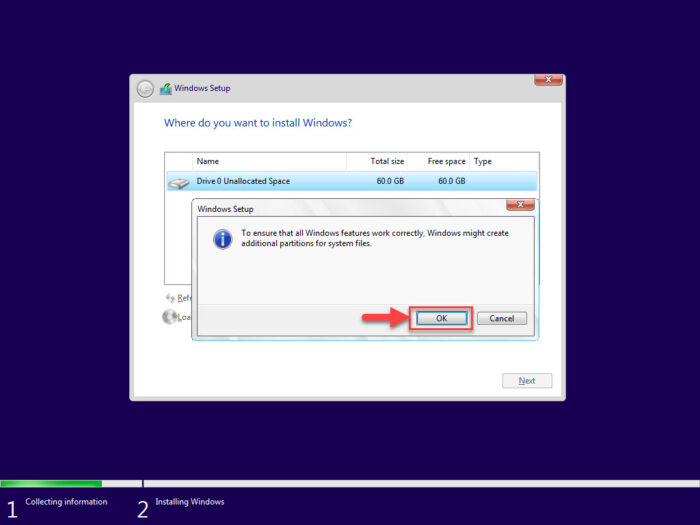
Automatic creation of additional partitions prompt -
Select the partition you wish to install the operating system on and click Next.
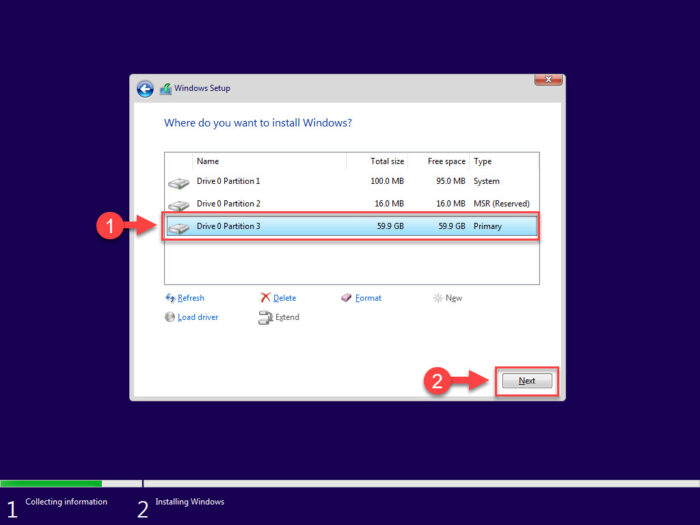
Select the primary partition to install Windows Windows 11 will now begin installing on your device. This step may take a few minutes and your device may reboot a few times.
Learn how to install Windows 11 without an internet connection or without a Microsoft account.
Further ahead in the process, you will be asked to configure your PC through several Out Of Box Experience (OOBE) screens. Proceed with the on-screen instructions and configure your PC, and you will have successfully installed Windows 11 version 2023.
Once it finishes, you will be logged into your user account on the all-new Windows 11 PC! You can now begin installing the relevant software and customizing it according to your liking.
Ending thoughts
Performing a clean install using an ISO image will erase everything in the OS partition., as it is completely formatted. However, if you are performing an in-place upgrade, then everything will remain as-is, except for the introduction of new features. even your personalized preferences will remain untouched.
Windows 11 23H2 release is just around the corner, and the people excited about it can upgrade to it using any one of the above means as soon as it is available.


