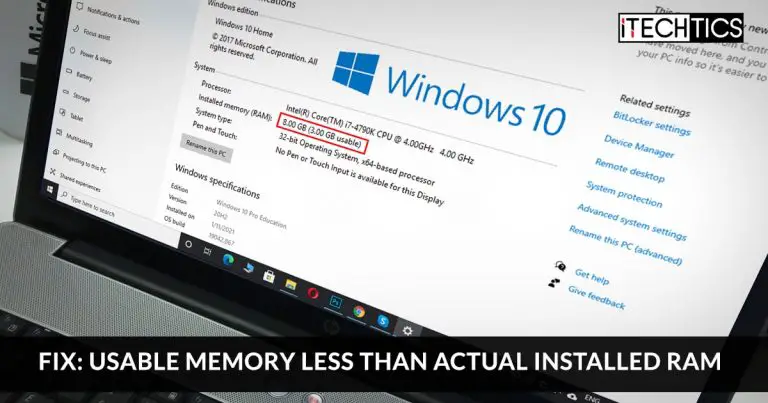
RAM is a vital component in determining the performance of a computer. The amount of RAM your computer has determines the computer’s ability to process information, so the larger the RAM, the more computing capacity it will have. However, it is only valuable if it can be utilized. It’s not desirable to have a 32 GB memory module installed just to utilize part of it.
If you believe that your device is not performing as it should even after throwing Gigabytes of RAM into it, it is likely that your system is not utilizing its full RAM capacity.

This article discusses how you can fix the issue of the usable memory being less than what is physically available to it.
Table of Contents
How to check the total installed RAM
You first need to determine whether insufficient RAM is the issue of poor system performance. Therefore, you must compare the actual installed RAM and the usable memory on your PC.
To check the actual installed RAM capacity on your PC, run the following command in Command Prompt to obtain the real figures:
wmic memorychip get capacity
This command will return the memory capacity of each memory mode in your device. The numbers will be in bytes.
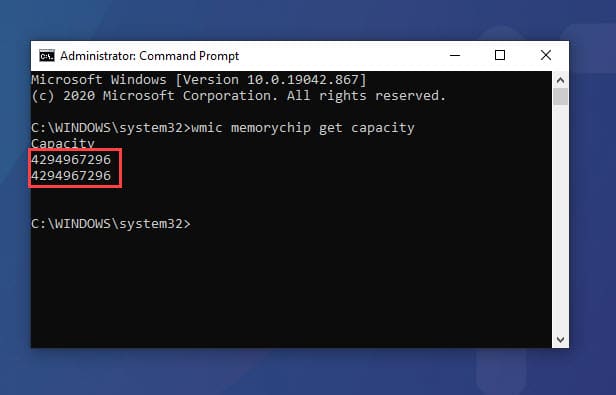
In the above image, the 2 rows indicate that there are 2 RAM modules, each with a capacity of 4 GB.
How to check available usable RAM
As the subject illustrates, it is not necessary that all of the installed memory is available for the system to use. Hence, you need to confirm what capacity of the installed RAM is usable by the operating system.
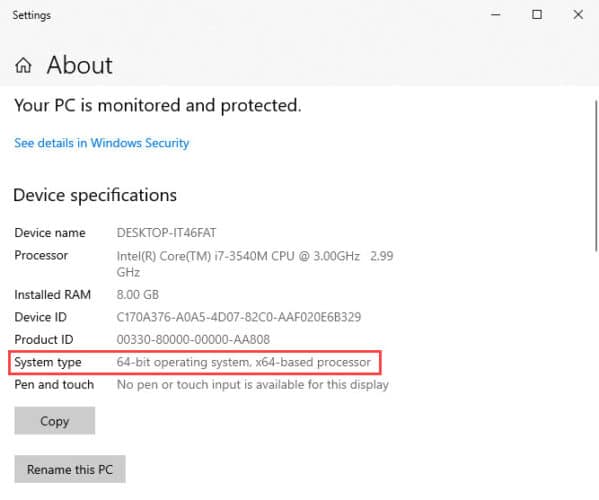
This information is displayed on the About page. Open the About page in the Settings app and look for the value ahead of “Installed RAM.” This value is the usable RAM your OS has.
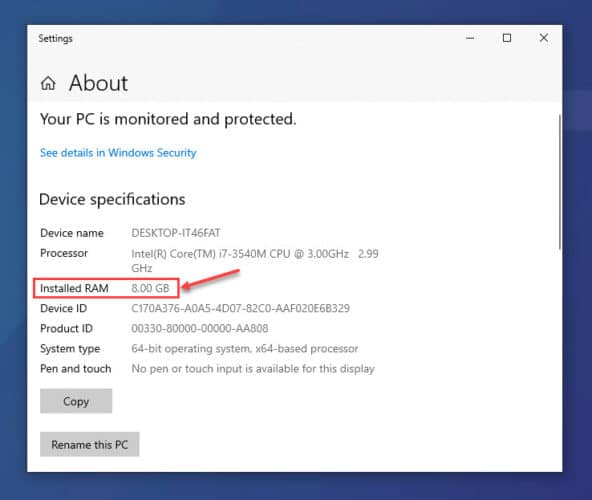
If you find a difference between the actual memory installed and the usable memory, then there might be something wrong with your system’s configuration which needs to be fixed. This will be discussed further down the post.
Possible causes
As we said, there can be various reasons why your system has less usable memory than there are:
- The operating system installed has a 32-bit architecture.
- The devices installed on your computer have reserved memory for specific functions.
- The motherboard does not have the ability to handle the installed amount of RAM.
- BIOS settings are configured to reserve memory.
- BIOS is outdated.
- The version of Windows installed.
The factors affecting the usable memory can be any of the above-mentioned.
The 32-bit OS is not programmed to handle more than 4 GB of memory, resulting in a total usable memory no greater than 3.2 GB. Here, the remaining 0.8 GB of memory is mapped by other components such as BIOS, GPU, and other devices. Once the memory sectors are mapped, they are no longer available to the OS.
Other factors include the OS not supporting the amount of memory installed on the computer. Here is some information on a few operating systems which tell us their maximum supported memory capacity:
| OS | Maximum supported memory |
| All 32-bit Windows OS | 4 GB |
| Windows 10 Enterprise x64 | 6 TB |
| Windows 10 Education x64 | 2 TB |
| Windows 10 Pro for Workstations x64 | 6 TB |
| Windows 10 Pro x64 | 2 TB |
| Windows 10 Home x64 | 128 GB |
The list does not end here. Multiple other factors can also cause your computer to be able to use less memory than it has. This has been addressed in the section below.
Fix usable memory less than actual memory
There are several tasks you can perform to allot more usable RAM to your OS. Here is what you need to do:
Check memory allocation using Resource Monitor
Resource Monitor is a built-in tool in Windows 10 that tells you what resources are being used by which hardware or services. It also explains how the device’s memory is split up to be distributed for various uses.
Open up the Resource Monitor by searching for it in the Search Box. Switch to the Memory tab. under “Physical Memory” you should be able to see how the RAM is distributed. This will let you know what portion is being used and what porting is being reserved by other hardware.
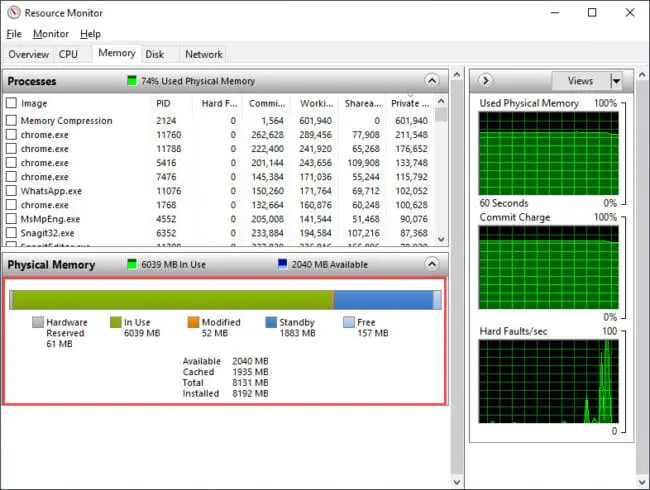
The information from the Resource Monitor will be your guideline through the rest of the steps and will assist you to make the correct configurations as needed. Here is what the different allocations mean:
| Memory Allocation | Description |
| Hardware Reserved | The memory that is reserved for use by BIOS and some drivers for other peripherals |
| In Use | Memory that is used by the process, drivers, or the operating system |
| Modified | Memory whose contents must go to disk before it can be used for another purpose |
| Standby | Memory that contains cached data and code that is not actively in use |
| Free | Memory that does not contain any valuable data and that will be used first when processes, drivers, or the operating system need more memory |
Switch to 64-bit OS
As you may have already noticed from the table given above, 64-bit operating systems support more memory as compared to 32-bit operating systems. Hence, we would suggest that if you are using a 32-bit OS, you switch to a 64-bit architecture. Unfortunately, the process requires a fresh installation of OS. You can refer to our page to download and install Windows 10 64-bit.
To check your current OS architecture, simply open the About page in the Settings app and look for it in front of System Type.
Check if RAM modules are seated properly
This may seem like an unnecessary step, but consumers did come to realize that one of their RAM modules was not physically seated correctly, and was therefore undetectable by the computer. Therefore, ensure that all modules are seated and accessible by computer. To verify this, run the wmic memorychip get capacity command in Command Prompt.
Rearrange RAM modules
Motherboards often require that the RAM modules be set according to the type of bay. Each bay has its own clocking-speed support, hence might not be able to properly make full use of the RAM modules that have been placed incorrectly.
We suggest that you have a look at your motherboard’s user manual and rearrange your modules accordingly. Moreover, if the docking bay is color-coded (black and white) then ensure that you match the colors to the modules.
Disable maximum memory upon boot
Maximum memory consumption is often configured when the computer is starting up. This enables the computer to perform its startup tasks more quickly and efficiently. However, it also allots a portion of RAM for this purpose which is no longer usable by the OS.
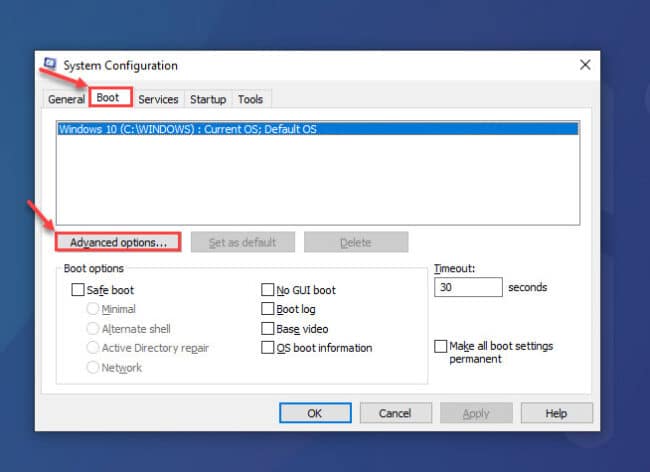
To disable this option, open the System Configuration window by typing in msconfig in Run. Then switch to the Boot tab and click Advanced options.
On the Advanced window, uncheck the box next to Maximum memory and click Ok.
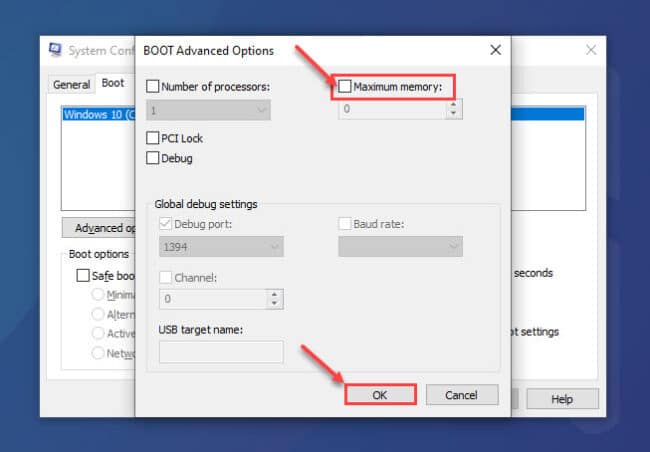
Once done, reboot the computer and check if the “Installed RAM” has increased from its previous value on the About page (Run –> ms-settings:about).
Reconfigure BIOS settings
It is possible that an integrated GPU is reserving a portion of the RAM to use as its Video RAM (VRAM). This setting, amongst other settings, can be reconfigured through the BIOS.
Access BIOS on your PC upon startup and change the following settings:
- Virtualization – Enabled
- iGPU – Disabled
- Render Standby – Enabled
- iGPU memory – Auto
- Multimonitor – Disabled
- Memory Remap – Enabled
You must look around BIOS for the settings mentioned above and set them to the ones stated. It has been reported that the settings iGPU memory to auto and iGPU to off has resolved the issue for many users.
Update BIOS
An outdated BIOS version can cause your OS to support only a portion of the actual available memory on your device. Hence, it is important that you update it to the latest available version to get the best experience.
We must warn you that updating BIOS can be an advanced-level task in some scenarios, therefore only perform the task if you completely understand what you are doing. Any incorrect configurations can damage your BIOS and prevent you from running your computer at all.
To update your system BIOS, refer to your motherboard’s user manual or the manufacturer’s website for proper guidelines and downloading.
Set Pagefile to clear upon system shutdown
Pagefile is an extension of RAM which comes into play for temporarily storing data within RAM. In some cases, the Pagefile reserves some space in the system memory to perform the necessary tasks. You can configure the Pagefile to automatically clear itself when you shut down the computer.
Before we proceed further, we suggest that you create a system restore point as the process involves manipulating system registries.
Launch the Registry Editor by typing in regedit in Run, and then paste the following path into the address bar for quick navigation:
Computer\HKEY_LOCAL_MACHINE\SYSTEM\CurrentControlSet\Control\Session Manager\Memory Management
Now, double-click ClearPageFileAtShutdown in the right pane and set its Value Data to 1. Then click Ok. Once done, restart your computer for the changes to take effect.
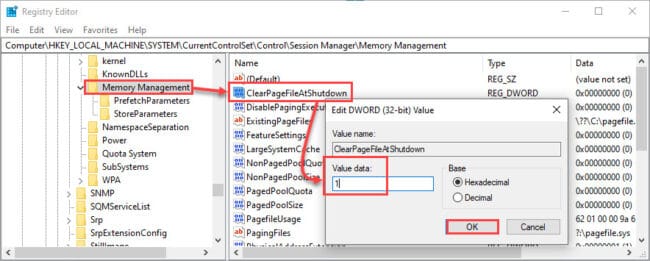
Once the computer reboots, check if your “Installed RAM” on the About page is the same as the actual memory installed.
Conduct a memory test
You can also perform a memory test to ensure that there aren’t any bad sectors on there. Windows 10 comes with a built-in tool for the task, however, it does involve a system reboot.
To invoke a memory test, type in mdsched.exe in Run and hit Enter. In the pop-up window, click Restart now and check for problems.

Your computer will now reboot and then automatically go into scanning mode. It will then scan your memory to look for any bad sectors. If found, we recommend that you replace your memory module(s) on priority so that it can be used to its maximum extent. You can view the results in System Tray once the computer restarts.
Closing words
We believe that each individual should be able to enjoy the full usage of what they have paid for. An extra ounce of RAM can save the day by not slowing down your computer and ensuring that you have a smooth experience by performing each task when it is supposed to.
Therefore, we suggest that you check if your device is using the RAM it is meant to, or is it going to waste.


