Computer uptime is the amount of time the computer has been running continuously since the last reboot, without a shutdown or restart. PC uptime is useful in troubleshooting different computer issues. This is used especially by network admins for troubleshooting purposes.
Computer uptime is synonymous with Windows uptime, as both are almost the same. You can check Windows uptime by using the network adapter stats from the task manager, a command prompt or Powershell. We will discuss each method one by one.
Table of Contents
Quick Summary
Check uptime from Task Manager
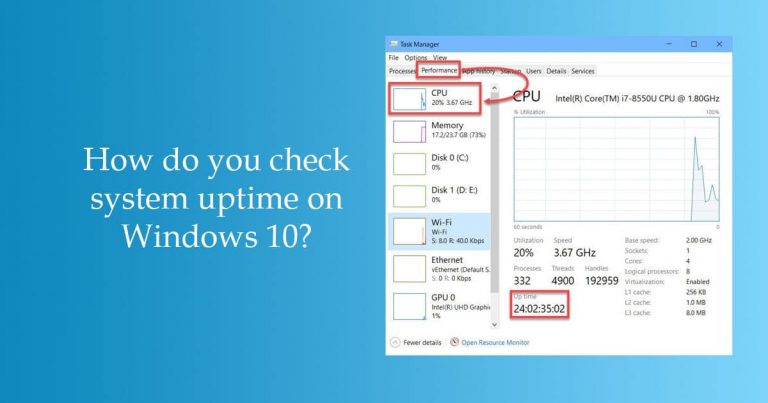
The quickest way to check uptime in Windows 10 and Windows 11 is to use the Task Manager. The biggest advantage of using the Task Manager is that it shows the uptime in real-time to the seconds precision.
-
Open Task Manager by right-clicking on the taskbar and selecting Task Manager (Ctrl + Shift + Esc).
-
Go to the Performance tab and go to the CPU section where you will see the uptime in days: hours: minutes: seconds in real-time.

Showing Up time in Task Manager
Clarification: There is one clarification here. Windows calculates the total uptime of the computer. This is like CPU uptime, the time CPU has been active. If you put the computer to sleep or hibernate mode, those times will not reset the uptime timer. When the computer returns to an active state, Windows will start calculating the uptime from the same position where it left off.
For example, if my computer was active for 2 hours and then I hibernated it for 24 hours. I started the computer again and used it for two more hours. Windows will calculate the total uptime as 4 hours.
Check uptime using the network adapter
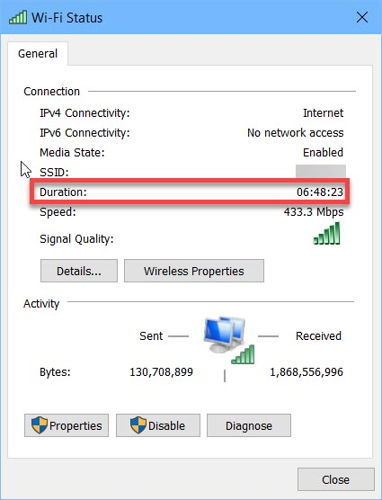
Another way to quickly check the current system uptime is to check the active network adapter status. This only works if your network is always connected.
- Right-click on the network icon in the system tray and select “Open Network & Internet settings“.
- From the Status section, click on “Network and Sharing Center”. Or simply go to Run –> control /name microsoft.networkandsharingcenter
- Click on the active network adapter link
- The opening window will show the uptime.

Basically, this is the network uptime. This will reset if the computer goes to sleep or hibernation.
Check PC Uptime On Windows Using Command Line
You can also check the uptime using the command-line.
Systeminfo
Systeminfo is a command that lists general information about the Windows system. It lists the last boot time of Windows. We will need to manually calculate how much time has passed so far.
Open command prompt by going to Run –> cmd and run the following command:
systeminfo | find “System Boot Time”

WMIC
There is another WMIC command, which will let you know about the boot time of the computer as a string. This can be helpful for developers and DevOps.
Open the command prompt and run the following command:
wmic path Win32_OperatingSystem get LastBootUpTime
If you see the above screenshot of my computer, you will know that the boot time of my computer was:
Year: 2019 + Month: 09 + Day: 13 + Hour: 15 + Minutes: 24 + Seconds: 00 + Milliseconds: 500000.
The last +300 is the time zone. That means I’m in GMT + 3 timezone.
Net Statistics utility
Net Statistics command can be used to check the last boot time:
Open the command prompt and run the following command:
net statistics workstation
The line starting with Statistics since is your boot time.
The same command can be used to check Windows Server uptime but the command will become net statistics server.
Check system uptime using PowerShell
PowerShell gives a clearer answer using the same string as the command prompt. It will calculate the uptime instead of the last boot time. It also shows the total no. of days, hours, minutes and seconds separately.
Open PowerShell and run the following command:
(get-date) - (gcim Win32_OperatingSystem).LastBootUpTime
If you are using PowerShell 6, then you can simply use the following command to get the Windows uptime and the last startup time:
Get-Uptime -SinceDifference between uptime and availability?
Most people confuse uptime with availability. Before moving forward, we should know the difference between uptime and availability. They are not the same. According to Wikipedia:
Uptime is a measure of system reliability, expressed as the percentage of time a machine, typically a computer has been working and available.
Availability is the probability that a system will work as required when required during the period of a mission.
A computer may be up and running, but the resources required for a specific operation may not be available depending upon the system load. For example, a computer may be running, but its network card may not work properly or its bandwidth is being overused. In this case, the system has uptime, but it is not available for the specific task.
Final thoughts
Default allows Windows to start quickly on Windows 10. If enabled, Windows will not reset the LastBootUpTime value. You will not get the exact Windows uptime. To disable fast startup quickly, run the following command:
powercfg -h offIf you want to check the current Windows uptime, you will need to use the network adapter method to check the network time. But it only works if you are always connected to the Internet.
These are some ways to quickly get the last boot time or check the total uptime of the computer. Every command has its own advantages. You can use the method which suits you best. The only thing I haven’t found is the answer to how old is my computer? The systeminfo command only gives information about the Windows installation date and time. Maybe BIOS can show me something about that. Most of the methods mentioned above work with all versions of Windows, including Windows 10, Windows 8, Windows 7, Windows Vista. You can also check Windows Server uptime using the same commands.
Please tell me about how you check the uptime of your computer and for what purpose do you use this information?


1 comment
Ian
Thanks, This was driving me mad ! I know I rebooted a few days ago but Task man was showing 3 weeks uptime. The network adapter method showed the truth.