Windows 11 comes preinstalled with Windows Security, formerly known as “Microsoft Windows Defender Antivirus.” As you may already be familiar with the app and its name, the purpose is to keep your devices safe and secure from any harmful and malicious content. However, users may be required to turn it off entirely due to several reasons.
You may need to install any third-party software that the Defender is blocking, or use other antivirus software and no longer need Windows Defender. For any reason, Windows Defender can be disabled both permanently and temporarily.
This post discusses how you can disable Windows Defender Antivirus on Windows 11 both temporarily and permanently while discussing other myths that are said to work in disabling Defender but do not.
Table of Contents
Disable Windows Defender in Windows 11 Temporarily
Our first step will be to temporarily disable Defender. Here’s how you can do it on Windows 11:
-
Navigate to the following:
Settings app >> privacy & security >> Windows Security >> Virus and Threat Protection
-
Click on “Manage settings” under the “Virus & threat protection” section.
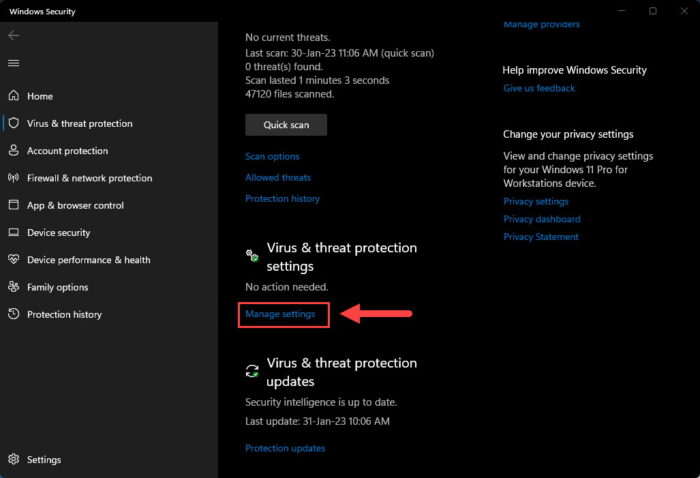
Manage virus and threat protection settings -
Toggle the slider under “Real-time protection” to the Off position.
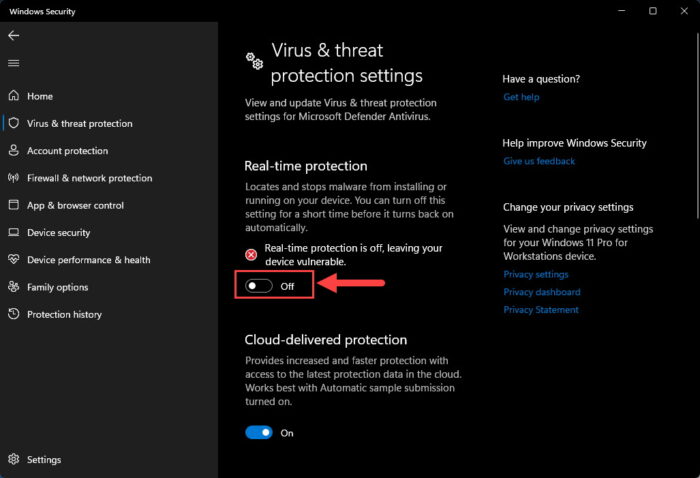
Disable real-time protection If prompted with a UAC, click Yes.
This will temporarily disable only the real-time protection component from your Windows Defender, which means that you should be able to install any app or program that was being prevented by it.
However, Windows Defender will re-enable itself the next time the device is restarted.
Disable Windows Defender in Windows 11 Permanently by taking ownership
There is a Group Policy Object (GPO) in Windows 11 by the name “Turn off Microsoft Defender Antivirus” which is supposed to turn off the Defender once enabled. However, this GPO is also reset when the Windows 11 device is restarted. Therefore, it is not a means to disable Windows Defender permanently.
I have tested most of the methods available on the Internet, including Windows Registry manipulation, disabling services, and removal of the Wdboot driver. However, none of these have worked for us so far.
However, there seems to be a method that does the trick of taking ownership of Windows Defender files and folders, and then removing all permissions.
We have divided these methods into different parts so that you can keep track of the activity while performing it.
Before you begin, make sure that you have access to an administrator account.
Step 1: Boot into Safe Mode
The purpose of booting into Safe Mode is to avoid the running of unnecessary apps, programs, and services that may hinder the process. Here’s how to boot into Safe Mode in Windows 11:
-
Open the System Configuration window by typing in “msconfig” in the Run Command box.

Open System Configuration -
Switch to the Boot tab.

Switch to the Boot tab -
Click “Safe boot,” and then click Apply and OK.

Select Safe Boot -
In the confirmation dialog box, click Restart.
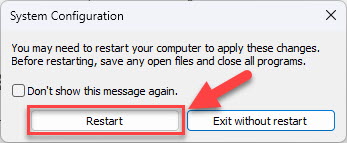
Restart the PC
Your device will now restart and boot into Safe Mode. Log in to the administrator account and continue to the next phase.
Step 2: Take Ownership
You must now take complete ownership of the Windows Defender executable files to permanently disable it. Here is how:
-
Open File Explorer and enter the path below:
C:\programdata\Microsoft\Windows Defender\

Enter the path to Defender’s files You can also navigate to this path using the GUI after unhiding the “ProgramData” folder.
-
Right-click on the folder “Platform” and click Properties from the context menu.

Open Platform properties -
Switch to the Security tab and click Advanced.

Open Advanced security settings -
Click Change in front of Owner.

Change owner -
Select the “Administrators” group as the owner of the files.

Set Administrators as owners Enter “Administrator” in the text field below the “Enter the object name to select” section. Then click “Check Names.” When the field displays the complete name of the user group as in the image above, click OK.
-
Back in the Advanced Security Settings window, check the box next to “Replace owner on subcontainers and objects,” then click Apply.
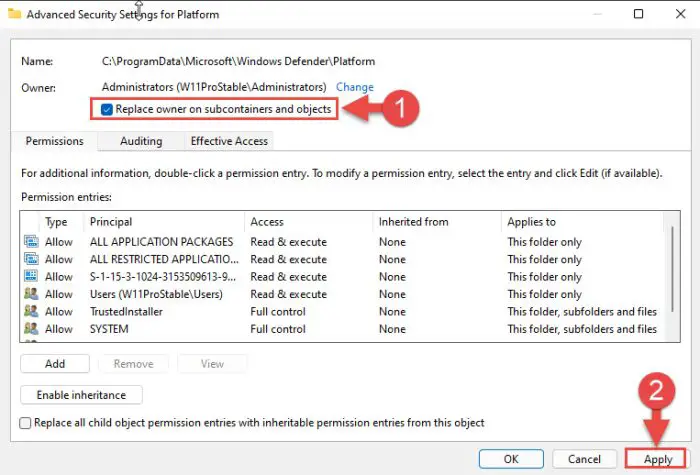
Replace the subcontainer owner -
In the confirmation box, click OK.

Confirm action Do not close the Advanced Security Settings window.
Your user account has now taken ownership of the Windows Defender files. It’s time to move on to the next phase of the process.
Step 3: Remove Permissions
Now that you have the ownership, it is time to remove the permissions of the other users and groups. Here is how:
-
Select each Permission Entry from the list and click Remove.
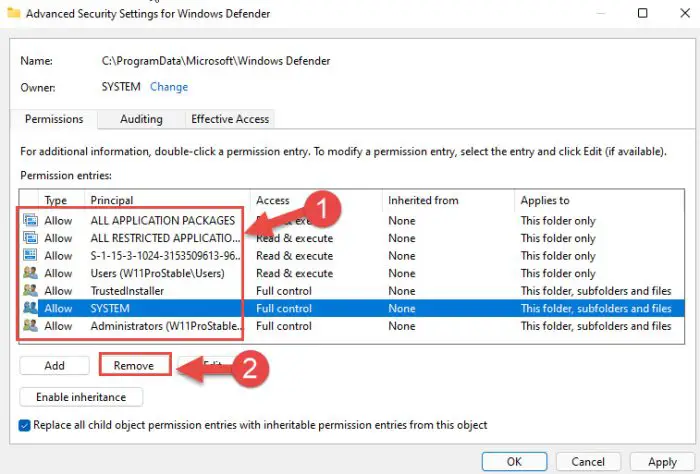
Remove permissions -
Repeat Step 1 until all entries are removed.
-
Check the box next to “Replace all child object permission entries with inheritable permission entries from this object” and click Apply and OK.
If prompted for a confirmation, click Yes.
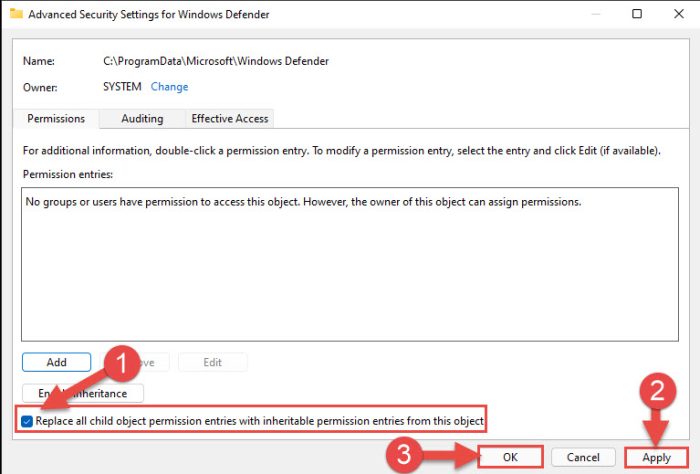
Replace child object permissions
The permissions have now been removed successfully.
Step 4: Reboot Normally
Now all you need to do is reboot the computer normally (Without Safe Mode). Here is how:
-
Open the System Configuration window by typing in “msconfig” in the Run Command box.

Open System Configuration -
Select “Normal startup” and then click Apply and OK.

Boot Windows normally -
In the confirmation dialog box, click Restart.
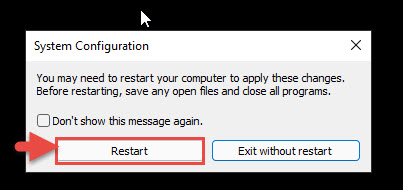
Restart PC normally
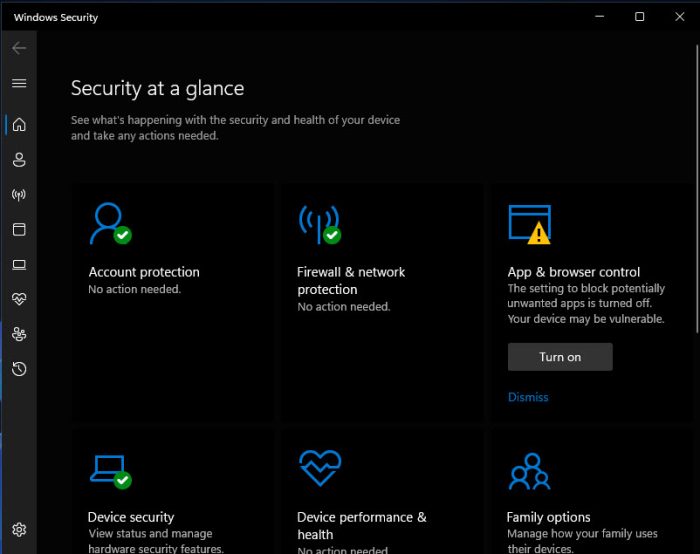
The computer will now reboot into normal mode. When it does, you can check and confirm that Windows Defender has been permanently disabled by verifying that the Virus & Threat Protection option in Windows Security has disappeared.
Disable Windows Defender in Windows 11 Permanently from Windows Registry
Another method to disable Windows Defender permanently is by tweaking the Windows Registry. Here is how:
Note: Misconfiguration of critical values in the system’s registry could be fatal for your operating system. Therefore, we insist that you create a system restore point or a complete system image backup before proceeding forward with the process.
You can also use our top selection of disk imaging and backup software so you never lose your data or operating system again.
-
Press the Windows key + i to open the Settings app.
-
Click “Privacy & security” on the left.
-
Click “Windows Security.”
-
Click “Virus & threat protection.”
This will open the Windows Security app
-
Click “Manage settings” under “Virus & threat protection settings.”
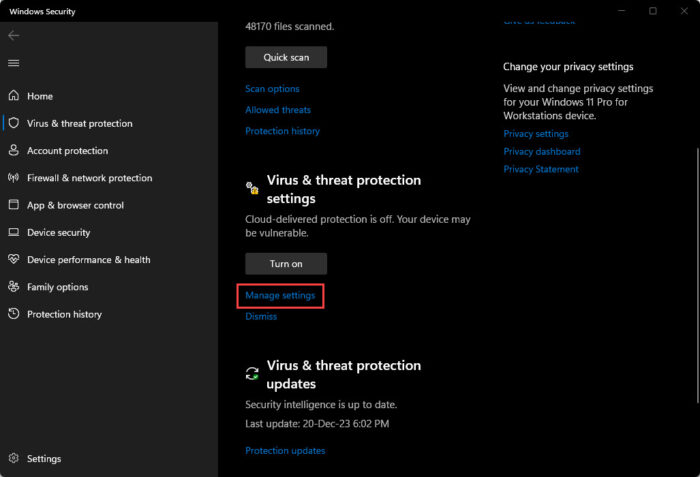
Manage virus and threat protection settings -
Toggle the slider under “Tamper protection” into the Off position.

Disable tamper protection -
Now press the Windows key + R to open the Run Command box.
-
Type in “regedit” and press Enter to open the Registry Editor.
-
Navigate to the following path from the left pane:
Computer\HKEY_LOCAL_MACHINE\SOFTWARE\Policies\Microsoft\Windows Defender
-
Right-click the “Windows Defender” key, expand New, and click “DWORD (32-bit) Value.” Name this DWORD “DisableAntiSpyware“.

Create the DWORD DisableAntiSpyware -
Now repeat the last step and create the following DWORDs:
- DisableRealtimeMonitoring
- DisableAntiVirus
- DisableSpecialRunningModes
- DisableRoutinelyTakingAction
- ServiceKeepAlive
-
Set the values for these DWORDs as given here:
- DisableAntiSpyware – 1
- DisableRealtimeMonitoring – 1
- DisableAntiVirus – 1
- DisableSpecialRunningModes – 1
- DisableRoutinelyTakingAction – 1
- ServiceKeepAlive – 1
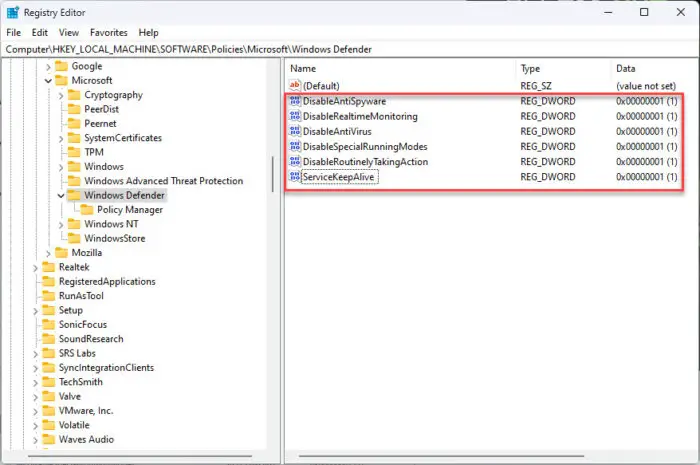
Create the DWORDS -
Now create a new key under the “Windows Defender” key by right-clicking it, expand New, and click Key. Name this key “Real-Time Protection.”

Create a new key -
Now create the following DWORDS inside “Real-Time Protection” key with the given values:
- DisableBehaviorMonitoring – 1
- DisableOnAccessProtection – 1
- DisableScanOnRealtimeEnable – 1
- DisableRealtimeMonitoring – 1
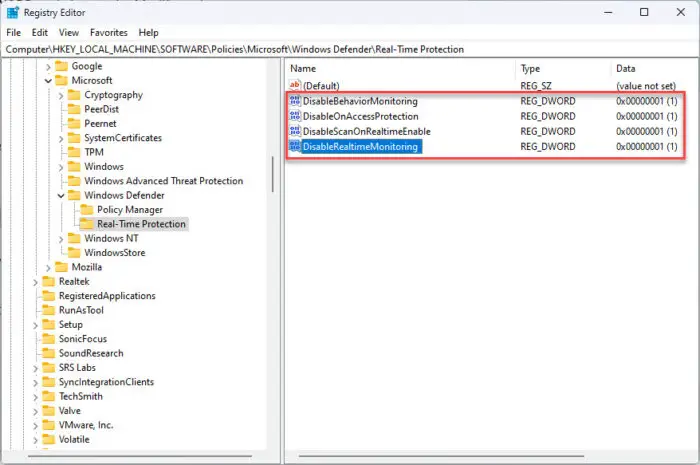
Create DWORDs inside the RealTime Protection key -
Now create a new key by the name “Signature Updates” under the “Windows Defender” key, and then create the following DWORD inside it with this value:
- ForceUpdateFromMU – 1

Create the Signature Updates key and add DWORD -
Create another key under “Windows Defender” by the name “Spynet” and add the following DWORD:
- DisableBlockAtFirstSeen – 1

Create the Spynet key with the DWORD -
Now restart the computer for the changes to take effect.
Once the computer restarts, Windows Defender will be disabled indefinitely, unless you revert the changes made to the Registry.
Closing Words
Once Windows Defender has been deactivated, your device becomes vulnerable if you do not have another antivirus to protect it. Therefore, if you do intend to keep it disabled, we suggest that you consider these 17 aspects before making an antivirus purchase.

