ReFS, Resilient File System, is a new file system which was added in Windows 8 and now available for Windows 8 and later. Basically, it is a local file system and has many features for Windows users.
It is designed to prioritize the data Availability. and if corruption occurs the online salvage process localized requiring no volume downtime to the area where a corruption occurred. ReFS stay online when any corruption occurred.
It also provides Integration and stores data to avoid data loss. All the metadata of file system remains protected. If any corruption is detected, ReFS will correct it automatically and recover your data quickly without any loss.
ReFS provide Scalability that it can scale any data size whether it is new or old.
App Compatibility feature of ReFS supports NTFS features and Win32 APIs and that are highly adopted.
Proactive Error Identification feature of ReFS identifies and detects the error rapidly by a scanner call “Scrubber”. After finding any error or corruption, this feature of ReFS will recover from the corruption as soon as possible.
You can format your drive with ReFS to have more features and security of your data. Windows 10 version 1703 comes with ReFS 3.2 version, but for compatibility reasons with NTFS you can still format your drives with ReFS version 1.2.
Format drive with ReFS
Following steps will guide you to format your drive with ReFS.
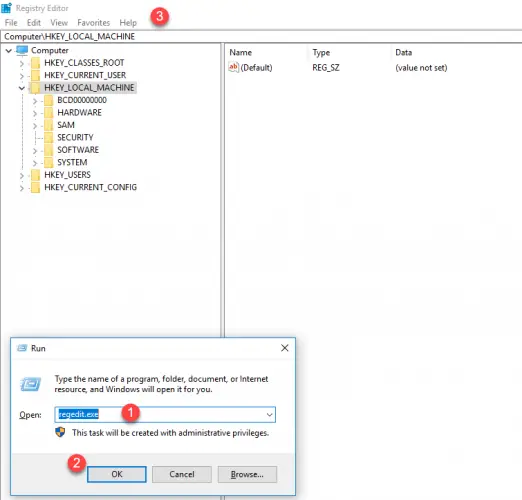
- Press “Window key +R” to open Run dialog and type “regedit.exe”, this will open the Registry Editor window.

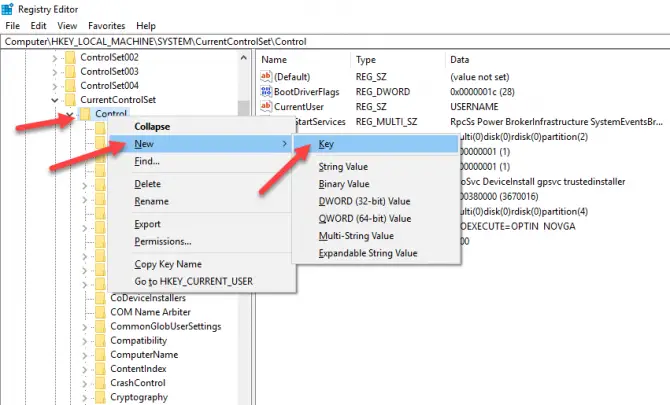
- Now go to following registry “HKEY_LOCAL_MACHINE\System\CurrentControlSet\Control”. And create a new key with name “MiniNT”.

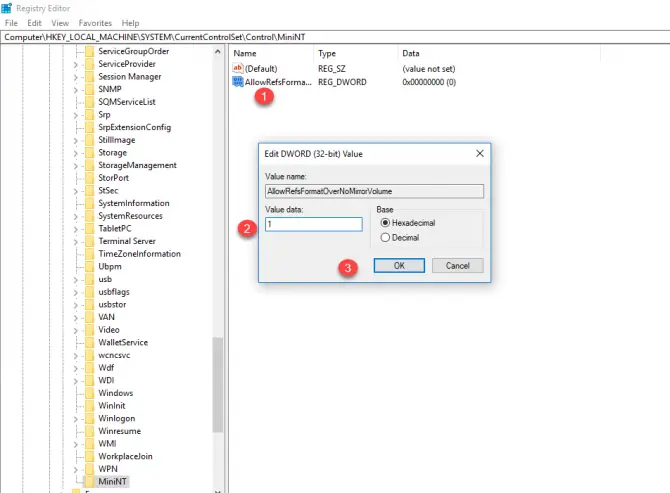
- In this key you have to create a DWORD value and name it “AllowRefsFormatOverNoMirrorVolume” and set its value to 1 to unblock the ReFS.

- Now you have created ReFS entry in Registry Editor. Close the window. Next, you have to run few commands. You still need to format your drive with ReFS 1.2 version for the compatibility purposes.
- Run “format e: /u /fs:refs /i:enable”. This command will format the drive “e” with ReFS 3.2. You can specify your drive name according to your need that which drive you want to format in ReFS.
- Run “format e: /u /fs:refsv1 /i:enable”. This command will format the drive “e” with ReFS 1.2 version.
- So your formatting is done. And your drive will be formatted with ReFS. After formatting, delete the MiniNT key which you created in the Registry Editor window to prevent any issue in your Windows.
ReFS supports large volume up to 1 yobibyte or 1.2 trillion terabytes. And provides integrity for data and metadata. Have you ever tried ReFS?


3 comments
ruftas
Currently have Windows 10 pro for workstations. Activated. But no ReFS support.
Was previously using windows 11.
Rino
doesn’ wrok for me. win 10 PRO x64 updated to 02 feubrary 2019. No ReFS voice listed. Unable to format as ReFS in any way on internal or external or SSD drive of any brand.
Usman Khurshid
Microsoft removed ReFS feature from normal Windows 10 systems. It is only available on Windows 10 Enterprise and Workstation editions.