There can be a number of reasons why you’d want to format USB drive in Windows 10. Either it could be a brand new USB drive that needs to be formatted before it can be used, or you could be facing some issues with your USB and want to reformat it. Other reasons could be because you want to erase all the data on the USB quickly, or maybe because you are unable to access its contents because the USB drive is encrypted.
Regardless of your reason, if you want to format your drive, this article is for you. We have discussed several ways you can format your USB drive while on a Windows 10 PC.
However, before we learn how to do that, let us learn what formatting is and why it is required.
Table of Contents
Why USB drives require formatting
Every storage device needs a file formatting system. This is because the file system defines the attributes, characteristics, and rules which the device will have after it has been formatted. It is also a mechanism of how the storage device reads and writes the data. Therefore, a USB drive, being a storage device, requires a file formatting system before it can be used.
Windows currently supports 3 types of formatting:
- NTFS
- exFAT
- FAT32
Each of these file systems have their own attributes, advantages, and disadvantages.
When trying to format a USB drive on a Windows 10 device, you have to choose from the file system you want to format it in. Go here to learn more about the differences between NTFS, exFAT, and FAT32 file systems.
Allocation Unit Size (AUS)
Before we dig into the process of formatting USB drives, there is one more thing we ought to cover: the Allocation Unit Size (AUS). While formatting a storage drive, apart from the file system type, you are also expected to define an AUS.
AUS is the size of each block within a storage space. However, the overall space of the storage will be the same, regardless of the AUS. However, it does affect how much storage space can potentially be wasted. This can be understood better with the aid of an example.
If you have a 3KB file stored in a storage space having 4KB AUS, the 3KB file will be stored in a single block. Nevertheless, the remaining 1KB will be wasted.
In contrast, if you save a 3KB file in storage space with an AUS of 2KB, then it will need to be stored in separate blocks. These blocks can be together or can be further apart, known as fragmentation. Fragmentation causes the storage space to perform relatively slow as the data is now scattered all across the storage space, hence consuming time to get and compile it.
Therefore, it is important that you select the correct AUS. The default AUS recommended by Microsoft is 4096 bytes for standard users.
How to format USB drives in Windows 10
Format USB drive from File Explorer
The quickest and easiest way to format a drive is from File Explorer. We suggest that you backup any critical data on the USB drive before proceeding as anything on there will be erased indefinitely.
Plug your USB in and right-click on it from the Explorer. From the context menu, click Format.

The formatting window will now pop up. Select the file system from the drop-down menu under File System, and then select your desired AUS from the drop-down menu under Allocation unit size. We suggest that you leave the AUS to its default value. Now enter a name for your USB under Volume Label and click Start to begin the formatting process. If prompted for confirmation, click OK.

Once done, click OK on the dialog box indicating that the formatting process has been completed. You will now find an entirely formatted and empty USB drive.

Format USB drive from Disk Manager
Windows 10 comes with a built-in tool known as the Disk Manager. This tool is specifically for managing any storage space in or connected to your device. This method can be especially resourceful if you cannot initially find your USB drive through File Explorer.
When a USB drive is missing from the explorer, it usually means that it has not been formatted to any file system at all. This is usually the case with brand new USB drives.
In that case, open the Disk Manager by typing in diskmgmt.msc in Run. From there, you will likely find the USB drive displayed as “Unallocated.”

Right-click on the empty white space on the drive and click New Simple Volume from the context menu.

You will now encounter a new volume wizard. Click Next on the welcome page. On the next page, you will be asked to confirm the size of the partition. Leave it at its default value (unless to want to create more partitions) and click Next.

Next, ensure that the “Assign the following drive letter” radio button is selected, then select a drive letter from the drop-down menu in front of it. Click Next when done.

It is now time to select the formatting style and the AUS. Select your desired style and value, then enter a name for the USB drive. Click Next when done.

On the next confirmation screen, click Finish to begin the formatting process. It will then take a few seconds for the USB drive to be formatted. When it does, you will be able to see it in the explorer as a regular USB drive.
Format USB drive using Command Prompt
The command line is a great way for the IT pros to format their USB drives without having to access the GUI. Command Prompt can be used in two ways to format a USB drive. However, one of those methods is only applicable if the drive is already formatted and has a drive letter assigned.
Format USB using drive letter using Command Prompt
To format a USB drive that already has a drive letter assigned, use this method.
Launch the Command Prompt with administrative privileges and then use the following command to format your USB drive. You will need to press Enter twice to confirm the presence of the USB drive attached to your PC.
format DriveLetter: /v:Label /fs:FileSystem /q
Replace DriveLetter with the existing drive letter assigned to the USB drive, Label with the new volume label, and FileSystem with the file system format you want to do. You can use the following file system syntaxes in the above command:
- NTFS
- exFAT
- FAT32
Here is an example of the command:
format D: /v:iTechtics /fs:FAT32 /q

Format USB without drive letter using Command Prompt
If you have just bought a new USB drive and are not even formatted once, use this method to format it using Command Prompt.
Launch Command Prompt with administrative rights and type in Diskpart.

Now type in List disk to display a list of storage spaces on your device. From there, note down the disk number associated with your USB drive and then type in select disk followed by disk number, as in the example in the image below:

Now type in the following 3 commands one after the other:
clean
create partition primary
active

Now use the following command to finally format your USB drive according to your selective file system.
format fs=FileSystem label="VolumeLabel" quick
Replace FileSystem with the file system of your choice (NTFS, FAT32, or exFAT), and VolumeLabel with the new volume label for the USB drive. Here is an example:
format fs=fat32 label="itechtics" quick

At the end, enter Assign in Command Prompt to implement all of the commands made thus far.

You will now have successfully formatted your USB drive.
Format USB drive from PowerShell
As you may already be familiar with Windows PowerShell, it is an advanced command-line tool for a Windows environment. Here is how you can format a USB drive using PowerShell.
Launch Windows PowerShell with administrative privileges. Then type in Get-Disk to obtain disk information and note down the Number associated with the USB flash drive. Then, type in Clear-Disk -Number # -RemoteData. Replace the Hash with the number associated with the USB drive. Upon confirmation, enter A.

Now use the following cmdlet to create a new partition:
New-Partition -DiskNumber # -UseMaximumSize -IsActive -DriveLetter NewDriveLetter
Replace Hash with the number associated with the USB drive noted earlier, and NewDriveLetter with a new drive letter for the USB drive. Ensure that the drive letter is not in use by any other partition.
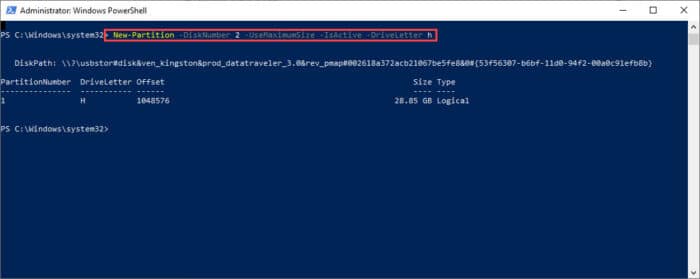
Once the partition has been created, it is time to format it. Use the following command:
Format-Volume -DriveLetter NewDriveLetter -FileSystem FileSystem -NewFileSystemLabel VolumeLabel
Replace NewDriveLetter with the same drive letter you had assigned while creating the partition, FileSystem with the file system format you want to format the USB drive with, and VolumeLabel with the new volume label for the USB. Here is how we formatted our USB drive using PowerShell:

Closing words
Although we have already discussed multiple ways to format your USB drive, we still think that using File Explorer is the easiest and the most convenient way to get the job done. However, we are sure some of our audience would still prefer to use the Command Line Interface.
Standard users only want to use their USB flash drivers to carry and transfer data, without having to think twice about what formatting is. However, it is a crucial part of the process, as what systems and what size files are supported are dependent upon it.


