The Windows operating system comes with a taskbar, located at the bottom of the screen by default. The taskbar holds the Start Menu, Search bar, and Cortana, amongst other application icons for quick and direct access. You can also pin your favorite apps here.
If you have ever had the privilege of performing a clean Windows 11/10 installation, you will know that the taskbar is appearing by default. it is always on top and accessible, except when you have windows open in full-screen mode.
That said, Windows allows you to set it to auto-hide, which means the taskbar will disappear when not in use, and reappear when you hover over the taskbar area. Hiding the taskbar will increase the vertical space on your screen for other apps to display more content.
Today we are going to discuss the different methods you can adapt to hide or show the taskbar on a Windows 11/10 computer.
Table of Contents
You can enable or disable the taskbar auto-hide feature using the following methods:
- From the Settings app
- From Windows registry
- From the Command Prompt
- From Windows PowerShell
The first 2 methods listed above have been discussed separately for Windows 10 and Windows 11 below as some of the steps involved are different for different operating systems. However, the methods involving the command line are common for both and thus have been combined.
How to Hide/Show Taskbar in Windows 11
From Setting App
Perform the following steps to enable the taskbar auto-hide feature in Windows 11:
-
Navigate to the following:
Settings app >> Personalization >> Taskbar
-
Here, expand “Taskbar behaviors” which is the last option on the page, and then check the box next to Automatically hide the taskbar.

Enable auto-hiding taskbar feature
The taskbar will now be hidden on your monitor. If you have multiple monitors connected, you will observe the changes across all of them. You may now hover your mouse cursor over the taskbar area to make it pop up. When you hover away, the taskbar will hide again.
If you wish to disable the auto-hide taskbar feature, simply uncheck the box next to Automatically hide the taskbar.
Note: If the taskbar is not hidden, you can try these fixes or adapt the other methods given below in this article.
From Windows Registry
If the method above did not work for you, try hiding/showing the taskbar through the Windows registry. Here is how:
Note: Misconfiguration of critical values in the system’s registry could be fatal for your operating system. Therefore, we insist that you create a system restore point before proceeding forward with the process.
-
Open the Registry Editor by typing in regedit in the Run Command box.

Open the Registry Editor -
Now paste the following into the navigation bar at the top for quick navigation:
Computer\HKEY_CURRENT_USER\Software\Microsoft\Windows\CurrentVersion\Explorer\StuckRects3

Quick navigation -
Here, you shall see the Settings value. Double-click it. In the Edit Binary Value popup, double-click the first entry in front of the “00000008” Value Data.
This is the first entry in the 2nd row, usually written as 7A.

Select entry to edit -
Replace this entry with 7B (instead of 7A) and then click Ok.

Make changes to the registry -
Now restart the explorer.exe process for the changes to take effect.
Once you restart explorer.exe, you will notice that the taskbar has gone into hiding. Furthermore, you should still be able to control the taskbar behavior from the Settings app as usual (if it worked in the first place).
If you wish to disable the taskbar’s auto-hide feature, simply return to the Settings value using the Registry Editor, replace the 7B entry with 7A, and then restart explorer.exe again.
How to Hide/Show Taskbar in Windows 10
Things are slightly different for Windows 10 when enabling or disabling the auto-hide taskbar feature in Windows 10 using the Settings app or the Registry Editor.
From Setting App
Perform the following steps to enable the auto-hide taskbar feature in Windows 10 using the Settings app:
-
Navigate to the following:
Settings app >> Personalization >> Taskbar
-
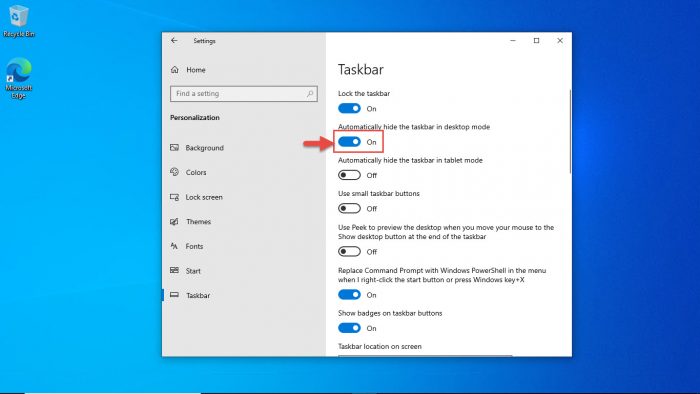
Here, toggle the slider under “Automatically hide the taskbar in desktop mode” into the On position.

Enable auto-hiding taskbar feature
The taskbar will now go into hiding and only appear when you hover your mouse cursor over the area. If you wish to disable the auto-hide taskbar feature, simply toggle the slider into the Off position under “Automatically hide the taskbar in desktop mode.”
If this method does not work for you, you can try these fixes or adapt to the methods given below.
From Windows Registry
Note: Misconfiguration of critical values in the system’s registry could be fatal for your operating system. Therefore, we insist that you create a system restore point before proceeding forward with the process.
-
Open the Registry Editor by typing in regedit in the Run Command box.

Open Registry Editor -
Now paste the following in the navigation bar at the top for quick navigation:
Computer\HKEY_CURRENT_USER\Software\Microsoft\Windows\CurrentVersion\Explorer\StuckRects3

Quick navigation -
Here, you shall see the Settings value. Double-click it. In the Edit Binary Value popup, Double-click the first entry in front of the “00000008” Value Data.
This is the first entry in the 2nd row, usually written as 02.

Select entry to edit -
Replace this entry with 03 (instead of 02) and then click Ok.

Make changes to registry -
Now restart the explorer.exe process for the changes to take effect.
Once you restart explorer.exe, you will notice that the taskbar has been hidden and will show when you hover over the area. If you wish to disable the auto-hide taskbar feature, simply replace 03 with 02 in the Settings value, and then restart explorer.exe.
Enable/Disable Auto-Hide Taskbar Feature in Windows 11/10
We are now going to show you how to show or hide the taskbar in Windows 11/10 using the Command Line Interface (CLI). These methods work for both the operating systems.
From Command Prompt
-
Now enter the following cmdlet to hide the taskbar.
powershell -command "&{$p='HKCU:SOFTWARE\Microsoft\Windows\CurrentVersion\Explorer\StuckRects3';$v=(Get-ItemProperty -Path $p).Settings;$v[8]=3;&Set-ItemProperty -Path $p -Name Settings -Value $v;&Stop-Process -f -ProcessName explorer}"
Hide taskbar from Command Prompt
As you can see in the image above, running the cmdlet has hidden the taskbar. If you wish to unhide the taskbar, then use the following cmdlet.
powershell -command "&{$p='HKCU:SOFTWARE\Microsoft\Windows\CurrentVersion\Explorer\StuckRects3';$v=(Get-ItemProperty -Path $p).Settings;$v[8]=2;&Set-ItemProperty -Path $p -Name Settings -Value $v;&Stop-Process -f -ProcessName explorer}"
From Windows PowerShell
-
Now enter the following cmdlet to hide the taskbar:
&{$p='HKCU:SOFTWARE\Microsoft\Windows\CurrentVersion\Explorer\StuckRects3';$v=(Get-ItemProperty -Path $p).Settings;$v[8]=3;&Set-ItemProperty -Path $p -Name Settings -Value $v;&Stop-Process -f -ProcessName explorer}
Hide taskbar using PowerShell
The taskbar will now be hidden and will pop up when you hover your mouse cursor over the area.
If you want to unhide the taskbar, then enter the following cmdlet in PowerShell:
&{$p='HKCU:SOFTWARE\Microsoft\Windows\CurrentVersion\Explorer\StuckRects3';$v=(Get-ItemProperty -Path $p).Settings;$v[8]=2;&Set-ItemProperty -Path $p -Name Settings -Value $v;&Stop-Process -f -ProcessName explorer}
Closing Words
We have discussed above the 4 different methods you can adapt to show or hide the taskbar on a Windows 11 or 10 computer. If the conventional method fails, which is through the Settings app, we recommend using either the Command Prompt or Windows PowerShell to hide or show the taskbar. If that fails too, only then do we suggest the method using the Registry Editor.
That said, if you are still facing a problem enabling or disabling the auto-hide taskbar feature, you can try out these fixes, or make an attempt to repair your operating system with the DISM and the SFC tools.


