Microsoft recently announced that .NET could now be installed via command line on a Windows computer using the Windows Package Manager (winget) command-line tool. This is a tool that specializes in installing, removing, upgrading, and configuring apps and components.
Although it comes preinstalled in Windows 10 and 11, you can still download it from GitHub or Microsoft Store if running an earlier Windows version.
Using winget, you can now install any version of .NET or .NET Framework on a Windows PC directly from the command line, without worrying about the configurations. This is especially useful for sysadmins to deploy .NET on mass computers.
Let us now show you how to install any .NET version as well as other related components using the winget tool.
Table of Contents
Which .NET Components can Winget Install
Currently, winget can be used to install the following .NET versions and components:
- Uninstall Tool
- Microsoft .NET Core SDK Uninstall Tool
- .NET Framework
- .NET Framework 4.8
- .NET SDK
- Microsoft .NET SDK 7.0 Preview
- Microsoft .NET SDK 6.0
- Microsoft .NET SDK 5.0
- Microsoft .NET SDK 3.1
- .NET Runtime
- Microsoft .NET Runtime 7.0 Preview
- Microsoft .NET Runtime 6.0
- Microsoft .NET Runtime 5.0
- Microsoft .NET Runtime 3.1
- ASP.NET Core
- Microsoft ASP.NET Core Hosting Bundle 7.0 Preview
- Microsoft ASP.NET Core Hosting Bundle 6.0
- Microsoft ASP.NET Core Hosting Bundle 5.0
- Microsoft ASP.NET Core Hosting Bundle 3.1
- .NET Desktop Runtime
- Microsoft .NET Windows Desktop Runtime 7.0 Preview
- Microsoft .NET Windows Desktop Runtime 6.0
- Microsoft .NET Windows Desktop Runtime 5.0
- Microsoft .NET Windows Desktop Runtime 3.1
- ASP.NET Core Runtime
- Microsoft ASP.NET Core Runtime 7.0 Preview
- Microsoft ASP.NET Core Runtime 6.0
- Microsoft ASP.NET Core Runtime 5.0
- Microsoft ASP.NET Core Runtime 3.1
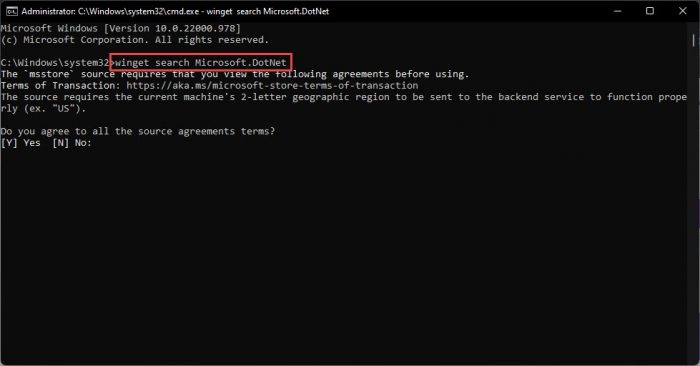
To check which .NET packages are available to install, run the following cmdlet on an elevated Command Prompt:
Note: You may need to agree to terms and conditions by entering “Y” if running winget for the first time.
winget search Microsoft.DotNet
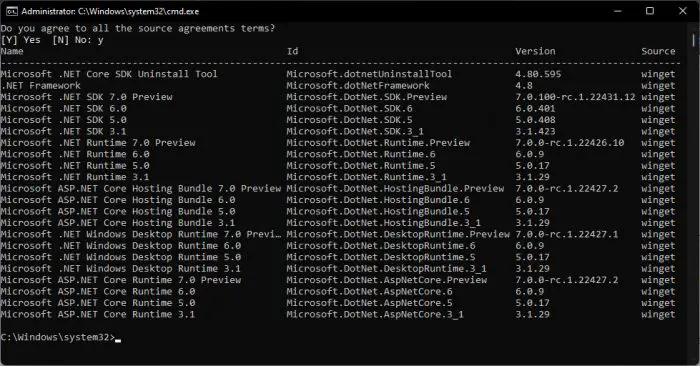
You will now see a complete list of available .NET packages that can be installed, along with their details which include the package IDs and complete version details.

You can now use this information to install the right .NET package.
Install Any .NET Version from Command Prompt
Now that you know which versions and packages can be installed using winget, you can use a simple command to install it using the associated package ID, using this syntax in an elevated Command Prompt:
winget install PackageIDSubstitute PackageID with the full name of the package, as in the example in the image below:

It will take a few seconds for the package(s) to download and install. You may also see an installation wizard automatically processing the installation pop-up briefly.
Additionally, you can also specify the architecture for the installation, for example, x64, x86, or Arm64, using this cmdlet:
winget install --architecture x64 ProductIDYou can replace the ProductID associated with the package you want to install, and “x64” with your specific hardware architecture.
Uninstall .NET from Command Prompt
You can also remove/uninstall .NET using the winget command line tool. Use the given cmdlet and replace ProductID with the one you wish to remove:
Learn how to check installed .NET version(s).
winget uninstall ProductID
Update .NET Version using Command Prompt
You can also update your .NET version if one is available using the Windows Package Manager. However, technically, it does not upgrade it but intimates you if an update is available. If one is, then you can install the latest version using the winget install cmdlet shared above in this post.
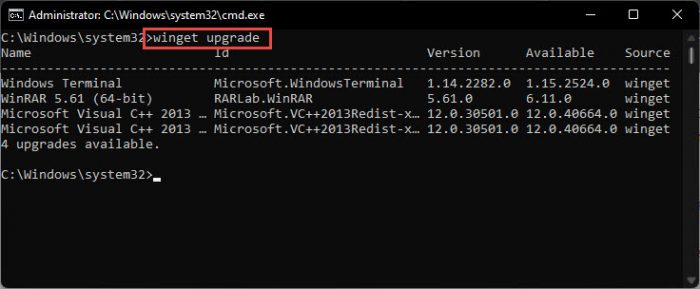
Enter the following command in an elevated Command Prompt to check for available updates.
winget upgrade
If a .NET update is available, it will be listed here. You can then update the desired package using the install cmdlet.
Closing Thoughts
Although there are other methods to install the different .NET versions on a Windows PC, one might prefer using the Windows Package Manager (winget) since it involves minimum navigation and can install multiple versions, all from the same place.
One does not need to search and download the desired version first from the internet and then execute it and follow through with the installation wizard. All of this is done using a single command.
That said, winget might just become popular amongst sysadmins that often need to install .NET on a plethora of computers, making it easier and time-saving.


