BitLocker is a built-in tool in Windows used to encrypt your data and keep it secure. We have already discussed how to enable, disable, and manage BitLocker using the Graphical User Interface (GUI) in Windows. In this post, we shall be discussing how you can achieve the same using just the Command Line Interface (CLI).
Table of Contents
There are many options that the command line offers while managing BitLocker which the BitLocker Drive Encryption manager (in the Control Panel) does not offer. Therefore, managing BitLocker using Command Prompt can prove useful, especially for system administrators.
This post discusses how you can enable and disable BitLocker encryption on the operating system (boot) drives as well as fixed drives, set passwords, and create a USB Recovery Key for unlocking. All this is done using the manage-bde.exe command-line tool designed to manage BitLocker on the local machine.
Note that all commands in this post are executed in Command Prompt with elevated privileges, unless told otherwise.
How to Check BitLocker Encryption Status using Command Line
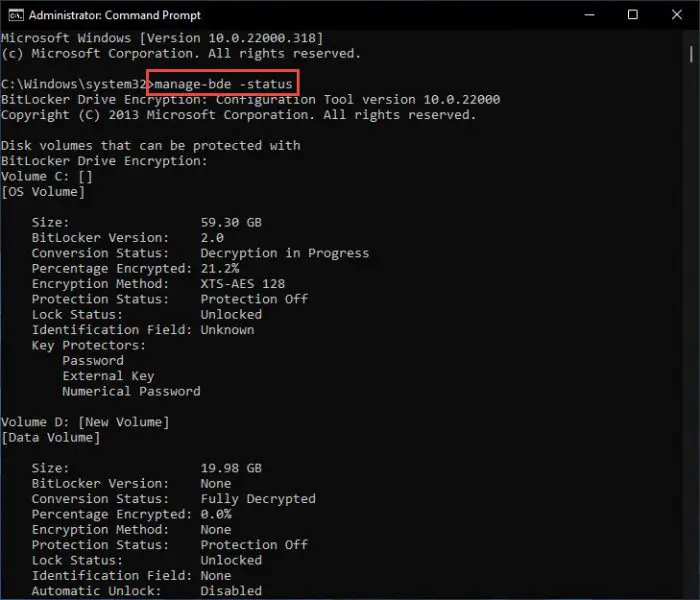
We will start by checking the current status of BitLocker, where we will get its version, encryption state, percentage of the partition encrypted (if any), and whether the volume is currently locked or unlocked.
To know the current encryption status for all volumes on the device, paste the following command in Command Prompt:
manage-bde -status
You will now see the status of each volume on your computer, as in the image below.
You can now continue to the steps below to enable and manage your BitLocker encryption.
How to Enable BitLocker using Command Line
There are 2 types of volume partition on a computer: a volume that contains the operating system (usually labeled C:) and the non-boot drives/volumes. When configuring BitLocker on a boot drive, you do not need to enable the auto-unlocking feature as it unlocks automatically using either the Recovery Key or the pre-boot password.
Whereas in the case of a non-boot drive, the auto-unlocking feature can be enabled (but is not mandatory) so you do not have to unlock it separately after you have logged into your system. This is discussed in detail further down the article.
Furthermore, you can choose whether to unlock BitLocker encryption using just the Recovery Key (can also be saved on a USB flash drive to be used as a key), or configure a PIN/password, or use both.
Enable BitLocker with Only Recovery Key
If you want to use only the Recovery Key, you need a secondary partition (which is not locked) where you can store the Recovery Key having the .bek file extension. You can also use a USB flash drive to store that key, which will then act as the unlocking key for your PC.
The complete syntax for enabling BitLocker is as follows:
manage-bde -on c:
In the command above, we have enabled BitLocker on volume label C.
However, this can be combined with certain parameters that will generate a random 48-digit Recovery Key and store it to a location of our choice. In the example below, the command will enable BitLocker on the C drive, create a random Recovery Key, and save it to the D drive:
manage-bde -on c: -recoverykey d: -recoverypassword
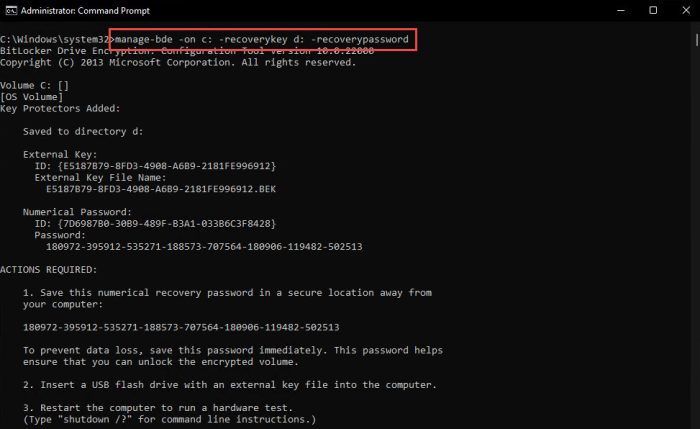
Since the Recovery Key is a hidden file, you will not be able to see it using the default File Explorer settings. So do not worry if you are unable to find the Recovery Key in the USB drive or any volume for that matter.
The system now needs to run a hardware test to start the encryption process. Restart the computer using the following command:
shutdown /r /t 1
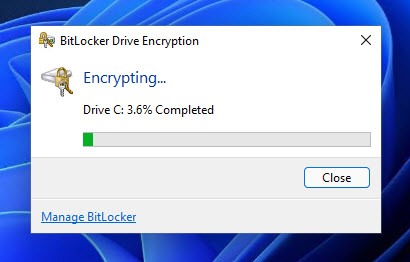
This will reboot your computer after one second. When it boots up again, keep the USB/volume connected to your system to unlock the OS drive. When you log in, you can see that your OS drive is being encrypted.
Enable BitLocker with PIN Authentication and Recovery Key
You can also set a PIN or a password on your drive to unlock it with or without a Recovery Key. We must warn you that in case you lose or forget your PIN/password and do not create a Recovery Key, accessing/recovering the encrypted data would be very difficult.
Before we proceed with configuring BitLocker with a PIN or a password, we must enable pre-boot password and Personal Identification Number (PIN) support for BitLocker.
The process of enabling PIN authentication requires the configuration of a Group Policy which we have discussed here. You may click this link to learn how to configure it using the Windows GUI.
Alternatively, you may download and execute the Windows Registry file (valid for Windows 10 and Windows 11) to automate the process for you given below. Here is how to run the .reg file successfully:
Wrongful manipulation of the Windows Registry can cause harm to your operating system. Therefore, we recommend that you create a system restore point before proceeding forward.
- Download the compressed file by clicking on the given link:
 Enable Pin for Bitlocker (Registry) (unknown, 1,625 hits)
 - Right-click on the downloaded file and extract it.

- Now navigate to the extracted folder and double-click the EnablePinForBitLocker file to run it.
- On the UAC prompt, click Yes.

- On the confirmation dialog box, click Yes again.

- On the next popup, click Ok.

- Now restart your computer for the changes to take effect.
After the computer reboots, you may proceed to configure BitLocker with only a PIN or password authentication. Enter the following command while replacing “C:” with the letter of the drive that you want to encrypt.
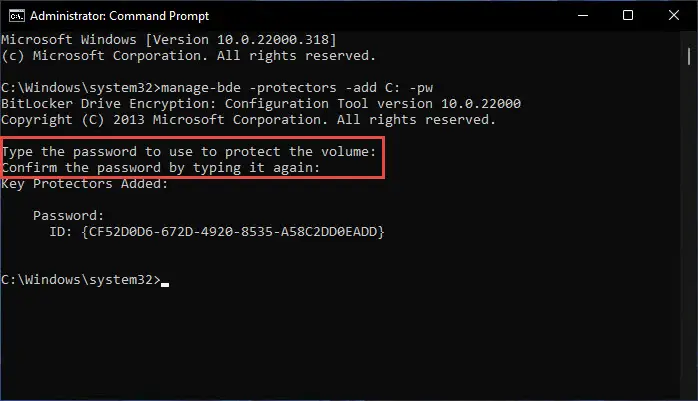
manage-bde -protectors -add C: -pw

You will now need to enter the password that you want to set and then reconfirm it. Press Enter each time after entering the password. If added successfully, you will see the message “Key protectors added.”
Now use the following command to enable BitLocker on the drive while saving the Recovery Key in another volume, just as we did in the previous section of this article:
manage-bde -on c: -recoverykey d: -recoverypassword

Note: You can also use only the first half of the command above (manage-bde -on c:) to enable BitLocker but not create a Recovery Key.
Now restart your computer using the command below.
shutdown /r /t 1
As the computer reboots, you will be asked to enter the PIN/password (if the OS drive has been encrypted). Enter your credentials to unlock the drive and boot in.
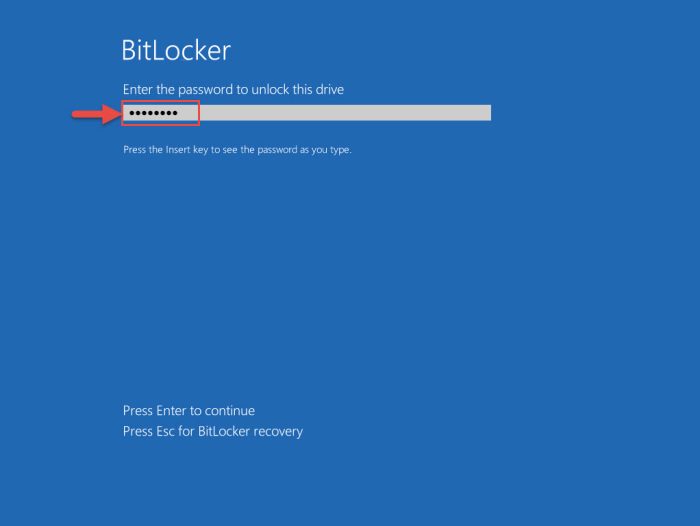
When you log in, you can see that the remainder of your volume is being encrypted. Allow the process to be completed.

How to Enable BitLocker Auto-Unlock Feature using Command Line
If you have enabled BitLocker on non-OS volume(s), then those will need to be unlocked manually after you have logged into your system, unless the auto-unlock feature is enabled. If not, you will see the volume locked, as in the image below, and will need to either provide the Recovery Key or enter the PIN/Password when trying to access it.
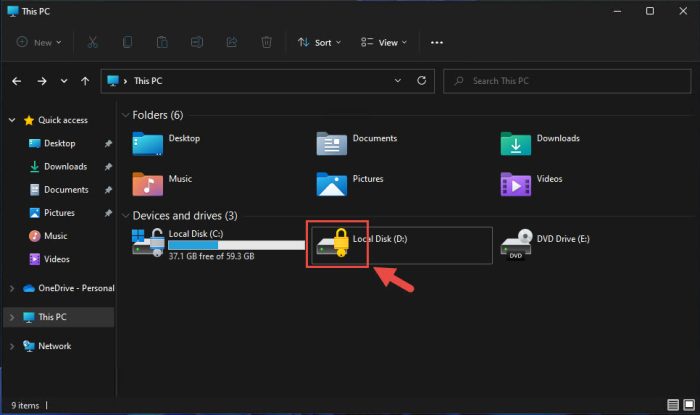
The auto-unlock feature will only unlock the non-OS drives automatically if the OS drive is initially unlocked using the BitLocker PIN/password or the Recovery Key.
Follow the steps below to enable BitLocker while configuring the auto-unlock feature on a volume:
Note that this feature does not need to be enabled on boot drives as they are automatically unlocked when the credentials are provided as the system is booting.
- Start by downloading the .reg file, extract it, and then run it.
 Enable Pin for Bitlocker (Registry) (unknown, 1,625 hits)
 - Now open Command Prompt with administrative privileges and use the following command to configure a PIN or a password. Replace “D:” with the drive letter of the volume that you want to encrypt:
manage-bde -protectors -add D: pw
- Then enter your password and reconfirm it. Hit Enter each time. You will see the message “Key Protectors Added” if the password has been configured successfully.

- Now enter the following command to enable the auto-unlock feature while replacing “D:” with the same drive letter:
manage-bde -autounock -enable D:
- Now enable BitLocker on the same drive by using the command below. You can add to the command to also create a Recovery Key, the same as we did in the previous section of this post.
manage-bde -on D:
The volume will now begin encryption. Using this technique, the non-OS volume(s) will automatically be accessible without any special authentication as soon as you log in using the Recovery Key or PIN/password for the boot drive upon startup.
How to Disable BitLocker Auto-Unlock Feature using Command Line
If you want to disable a drive’s auto-unlock feature, it needs to be first unlocked. Only then will you be able to remove the feature. If your drive is already unlocked, continue down to the next section.
Unlock BitLocker Drive using Command Line
- In the Command Prompt, enter the following command while replacing “D:” with the drive letter of the volume that you want to unlock:
manage-bde -unlock D: -pw
- Now enter the PIN/password for the drive and hit Enter.

Alternatively, you can also use the command below to provide the Recovery Key instead of the password to unlock the drive:
manage-bde -unlock D: -recoverykey "PathToRecoveryKey"
Your drive will now be unlocked. You may now move onto the next section to disable the auto-unlocking feature.
Disable BitLocker Auto-Unlock using Command Line
Once you have ensured that the drive is unlocked, use the given command while replacing “D:” with the drive letter that you want to disable the feature on:
manage-bde -autounlock -disable D:
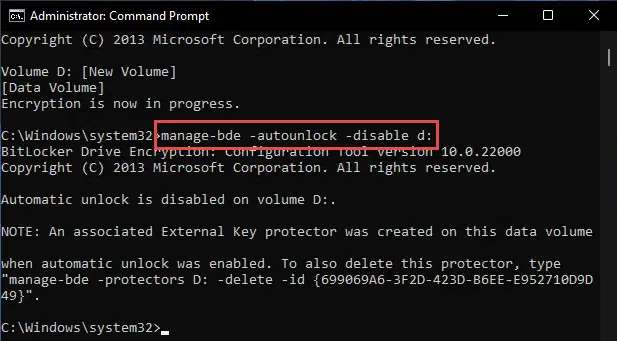
Automatic unlocking of the drive will now be disabled.
How to Turn Off BitLocker using Command Line
To turn off the BitLocker encryption on your drive, you first need to ensure that it is unlocked using the steps given above. You may then proceed to enter the following command in Command Prompt to disable BitLocker while replacing “D:” with your respective drive letter.
manage-bde -off D:

Manage-bde Syntax, Switches, and Parameters
As we mentioned before, manage-bde.exe provides a lot of other features to BitLocker which are not accessible through the GUI. Below is a list of the parameters of manage-bde and what they do:
| Parameter | Description |
|---|---|
| manage-bde -status | Provides information about all drives on the computer, whether or not they are BitLocker-protected. |
| manage-bde -on | Encrypts the drive and turns on BitLocker. |
| manage-bde -off | Decrypts the drive and turns off BitLocker. All key protectors are removed when decryption is complete. |
| manage-bde -pause | Pauses encryption or decryption. |
| manage-bde -resume | Resumes encryption or decryption. |
| manage-bde -lock | Prevents access to BitLocker-protected data. |
| manage-bde -unlock | Allows access to BitLocker-protected data with a recovery password or a recovery key. |
| manage-bde -autounlock | Manages automatic unlocking of data drives. |
| manage-bde -protectors | Manages protection methods for the encryption key. |
| manage-bde -tpm | Configures the computer’s Trusted Platform Module (TPM). This command isn’t supported on computers running Windows 8 or win8_server_2. To manage the TPM on these computers, use either the TPM Management MMC snap-in or the TPM Management cmdlets for Windows PowerShell. |
| manage-bde -setidentifier | Sets the drive identifier field on the drive to the value specified in the Provide the unique identifiers for your organization Group Policy setting. |
| manage-bde -ForceRecovery | Forces a BitLocker-protected drive into recovery mode on restart. This command deletes all TPM-related key protectors from the drive. When the computer restarts, only a recovery password or recovery key can be used to unlock the drive. |
| manage-bde -changepassword | Modifies the password for a data drive. |
| manage-bde -changepin | Modifies the PIN for an operating system drive. |
| manage-bde -changekey | Modifies the startup key for an operating system drive. |
| manage-bde -KeyPackage | Generates a key package for a drive. |
| manage-bde -upgrade | Upgrades the BitLocker version. |
| manage-bde -WipeFreeSpace | Wipes the free space on a drive. |
If stuck with these parameters, concatenate “/?” in front of the command and parameters in the Command Prompt to get more help. To learn more about these parameters, read Microsoft’s support page.
Similarly, the manage-bde protectors also have quite a few switches. Here’s a list:
| Parameter | Description |
|---|---|
| -get | Displays all the key protection methods enabled on the drive and provides their type and identifier (ID). |
| -add | Adds key protection methods as specified by using additional -add parameters. |
| -delete | Deletes key protection methods used by BitLocker. All key protectors will be removed from a drive unless the optional -delete parameters are used to specify which protectors to delete. When the last protector on a drive is deleted, BitLocker protection of the drive is disabled to ensure that access to data is not lost inadvertently. |
| -disable | Disables protection, which will allow anyone to access encrypted data by making the encryption key available unsecured on the drive. No key protectors are removed. Protection will be resumed the next time Windows is booted unless the optional -disable parameters are used to specify the reboot count. |
| -enable | Enables protection by removing the unsecured encryption key from the drive. All configured key protectors on the drive will be enforced. |
| -adbackup | Backs up recovery information for the drive specified to Active Directory Domain Services (AD DS). Append the -id parameter and specify the ID of a specific recovery key to back up. -id parameter is required. |
| -aadbackup | Backs up all recovery information for the drive specified to Azure Active Directory (Azure AD). Append the -id parameter and specify the ID of a specific recovery key to back up. -id parameter is required. |
<drive> | Represents a drive letter followed by a colon. |
| -computername | Specifies that manage-bde.exe will be used to modify BitLocker protection on a different computer. You can also use -cn as an abbreviated version of this command. |
<name> | Represents the name of the computer on which to modify BitLocker protection. Accepted values include the computer’s NetBIOS name and the computer’s IP address. |
Final Thoughts
There are quite a few things you can do just from the Command Prompt alone for BitLocker. We started this post with the most basic commands and what they do, then worked our way up so that it is easier for you to understand BitLocker through the command line.
There are similar tools also available in Windows to manage-bde, such as repair-bde, which you can use to recover lost encrypted data due to damaged hard disks.
If you are using an operating system that does not have BitLocker, you can try out these alternatives to keep your data safe.




2 comments
Luke
i stepped through your process and it seems like it is going to work after a reboot. The bitlocker screen appears and yet the password i put in and the recovery password do not work, it looks like it almost takes it but never does. it ends up in a loop and keeps asking password or recoverykey which neither work
any suggestions?
appreciate the assist
KMontoya87
If you are obtaining the unlock code via Microsoft account, you should see an identifier you can matchup with the appropriate key. Pay close attention to the characters you are inputing and before hitting enter check, confirm, recheck and reconfirm. Most users don’t use their function keys to input numbers on a day-to-day basis, so the method is vastly error prone – that’s by design. If it appears to be the correct key still, perhaps getting in contact with MS support to see if they can do anything may be in order.