

Key Points
- You can schedule emails for later using the outlook app or the web version with the “Schedule Send” option.
- Automated replies let you send out emails to senders to let them know that you may not be available.
- To configure automatic replies, go to Outlook Settings and open Automatic Replies settings.
Sending an important email at the right time so that it is immediately highlighted can be difficult. You may not be available to type out a lengthy email when you want the receiver to receive it. To overcome this obstacle, you can schedule an email so that the other party will receive it when you want it delivered. Microsoft Outlook is one such platform that offers scheduling emails.
Moreover, Outlook also provides native capabilities for automating replies. These are known as Out of Office (OOO) replies, which are automatically delivered to the other party that sends you an email. These The Out of Office automated emails are usually used to inform the other party that you are away for some time and cannot get back to them during the normal time tenure.
Microsoft Outlook is an email and calendar management platform. It also serves as an emailing client and has standalone apps for various platforms, including Windows and Android. On a computer, it can be installed as a Progressive Web App (PWA), and a standalone app that is part of the Microsoft Office suite and Microsoft 365.
This guide shows you how to schedule emails and configure automated replies in Outlook on the web, on an Android device, and through the standalone Outlook app.
Table of Contents
Why schedule emails or configure automated replies?
Scheduling emails allows your emails to be on the top of the receiver’s Inbox list. For instance, if you email your boss after office hours, and they do not check their emails until the next morning, the chances are that your email will fall below the list if other people have emailed the same receiver after you. By scheduling an email for the next morning, you can make sure that your email is the first they see as soon as they open their inbox.
Moreover, you can also schedule emails if you know you won’t be available at a given time. So instead of writing out emails and sending them when you need the other party to receive them, simply schedule them earlier.
Automated or “Out of Office” replies serve an entirely different purpose. These are the emails that are automatically sent to the email address that has messaged you. The purpose of such emails is to let them know that you have received the email, and will get back to them when you can.
Automated replies come in handy when you are traveling or going on a vacation and you know you won’t be able to respond to your emails promptly.
If you find yourself in either of these situations, you can schedule an email or configure automated replies from your PC or your mobile phone using this guide post.
Schedule emails in Outlook on the Web (PWA)
You can use the following guide to schedule emails in Outlook on the web, or if you have installed a PWA app on your computer.
-
Log into your Outlook account and click “New mail” at the top.
 Replies In Outlook 1")
Compose a new email -
Fill in the receiver’s email address, the subject, and the body of the email(or other information).
-
When the email is ready, click the down-arrow button next to Send, and then click “Schedule Send“.
 Replies In Outlook 2")
Schedule send -
Select a predefined time to send the email, or click “Custom time” to select your own.
 Replies In Outlook 3")
Set a custom scheduling time -
Now set a date and time for the email and then click Send.
 Replies In Outlook 4")
Schedule the email in Outlook for web
 Replies In Outlook 1")
 Replies In Outlook 2")
 Replies In Outlook 3")
 Replies In Outlook 4")
After performing the steps above, your email will be scheduled to go out at the defined time. However, in case you want to send it now or cancel it, go to the “Drafts” folder, open the email, and click Send to send it now, or simply delete the email if you do not want to send it at all.
Schedule emails in Outlook desktop app
If you are using the standalone Outlook app on your PC, then here is how you can schedule emails instead:
Note: Some settings may be different depending on your Outlook app or Office version.
-
Open the Outlook app and click “New email“.
 Replies In Outlook 5")
Compose a new email in Outlook app -
Compose the email as you want to, and when done, click Options in the top menu.
 Replies In Outlook 6")
Open the Options menu -
Click “Delay Delivery” in the ribbon menu.
Note: This option may be hidden away in a sub-menu depending on your Outlook or Office version.
 Replies In Outlook 7")
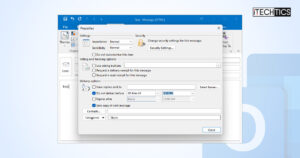
Delay email delivery -
Select “Do not deliver before” and then set the date and time to send out the email.
 Replies In Outlook 8")
Set the scheduled time to deliver the email -
When done, click Close.
-
Now click Send.
Clicking “Send” will not send the email right away – it will be sent as scheduled.
 Replies In Outlook 9")
Send the scheuled email
 Replies In Outlook 6")
 Replies In Outlook 7")
 Replies In Outlook 9")
To send a scheduled email or cancel it, you can find the email in the Outbox folder in the Outlook standalone app.
To cancel the email, simply delete it by clicking the red cross beside it.
 Replies In Outlook 10")
However, in case you want to send it out right now, you must open the email, switch to the Options menu, click “Delay Delivery” in the ribbon menu, and uncheck the option “Do not deliver before“. Then, clicking Send will send out the email immediately.
Schedule emails in Outlook for Android
On Android, you can use the following guide to schedule an email:
-
Open the Outlook app on your Android device and click “New email“.
 Replies In Outlook 11")
Click new email -
Compose the email and then click on the 3 dots in the bottom menu.
 Replies In Outlook 12")
Compose email and click 3 dots -
Click “Schedule Send“.
 Replies In Outlook 13")
Schedule the email -
Now select a predefined time to send the email, or click “Choose a time” for a custom time.
 Replies In Outlook 14")
Select a time or create custom time -
If you selected “Choose a time“, enter a date and time to send out the email and click SCHEDULE.
 Replies In Outlook 15")
Set a time and schedule
 Replies In Outlook 11")
 Replies In Outlook 12")
 Replies In Outlook 13")
 Replies In Outlook 14")
 Replies In Outlook 15")
The email will now be scheduled to be sent out at the defined date and time.
In case you want to cancel the email, you must delete it from the Drafts folder before it is sent out. You can also reschedule it by opening the email. You will be asked for a confirmation when editing the email. You can then click the 3 dots, and then click “Schedule Send“, and then enter a new schedule for the email.
That said, I found it interesting that there was no method to send the email right now. In case I wanted to send out a scheduled email using the Outlook app for Android, I must compose a new email or schedule it for an upcoming time so the email could be sent within the next half hour.
Set up Out of Office automated replies in Outlook on the Web (PWA)
You can also set up Out of Office automated emails on Outlook for all 3 platforms discussed above. If you are using the web version or a PWA for Outlook on your computer, then the following steps apply for configuring automated email replies in Outlook:
-
Open Outlook and click on the gear icon (Settings) in the top-right corner.
 Replies In Outlook 16")
Open Outlook settings -
Click Mail in the left pane, and then select “Automatic replies” in the middle pane.
 Replies In Outlook 17")
Automatic Replies settings -
Enable “Automatic replies on“.
-
Choose whether you only want to send out automatic replies during specific hours.
-
Write a message to be written in the automatic replies and click Save.
 Replies In Outlook 18")
Configure automatic replies in Outlook for web
 Replies In Outlook 16")
 Replies In Outlook 17")
 Replies In Outlook 18")
After performing these steps, all incoming emailers will receive automatic replies. If you have specified the hours, then the automatic emails will only be sent out during those hours.
In case you want to disable the Out of Office automatic replies, simply return to the same setting and toggle the “Automatic replies on” to Off.
Set up Out of Office automated replies in Outlook desktop app
If you are using the Outlook desktop app on your PC, then the steps to configure automated replies will be a bit different. Here is how you can configure automatic Out of Office replies in Outlook for desktop:
-
Open the Outlook app and click File in the top menu.
 Replies In Outlook 19")
Open Outlook file menu -
In the Info menu, click “Automatic Replies“.
 Replies In Outlook 20")
Open automatic replies setting in Outlook app -
Select “Send automatic replies“.
-
[Optional] Select “Only send during this time range” if you want to send automatic replies during specific hours, and then configure the time range.
-
Enter the message to send in the automatic email and then click OK.
 Replies In Outlook 21")
Configure automatic replies in the Outlook desktop app
 Replies In Outlook 19")
 Replies In Outlook 20")
When you are back in the office, you can disable this option by selecting “Do not send automatic emails“.
Set up Out of Office automated replies in Outlook for Android
You can also set up automatic replies in Outlook on your Android device through the Outlook app. Here is how:
-
Open the Outlook app and click on the Profile icon in the top-left corner.
 Replies In Outlook 22")
Open Outlook profile -
Click on the gear icon (Settings) in the bottom left corner.
 Replies In Outlook 23")
Open settings -
Select the email account to configure automatic replies.
 Replies In Outlook 24")
Click on the mail account -
Click “Automatic Replies“.
 Replies In Outlook 25")
Click Automatic replies -
Enable automatic replies.
 Replies In Outlook 26")
Enable automatic replies -
[Optional] Configure a time duration for the automatic replies.
-
Enter a message to be included in the automatic reply and then click the tick mark in the top-right corner.
 Replies In Outlook 27")
Set duration and message for automatic replies
 Replies In Outlook 22")
 Replies In Outlook 23")
 Replies In Outlook 24")
 Replies In Outlook 25")
 Replies In Outlook 26")
 Replies In Outlook 27")
After performing these steps, automated replies will be configured on your Outlook account.
In case you want to disable it, return to the Automatic replies settings and disable the feature.
Final thoughts
Sending emails doesn’t need to be hectic more than it already is. You can schedule emails in Outlook that will be delivered when you want them to, whether you are online or sleeping in bed. Moreover, you can also configure automatic replies to tell people not to expect a reply soon if you are out of the office for a long.
Outlook has an app for most platforms, including iOS and macOS. You can use the steps given above to set up automatic emails and scheduled emails on those devices as well as any others that either have an Outlook app or are capable of running the web version.


