Windows 10 sync settings allow a user to replicate their settings like themes, language preferences, passwords across multiple devices. This means you will get the same settings including the theme, Desktop wallpaper etc. wherever you login with your Microsoft ID.
You can easily enable or disable these sync settings in Windows 10. You can also choose what things to synchronize across Windows devices.

Table of Contents
How to enable or disable Sync Settings in Windows 10
If you are turning on the Sync settings for the very first time on your device, then it should not be much of a problem. All you need is an active Microsoft account and an Internet connection on the device.
To begin with, you must have a Microsoft user account on your device. If it is a regular local account, here is a guide on how to convert an existing account to a Microsoft account.
You can enable or disable the following items with Windows 10 sync settings:
- Account profile picture
- Command prompt defaults
- Passwords in Windows 10 Credentials Locker
- Date, time and regional settings
- Theme and wallpaper
- Microsoft Edge browser configurations
- Keyboard settings
- Language settings
- Mouse cursor settings
- Wifi profiles
Enable Sync Settings in Windows 10
If you are using a Microsoft user account, the synchronization settings are enabled by default. However, if you have disabled them, follow the steps below to enable Sync settings on a Windows 10 device.
- Navigate to the following location:
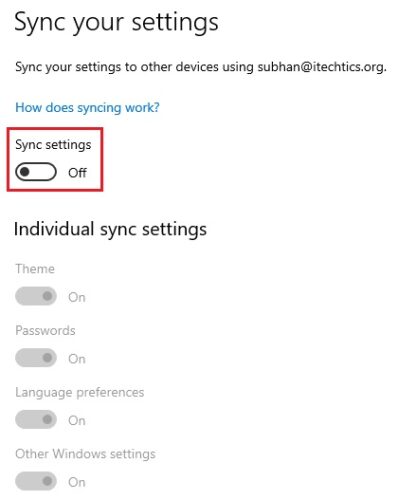
Start Menu -> Settings -> Accounts -> Sync your settings - Now ensure that all the switches are on beneath the settings that you want to sync.

- If you see the message “Your passwords won’t sync until you verify your identity on this device” as in the image above, navigate to Your info page.
- On the Your info page, click on verify beneath your profile information.

- On the next screen, click on one of the verification processes. Since ours only has an email address, we will click on it.

- You shall now receive a code on the selected verification method. Access that code and enter it in the next window. Click on Verify.

- Once the verification process is complete, return to the Sync your settings window and you should be able to enable the Passwords syncing across all your devices as well.

Your device settings will now be synced across all your devices running Windows 10 and having the same Microsoft user account.
You can use the guide below to disable the synchronization feature if you ever feel like it in the future.
Disable Sync Settings in Windows 10
Disabling the synchronization settings in Windows 10 is very simple. Navigate to the following location:
Start Menu -> Settings -> Accounts -> Sync your settings
Click on the slider below Sync settings to turn off all Individual sync settings altogether.

Alternatively, you can leave the slider below Sync settings on and individually turn off selective synchronization settings by disabling the sliders below them.

5 Ways to Fix Windows 10 Sync Settings Not Working
It might be possible that your settings aren’t syncing across all your devices, even when the settings are correct. This can be due to different reasons which we have addressed in the sections below. Try out these methods to troubleshoot and re-enable Windows 10 synchronization settings.
If some of your settings are greyed-out and you are seeing the message “Some of these settings are hidden or managed by your organization,” you can re-enable them through the Group Policy Editor and the Registry Editor.

Enable Sync Settings in Windows 10 using Group Policy Editor
The Group Policy Editor is a powerful utility in Windows 10. Follow the steps below to enable the synchronization options for your PC and gain back control.
- Launch the Group Policy Editor by typing in gpedit.msc in Run.
- Navigate to the following through the left pane:
Computer Configuration -> Administrative Templates -> Windows Components -> Sync your settings - Now double-click the associated policy on the right for which the option is greyed out. For example, if all the options in the Settings app are greyed-out, then double-click Do not sync. If the Passwords synchronization is greyed-out in the Settings app, double-click Do not sync passwords.

- You now have two options:
- Select the Disabled radio button and click on Apply and Ok. This will enable your sync settings and will then be manageable through the Settings app.

- Select the Enabled radio button, and then check the box next to “Allow users to turn syncing on.” Click on Apply and Ok when done. This will turn off syncing by default but the option will not be disabled.

- Select the Disabled radio button and click on Apply and Ok. This will enable your sync settings and will then be manageable through the Settings app.
- Now enter the following command in Command Prompt to implement the changes:
gpupdate /force
Enable Sync Settings in Windows 10 using Registry Editor
Similar results could also be achieved through the Registry Editor. However, it is recommended that you create a restore point before proceeding to the steps below as wrongly changing the system registries could result in the OS being corrupted permanently.
- Launch the Registry Editor by typing in regedit in Run.
- Navigate to the following location from the left pane:
HKEY_Local_Machine -> Software -> Policies -> Microsoft -> Windows -> SettingSync - Right-click SettingSync, expand New, and then click on DWORD (32-Bit) Value. Name this new DWORD as “DisableSettingSync.”

- Right-click SettingSync again and create another DWORD. Name this one as “DisableSyncSettingUserOverride.”

- Double-click the new DWORDs and set the Value Data of both to 0, then click Ok

- Restart the computer to implement the changes.
You should now be able to manage the synchronization settings of your account. In case you wish to disable this feature in the future, return to the DWORDs and set the Value Data of DisableSettingSync to 2, and DisableSettingSyncUserOverride to 1.

Run Microsoft account troubleshooter
If you are still unable to get your device to sync properly, you can run the troubleshooter. Although Windows 10 comes with a built-in troubleshooter, it does not have a dedicated troubleshooter for the Microsoft account. Nonetheless, you can download it separately from the link provided below:
Microsoft account troubleshooter [140 KB]
When downloaded, execute the program. On the Microsoft Accounts Wizard, click on Next to begin the scan.

The wizard will now begin searching for any possible anomalies with your Microsoft account.

Perform any action recommended by it and then close the wizard. Reboot the computer and try using the synchronization settings again.
Scan and fix corrupted system files
One of the reasons the synchronization settings might not be working is due to corrupted or missing system files. Thankfully, Windows 10 has built-in scanners that will replace corrupted or missing files with fresh ones.
- Launch the Command Prompt with administrative privileges.
- Run the following command and a scan shall begin:
sfc /scannow
- Once the scan completes, enter the following command to restore your Operating System’s health. This step can take a few minutes to complete.
DISM /Online /Cleanup-Image /RestoreHealth
- Once it finishes, reboot the computer.
Try syncing your account settings again. If the issue persists, continue to the following steps to mediate it.
Re-synchronize your Microsoft account with all devices
Since all of your synced settings are backed up onto Microsoft’s cloud, it might be possible that that data might have been corrupted. Therefore, we are going to perform the following few tasks, in the order mentioned, on all of the devices that are signed in with your Microsoft account but are not syncing.
- Switch your existing Microsoft user account to a local account.
- Remove the Microsoft account from the user account.
- Clear synced settings.
- Resync the Microsoft account to the user account.
Follow the steps below to perform all of the mentioned tasks in the same order:
- First, you must convert your Microsoft user account to a local user account. Click on the link for a complete guide on how to do it. Note that it requires you to sign out and therefore save all your data.
- You have to remove the account from the device entirely. To do so, navigate to the following:
Start Menu -> Settings -> Accounts -> Email & accounts - Click on the Microsoft account that you were using to sign into this user account, and then click on Remove. In the confirmation box, click Yes.

- Perform steps 1 through 3 on all devices experiencing synchronization issues.
- Once the account has been removed from all devices, you will need to clear the synchronized cache from your Microsoft account. Log into your Microsoft account from any browser, expand the settings by clicking on your picture in the top-right corner, and click on My account.

- Click on All devices under Devices. You may be prompted to re-enter your password at this point.

- Scroll down to the next page and click on Clear synced settings under Cloud synced settings.

- Click on Clear on the confirmation dialog box.

- Now, all that is left for you to do is login to the device using your Microsoft account again. For this, here is a detailed guide on how to convert a local user account to a Microsoft account.
- Once done, reboot your computer and ensure that your sync settings are enabled.
This approach will ensure that the new settings are synced across all devices from scratch.
Closing words
As you may have experienced, there can be a number of reasons why your settings are not synchronizing across all devices. The issue can also occur due to bad internet service, but that is rarely the case. Moreover, outdated Windows versions may also be a reason. Hence, it is advised to always keep your OS up to date.
Individuals using the sync feature will find this feature exceptional as they do not have to adapt to different settings on different devices. You can now also use this feature by following our guide to restore your synchronization options.


