
Nowadays, most devices come with two network adapters: one is Ethernet and the other is a Wi-Fi network adapter. However, these numbers can increase depending upon the type of system (standard or server), or which applications you are running on it (since hypervisors have their own virtual network adapters).
Windows 11 names these network adapters automatically, like Ethernet, vEthernet, Wi-Fi, Wi-Fi 2, etc. Moreover, when these adapters connect to a network, the network is also automatically named, except for Wi-Fis (These are usually named after the SSID of the wireless router/access point). So it can get quite confusing when there are multiple network adapters and multiple networks to connect to. Which is which?
Table of Contents
This article illustrates how you can change and customize your network’s and your network adapter’s names so that you are clear which adapter is connected to which network and avoid confusion.
Before we begin, let us show you how you can check your current network and network adapter’s names.
How to Check Network and Network Adapter Names in Windows 11
Through the Control Panel
The Control Panel is a quick way to check your current network adapters and what their names are. If they are connected to a network, you can also check out the network names.
Launch the Network Connections page in the Control Panel by typing in ncpa.cpl in Run. You should now be able to see all the network adapters on your device in the Control Panel window.

In this window, you can see the names of the network adapters on your device. We have highlighted them in the image below:

Along with the names of the network adapters, you will also see the names of the networks to which they are connected. These have been highlighted in the image below:

In the examples above, we have a total of 7 (physical and virtual) network adapters. Ethernet is connected to a network named “Network,” while Wi-Fi is bridged with vEthernet (External) and is connected to a network named “IGNITION.”
Through the Settings App
You can also check the network and network adapter names through the Settings app in Windows 11. To do so, navigate to the following:
Settings app >> Network & Internet >> Advanced network settings
You can see the names of the network adapters and the networks below the Network Adapters category:

How to Change Network Adapter Names in Windows 11
We shall now discuss how you can change the adapter names on a Windows11 machine. If you are looking to change the network name, refer to the next section of this post.
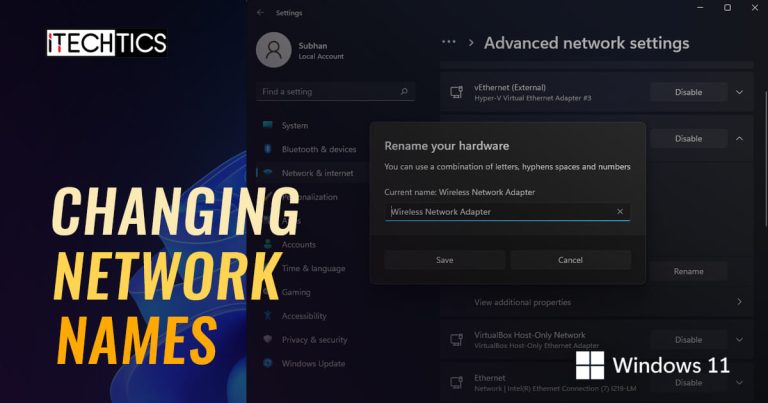
Using the Settings app
- Navigate to the following:
Settings app >> Network & Internet >> Advanced network settings - Now click on the down arrow in front of the adapter you want to change the name of, and then click Rename.

- In the popup window, enter a new name for the adapter in the text field, and then click Save.

Using the Control Panel
- Launch the Network Connections page in the Control Panel by typing in ncpa.cpl in Run.
- Right-click on the network adapter that you wish to change the name of, and then click Rename.

- Now enter the new name for the network adapter and hit Enter on the keyboard when done.

Using Windows Registry
Wrongful manipulation of the Windows Registry can turn fatal for your operating system. Therefore, we suggest that you create a system restore point before making any of the following changes:
- Open the Registry Editor by typing in regedit in Run.
- Now paste the following into the address bar at the top of the editor for quick navigation:
Computer\HKEY_LOCAL_MACHINE\SYSTEM\CurrentControlSet\Control\Network
- From the left pane, expand the first Key within Network, and then the first Key within that Key, then click the Connection key.

- Now look for the current network adapter name under Data Value (in front of Name) in the right pane.

- Now repeat steps 3 & 4 while expanding the remaining Keys and click on the Connections key till the moment you find the network adapter you need to rename.
- Once found, double-click Name.

- Now enter the new name for the network adapter and then click Ok.

- Now close the Registry Editor and restart the explorer.exe process.
Using Windows PowerShell
Before you begin, note down the current name of the network adapter that you want to change using one of the 2 methods stated in the last section of this post.
- Open Windows PowerShell with administrative privileges.
- Now use the following command to rename the network adapter while replacing CurrentName with the name of the network adapter that you wish to change, and NewName with a new name for the adapter:
Rename-NetAdapter -Name "<em>CurrentName</em>" -NewName "<em>NewName</em>"
So far we have discussed 4 methods to change the names for the network adapters. Let us now move on to see how to change the names for the networks only.
How to Change Network Names in Windows 11
Using Local Security Policy Editor
- Open the Local Security Policy editor by typing in secpol.msc in Run.
- Click on Network List Manager Policies under Security Settings in the left pane.

- Now double-click the network name that you want to change in the right pane.
- In the Netowrk Properties window, under the Network name tab, select the Name radio button and then enter the new name for the network in the text field. Once done, click Apply and Ok.

- Now run the following command in Command Prompt with administrative privileges for the changes to take effect.
gpupdate /force
Using Windows Registry
Wrongful manipulation of the Windows Registry can turn fatal for your operating system. Therefore, we suggest that you create a system restore point before making any of the following changes:
- Open the Registry Editor by typing in regedit in Run.
- Now paste the following into the address bar at the top of the editor for quick navigation:
Computer\HKEY_LOCAL_MACHINE\SOFTWARE\Microsoft\Windows NT\CurrentVersion\NetworkList\Profiles
- Now click on each Key below Profiles and check the ProfileName in the right-hand pane to look for the network name that you want to change.

- Once you have found the network name that you want to change, double-click on ProfileName. Enter the new name for the network under Value Data and then click OK.

- Now restart your computer for the changes to take effect.
FAQs
What is the difference between Network and Network Adapter?
The network defines a set of devices connected wirelessly, or via cables. The network adapter is a wireless or ported connection on a device that is used by the system to connect to the network.
How do I rename my Network Adapter?
Open the Network Connections page by typing in ncpa.cpl in Run. Then right-click on the adapter and click Rename from the context menu.
What is my network adapter name?
Windows automatically sets the name for the network adapters. To check your network adapter name, open the Connections Manager by typing in ncpa.cpl in Run and you will see all the network interfaces (virtual and physical) with their names.


