The best way to fix a printer not printing in a Windows computer is either to restart both the computer and the printer or clear the print queue from the Windows print spooler, which is in charge of managing the printing process.
A stuck printing job on a PC can be annoying as it does not just hang the current print but also the printing jobs behind it. If you have tried deleting the faulty printing job and it still exists in the queue in the state “deleting” or “printing,” you can use the methods provided below to manage and clear the printer queue and begin printing with a fresh start.

Table of Contents
Before you clear the printing queue, you can also try to simply restart the printing service, which is the Print Spooler.
How to Restart Print Spooler
Perform the following steps to restart the Print Spooler on a Windows machine:
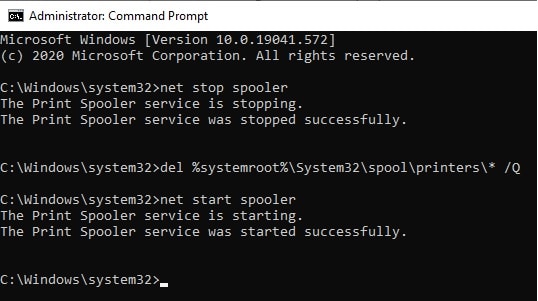
- Open the Command Prompt with administrative rights.
- Now paste the following command to stop the Print Spooler service.
net stop spooler
- Now use the following command to restart the service.
net start spooler
If restarting the spooler did not resolve the problem, you can now try clearing out the print queue.
How to Clear Print Spooler/Queue in Windows
When you perform an action to print an element, Windows does not send a print request directly to the printer. It first goes to a spooler within Windows where it sorts and queues the requests made. The print spooler service manages the list of print requests. Therefore, if one bad request chokes up the pipeline, none of the remaining requests can then make it to the printer.
If you cannot remove the bad print queues from your computer even after deleting them, you can resort to the methods below to remove them indefinitely without having to restart your PC every time.
Clear Print Queue Using Command Prompt
Command Prompt is an integral part of Windows as it aids administrators and regular users manage their Windows environment using the Command Line Interface (CLI).
You can use the guide below to clear all print elements in the queue:
- Open Command Prompt with administrative privileges. If you don’t open it with administrative privileges, you will get an access denied error.
- Now enter the following command in the order presented, one after the other:
You can now check that the queue has been cleared. You should now be able to send fresh printing requests without facing a blockage issue.
Clear Print Queue from Windows Services
You can also clear any troubling print queues without using the CLI. The technique used in the previous step can also be implemented through the GUI as well. Here is how:
- Open Windows Services by typing in services.msc in Run.

- Right-click the Print spooler service and then click Stop from the context menu.

- Leave the Services window open and enter the following in Run to open the destination folder “Printers” in File Explorer.
%systemroot%\System32\spool\printers\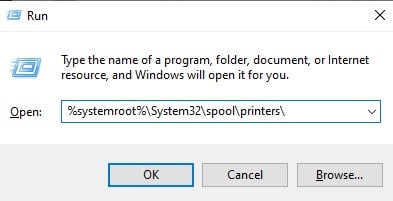
- Select everything in the folder by using the shortcut keys Ctrl + A and then delete the items.
- Now return to the Services window, right-click on Print spooler and click Start from the context menu.

These steps also perform the same function as with the Command Prompt above. You should now be able to send fresh print requests to the spooler.
How to Delete a Printer
From Print Management Console
The Print Management Console is a snap-in console in Windows used to manage configured printers on a computer. It can be used further to configure a printer, such as its ports, test the printer through a test page, etc. You may also manage the associated drivers for the printers.

Users can pause or resume ongoing printing jobs through this console. However, it does not allow you to clear the print queue. Nonetheless, it is still a useful utility to manage printers. It is especially useful for print servers installed to handle simultaneous printing tasks in an organizational structure.
There are 3 ways to access the Print Management console in Windows:
- Type in printmanagement.msc in Run.

- Navigate to the following through the Control Panel:
Control Panel >> System & Security >> Administrative tools (Windows Tools) >> Print Management - Type in mmc in Run, click add/remove snap-in under the File menu, select Print Management under Available snapins, then click on Add and Ok.
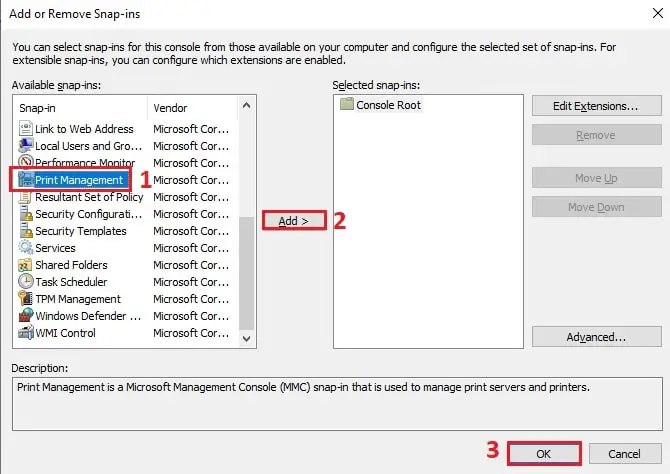
Once you have opened the Print Management Console, simply right-click on the printer that you want to remove and click Delete from the context menu.
From Control Panel
You can also remove a printer that is no longer being used by this device from the Control Panel. Here is how:
Note: There is no Print Management Console in the Windows Home editions. However, you can use the Devices and Printers option in the Control Panel to manage your printers and queues.
- Open the Control Panel and then change View by to Large icons.
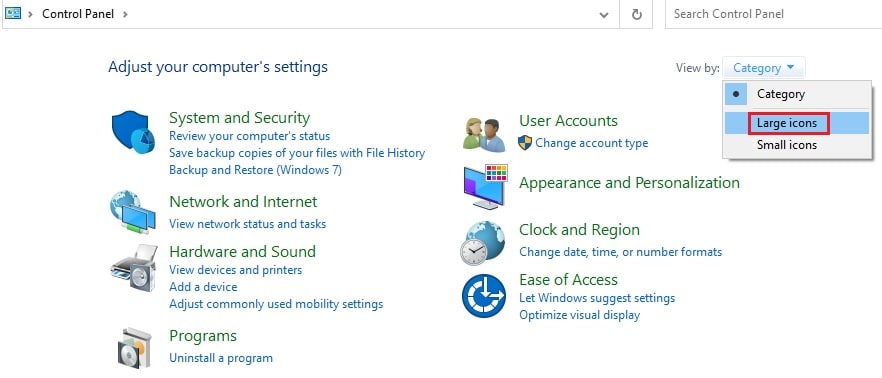
- Now select Devices and Printers.
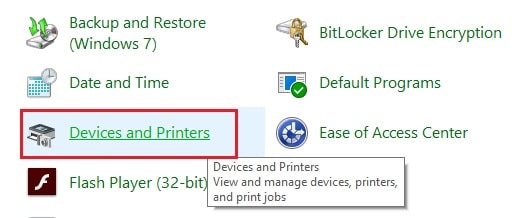
- Now right-click on the printer you wish to remove and then click Remove device from the context menu.
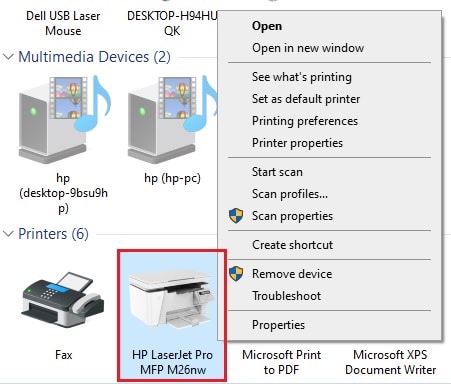
- When asked for a confirmation, click Yes.
From Windows Registry
if you’d prefer, you can also remove the printer directly from the Windows Registry. This method can be used when you are unable to remove it from any of the above-given methods.
Note: Misconfiguration of critical values in the system’s registry could be fatal for your operating system. Therefore, we insist that you create a system restore point before proceeding forward with the process.
- Open the Registry Editor by typing in regedit in Run.

- Now paste the following into the address bar at the top for quick navigation:
Computer\HKEY_CURRENT_USER\Printers\Connections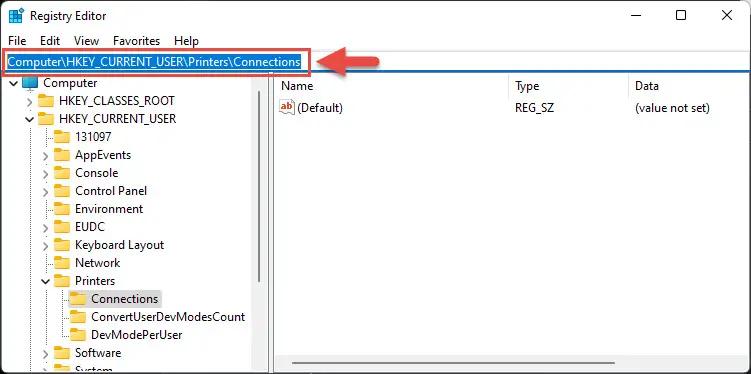
- Here you will find Keys under Connections containing the details for individual printers added to this PC. Right-click on the the Key associated with the printer that you want to remove and click Delete from the context menu.
How to Troubleshoot Printer Spooler
Windows 11 and Windows 10 come with preinstalled troubleshooter where the operating system automatically determines an error and tries to fix it. If the troubleshooter is unable to fix it, then we would suggest an action to be taken by you to fix it.
Here’s how to run this troubleshooter for printer-related issues:
- Navigate to the following:
Settings app >> System >> Troubleshoot >> Other troubleshooters - Here, click Run in front of Printer.
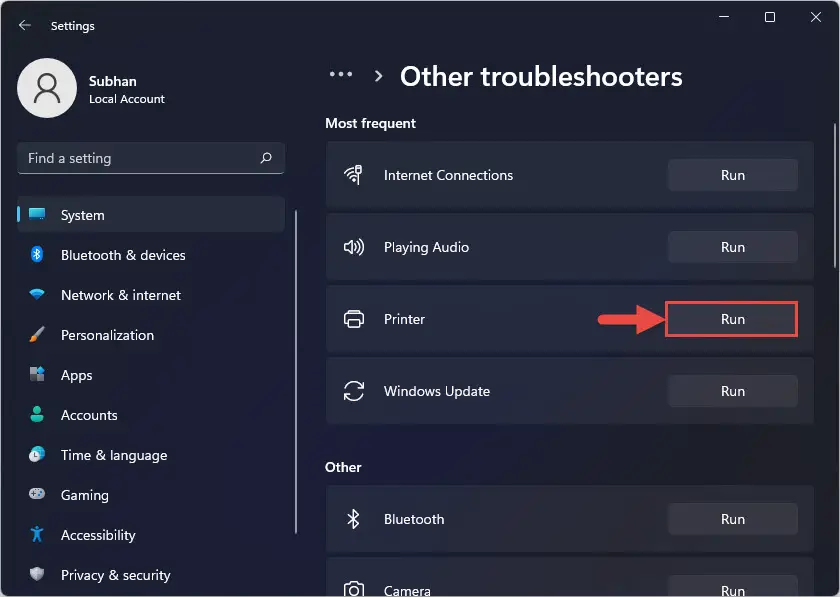
- Troubleshooting Wizard will now launch. From the first window, select which printer you want to troubleshoot, and click Next.

- The wizard will now start scanning for an issue and resolve it for you. If it asks you to perform an action instead, perform the task and then close the troubleshooter.
This should resolve any issues with the selected printer. However, if the issue persists, try reinstalling the printer driver manually. You can also backup your print queues and drivers before reinstalling them.
Closing Words
Continuously getting print jobs blocked can be frustrating. A user’s productivity is affected if they are not able to get their prints on time. Clearing out any choke pipelines in the print queue could clear passage for other jobs to continue.
If you are still ending up with the same printing task getting blocked, you might need to take a look at the printing settings and preferences, which can be accessed by using the Ctrl + Shift + P shortcut keys.


