Key Points
- Domain administrators can manage Windows Registries of devices added to the domain in bulk using Group Policy Objects.
Managed devices are those connected to your domain’s Active Directory, and a sysadmin can configure the rules and policies to apply to them. Things can get pretty complicated since there are so many things to manage, like network connectivity and permissions, access control, rights and privileges, etc.
While some policies can be applied using Group Policy, other more intricate policies need to be applied through the Windows Registry. You can modify the Windows Registries of the remote computers on your domain using Group Policy Preferences on the Domain Controller.
For example, you can turn on or off Windows Defender, enable Photo Viewer, change the network type, and do pretty much everything else that you can from the Windows Registry for all the computers or a specific Organizational Unit (OU) on the domain. In this article, we show you two methods to manage Windows Registries for remote computers on your domain.
Table of Contents
On this page
As mentioned before, there are two methods to manage and edit Windows Registries in an Active Directory Domain. One method is by using the built-in Group Policy Preferences Registry Browser, and the other is by manually specifying the path and other details for the registry key to modify. The former is considered the easier method as it automatically imports the details for the Windows Registry that you can then edit.
Manage Windows Registry using GPO Registry Wizard
Use the following steps to edit and manage Windows Registry values on remote computers within a domain:
-
On the Domain Controller, press the Windows Key + R to open the Run Command box.
-
Type in “gpmc.msc” to open the Group Policy Management Console.

Open the Group Policy Management Console -
Navigate to the following from the left pane:
Group Policy Management >> Forest: [ForestName] >> Domains >> [DomainName] >> Group Policy Objects
-
Right-click “Group Policy Objects” and click New.

Create a new GPO -
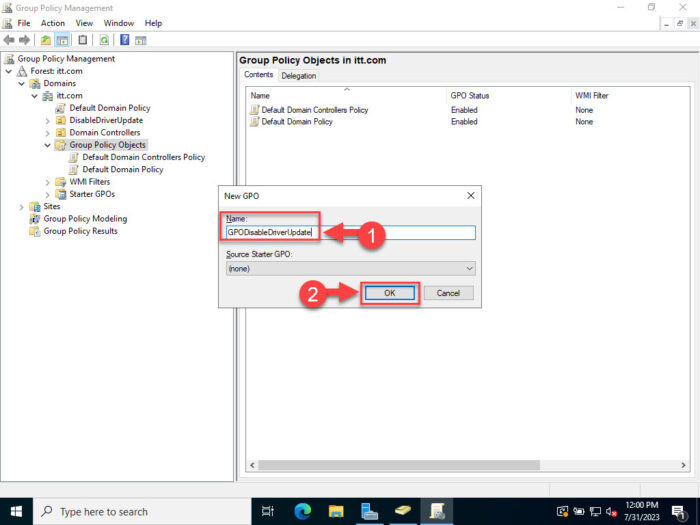
Enter a custom name for the GPO and click Ok.

Name the GPO -
Right-click the new GPO and click Edit.

Edit the GPO -
In the Group Policy Management Editor, navigate to the following from the left pane:
Computer/User Configuration >> Preferences >> Windows Settings >> Registry
-
Right-click “Registry,” expand New, and then click “Registry Wizard.”

Open the Registry Wizard -
Select “Another computer,” enter the remote computer’s name, and click Next.

Enter the remote computer’s name Note: If you see the error message “The network path was not found” while trying to connect to the remote PC, the remote PC could be turned off, the firewall could be blocking the connection, or the responsible Windows Service could be stopped.
Make sure that the computer is turned on, the firewall is disabled or the connection is allowed through the firewall, and run the following commands in an elevated Command Prompt on the remote PC to enable the RemoteRegistry service:
sc config remoteregistry start= demand
net start remoteregistry
Allow remote connection through the Registry Wizard -
Navigate to and expand to the Registry Key that you want to edit.
-
Select the Registry value by checking the adjacent box, and then click Finish.
This will import the remote Registry value(s) to the local server.
Note: You can select entire trees, or multiple Registry values to import.

Import the Registry value(s) to edit -
Back in the Group Policy Management Editor, expand the Registry tree in the left pane.

Expand the imported Registry tree -
Double-click the policy you want to edit from the right pane.
This will open the value’s Properties dialog box.
-
Make the necessary changes and then click Apply and Ok.
In this dialog box, you can choose an action (Create, Replace, Update, Delete) from the drop-down menu, the type of value, and the value data.

Edit the Windows Registry values -
Close the Group Policy Management Editor.
-
Back on the Group Policy Management Console, right-click on the OU you want to apply the policy to and click “Link an existing GPO.”

Link existing GPO to OU -
Select the GPO you edited and click Ok.

Select the GPO to link
This concludes the process of using the Group Policy Preferences wizard to apply Registry-level changes to one or more computers connected to your domain. After performing these steps, when the computers in the selected OU refresh the Group Policies applied to them, any Registry changes will be automatically updated.
Note that if the GPO is deleted, unlike from the OU, or a computer is moved out of the OU, the Registry values are not reverted to their original values.
Manually Manage, Edit Windows Registry using GPO
Another way to edit and manage the Windows Registry values of remote computers on your domain is by making the changes manually. Instead of importing the Registry keys and values first, you specify the target path, value, and value data manually.
Use the following steps to manage the Registry values of computers inside specific OUs:
-
On the Domain Controller, press the Windows Key + R to open the Run Command box.
-
Type in “gpmc.msc” to open the Group Policy Management Console.

Open the Group Policy Management Console -
Navigate to the following from the left pane:
Group Policy Management >> Forest: [ForestName] >> Domains >> [DomainName] >> Group Policy Objects
-
Right-click “Group Policy Objects” and click New.

Create a new GPO -
Enter a custom name for the GPO and click Ok.

Name the GPO -
Right-click the new GPO and click Edit.

Edit the GPO -
In the Group Policy Management Editor, navigate to the following from the left pane:
Computer/User Configuration >> Preferences >> Windows Settings >> Registry
-
Right-click “Registry,” expand New, and then click “Registry Item.”
A “New Registry Properties” box will pop up.

Add/update a new Registry item -
Select one of the following options from the drop-down menu in front of “Action:“
- Create
- Replace
- Update
- Delete
-
Select the Hive.
-
Enter the path for the value that you want to manage.
Note: Do not enter the name of the Hive in the key path.
-
Enter the precise name of the value that you want to create/modify.
-
Select the value’s type and enter its value data.

Enter the details for the Registry value to modify -
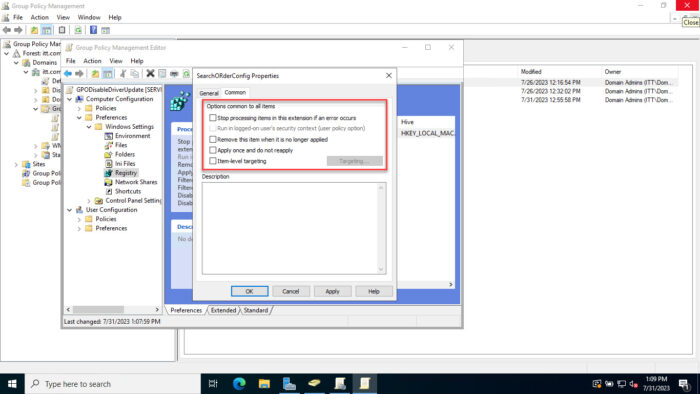
(Optional) Switch to the Common tab inside the Properties window to configure additional options.

Make optional changes to the Registry -
Click Apply and Ok when done.
-
Close the Group Policy Management Editor.
-
Back on the Group Policy Management Console, right-click on the OU you want to apply the policy to and click “Link an existing GPO.”

Link existing GPO to OU -
Select the GPO you edited and click Ok.

Select the GPO to link
Similar to the first method discussed in the section above, the Windows Registries are not restored on any devices when a GPO is unlinked, deleted, or a device is shifted from the OU.
When you have performed the steps above, the Registry value(s) will be updated on the computers inside the OU the next time they fetch the GPO from the Domain Controller.
Takeaway
It may be easier to manage Windows Registry on a single computer remotely. All you need to do is establish a Remote Desktop Connection and perform the tasks directly through the Registry Editor. But what to do when the same action needs to be performed on a number of devices?
You can use this detailed yet simplified guide that allows you to create, update, delete, and replace Windows Registry values in such scenarios. Of course, this would only work when you have administrative privileges and access to the Domain Controller, and the end devices are added to the domain. Thus, you can create a GPO and apply it to the Organizational Unit to make the necessary changes.
That said, we personally believe that the former method, which involves importing the Registry value(s) from a remote computer, is the safer option for managing the Windows Registry. We say so as it includes the accurate paths, current values, and the value type. This reduces the chances of the administrator making a mistake.
A mistake in modifying, deleting, or creating a Windows Registry value can drastically impact the outcome. The computer’s OS could be damaged permanently.
