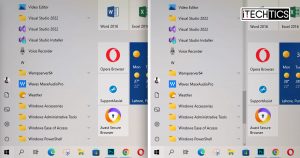
Scroll bars are the sliders you see in the corner of the window used to move up or down, or left and right within a User Interface (UI). By default, these scroll bars are configured to hide when not in use, making it difficult for a user to scroll about using the mouse.
While using a Microsoft Store app, the Start menu, or the Settings app, the scrollbar on the right side is only visible when you take your pointer to the right of the window or use the scroll wheel on your mouse. Even then, the scrollbar is not its maximum size as it should be.
Thankfully, you can disable the auto-hiding feature on the scroll bar in Windows 10 and Windows 11. This feature was not introduced until the release of Windows 10 version 1803.
Follow the given methods above to show or hide the scrollbars in Windows 11/10.
Table of Contents
How to Enable/Disable Automatic Scrollbar Hiding in Windows
Windows now allows you to choose whether you would like the scrollbars to hide automatically or keep on showing. This is effective only for Windows native apps, Microsoft Store apps, and the entire Windows UI.
However, this does not affect how the scrollbars are displayed on other apps, such as Microsoft Office products or other third-party applications.
Now follow the method of your choice to hide or show the scrollbars.
From Settings app
-
Navigate to the following:
Windows 11:
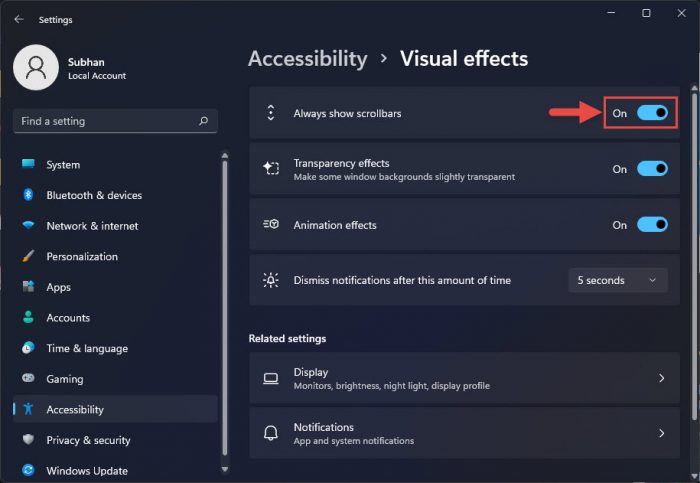
Settings app >> Accessibility >> Visual Effects
Windows 10:
Settings app >> Ease of access >> Display
-
Here, toggle the slider in the On or Off position in front of “Always show scrollbars” to either show scrollbars or hide them, respectively.

Toggle to show or hide scrollbars
From Windows Registry
You can also achieve this task by manipulating the system Registry. Here is how:
Note: Misconfiguration of critical values in the system’s registry could be fatal for your operating system. Therefore, we insist that you create a system restore point before proceeding forward with the process.
-
Open the Registry Editor by typing in regedit in the Run Command box.

Regedit -
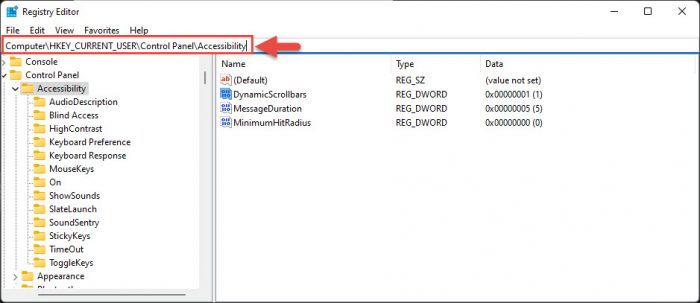
Now paste the following into the address bar at the top for quick navigation:
Computer\HKEY_CURRENT_USER\Control Panel\Accessibility

Quick navigation to Accessibility Key -
Now double-click the DynamicScrollbars value in the right pane and set its Value Data to either of the following options:
-
0 – Show scrollbars
-
1 – Hide scrollbars

Configure Value Data -
That’s it! You do not need to restart your PC to implement the changes. They will be applied immediately.
How to Hide or Show Scrollbars in Microsoft Word or Excel
As we already mentioned, the methods discussed above do not apply to Microsoft Office products or any third-party application for that matter.
In the case of Microsoft Word or Excel, you can choose whether to display or hide the scrollbars. This includes both the vertical as well as the horizontal scrollbars. Follow these steps to choose whether to hide or show them:
-
From within the Word/Excel window, click File from the top menu.

Open File menu -
On the next page, click Options.

Click Options -
From the Options window, switch to the Advanced tab. Scroll down to the Display section, and here, check the boxes beside “Show Vertical scroll bar” and “Show horizontal scroll bar” to show the scrollbars, or uncheck then to hide the scrollbars.

Enable or disable vertical and horizontal scrollbars
Note that when the scrollbars are hidden in Word or Excel, they will not appear automatically when you move the cursor to the side. Instead, you will manually need to enable them from the Advanced Options menu.
Closing Words
Before the option to hide or show the scrollbars was offered by Microsoft for Windows users, it was quite frustrating when the scrollbar would automatically disappear without an intimation.
Thanks to Microsoft’s feedback process, they were able to address the issue and leave it up to the users to configure it how they want.


