When you try and delete a file or a folder that is being used by another app, program, or process in Windows 11 or Windows 10, it is likely that you will be prompted and will be asked to either close the process and try again or cancel the command.
If you’re using Windows 10, then you may see a prompt stating “The action can’t be completed because the folder or file in it is open in another program.” If you are using Windows 11, then the prompt may also state the program the file/folder is being used by, as in the image below.

This article discusses various ways to force a file or folder to be deleted that is being stubborn. Before we look at the solution, we should highlight the common reasons why a file or folder simply does not delete it.
Table of Contents
Why Windows Won’t Let You Delete Locked Items
When a file or folder is in use by another process, Windows locks it in place. These are then automatically unlocked when they are no longer in use. However, occasionally, a file or folder may not unlock successfully, making you incapable of deleting it using conventional methods.
An item may be prone to deletion if an active program is currently using it, or a task running in the background. Other reasons may include file corruption, preventing it from being unlocked, or a virus may infect the folder/file.
If that is the case, you may need to apply a few tricks to delete a file or folder that is not going away.
How to Fix “The Action Can’t Be Completed Because The File Is Open In Another Program”
Occasional misfunctioning of Windows can become a thing if you play around with it a tad too much. This can lead to abnormal behavior of the operating system, rendering it incapable of temporarily or permanently removing a file or folder.
For this, we can apply a few Windows tricks, or use certain applications to unlock a file/folder and then delete it.
End Process using Task Manager
If you have already closed the program suspected of using the file/folder you are trying to delete, you may want to double-check it through the Task Manager. Check if the alleged process is still running, and end it if it is.
Open the Task Manager using the CTRL + Shift + Esc shortcut keys, and switch to the Details tab. From there, right-click on the process using the file/folder you want to remove, and click End Process Tree from the context menu.

Now try to delete the file/folder again.
Disconnect Remote Access to Local Files
It may be possible that another system on your network has access to the file/folder you are about to remove, without you knowing it. This also makes an item incapable of deletion since it is being used.
To do this, you must disconnect all open files and then retry to delete the item. To do so, open the Computer Management Console by typing in compmgmt.msc in Run, and navigate to the following using the pane on the left of the console:
Computer Management (Local) >> System Tools >> Shared Folders >> Open Files
Here, you will see the files/folders currently being accessed on your local computer remotely. Right-click on the blank space in the middle pane and click Disconnect All Open Files from the context menu.

In the confirmation box, click Yes. Once done, try to delete the stubborn item. If it still refuses to go, continue with the fixing methods listed below in this post.
Restart File Explorer
Sometimes it is the Explorer.exe process that does not behave as it should. It is the process that runs the desktop, taskbar, notification tray, start menu, all dialog boxes, prompts, and controller interfaces.
It may be possible that malfunctioning of File Explorer is preventing you from deleting an item. If so, restarting it might just solve the problem.
There are 3 ways to restart explorer.exe. Perform any and then try to delete the file/folder.
Disable Thumbnail Caching
By default, Windows is configured to store thumbnail data in a thumbs.db file, so it loads images faster the next time you access it. This feature sometimes malfunctions, and the operating system thinks the thumbnail data is still in use, even when the associated file is closed.
This feature can be disabled in 2 ways in Windows 11/10. Disabling it would not affect your system in any way except that the images take a few milliseconds longer to load.
You can disable thumbnail caching through the Group Policy Editor or through the Windows Registry Editor if you are using the Home edition of Windows.
Learn how to enable Group Policy Editor in Windows 11 Home or Windows 10 Home.
Through Group Policy
Follow the steps below to disable thumbnail caching in Windows:
- Launch the Group Policy Editor by typing in gpedit.msc in Run.
- Now navigate to the following using the left pane:
Local Computer Policy >> User Configuration >> Administrative Templates >> Windows Components >> File Explorer - Now double-click “Turn off the caching of thumbnails in hidden thumbs.db files.”
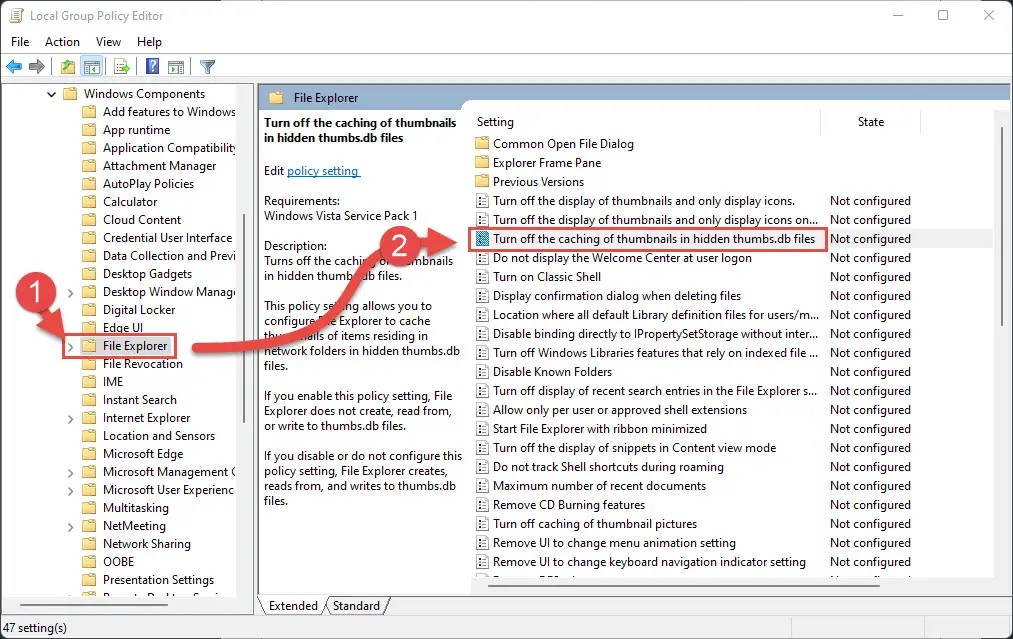
- Now select the Enabled radio button from the Properties window, and then click Apply and Ok.

- For the changes to take effect, launch the Command prompt with administrative privileges and type in gpupdate /force.
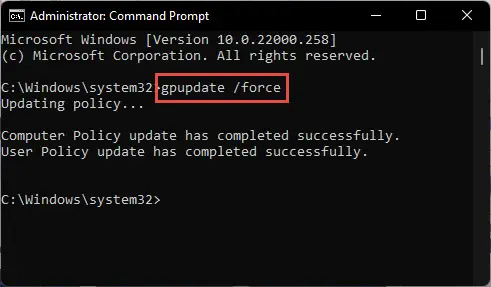
Now retry deleting the stubborn file. if it has been removed, you re-instate thumbnail caching by opening the same Group Policy and selecting the Not Configured radio button. Rerun the same command in Command Prompt for the changes to occur.
Through Registry Editor
The same can be achieved through the Registry Editor. Here is how:
Misconfiguration of critical values in the system’s registry could be fatal for your operating system. Therefore, we insist that you create a system restore point before proceeding forward with the process. This will help you restore your OS in case any issues are discovered or fail entirely.
- Launch the Registry Editor by typing in regedit in Run.
- Paste the following in the address bar at the top of the Editor for quick navigation:
Computer\HKEY_CURRENT_USER\Software\Policies\Microsoft\Windows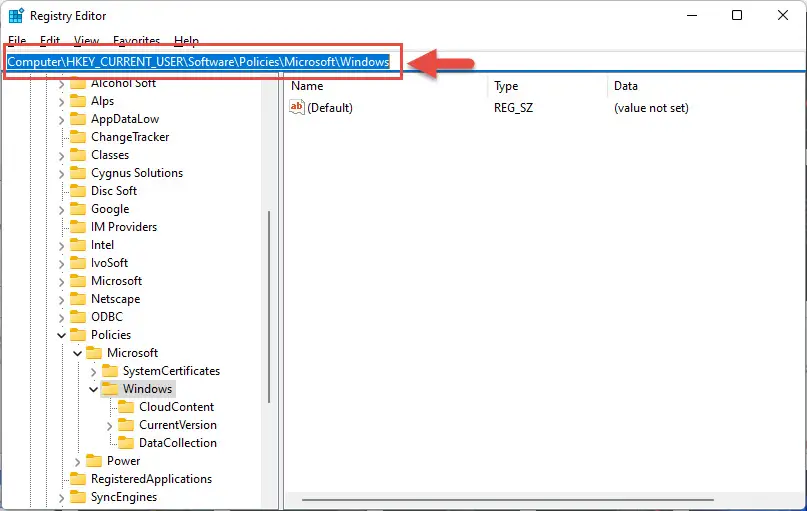
- Right-click Windows in the left pane, expand New from the context menu, and then click Key.

- Name this new key “Explorer.” – (Skip steps 3 and 4 if the “Explorer” key already exists).
- Now right-click the Explorer key, expand New from the context menu, and click DWORD (32-bit) Value.

- Name this new DWORD “DisableThumbsDBOnNetworkFolders.”
- Double-click DisableThumbsDBOnNetworkFolders and set its Value Data to 1, then click OK.

- Now restart your computer for the changes to take place.
Thumbnail caching will now be disabled. Try to delete the item you want to remove again. If successful, you can re-enable thumbnail caching simply by deleting the DisableThumbsDBOnNetworkFolders value in Windows Registry and rebooting the computer.

If your goal is not achieved using this method, we still have a few tricks up our sleeve.
Delete Temporary Files
Windows creates temporary files while performing certain tasks, most of which are automatically deleted once the task is completed. However, these files can impact the availability of your files and folders, which need to be deleted to remove the actual file/folder.
These files need to be deleted manually using the following steps:
- First, log into your PC from and administrator account.
- Now open the temporary files folder by typing in %temp% in Run.
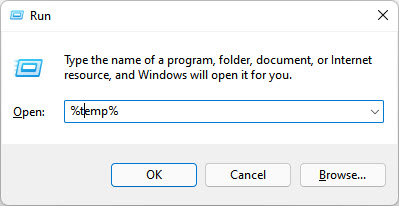
- Now select all the items using the Ctrl + A shortcut keys and hit Del on your keyboard.
- If prompted with a UAC, click Continue.
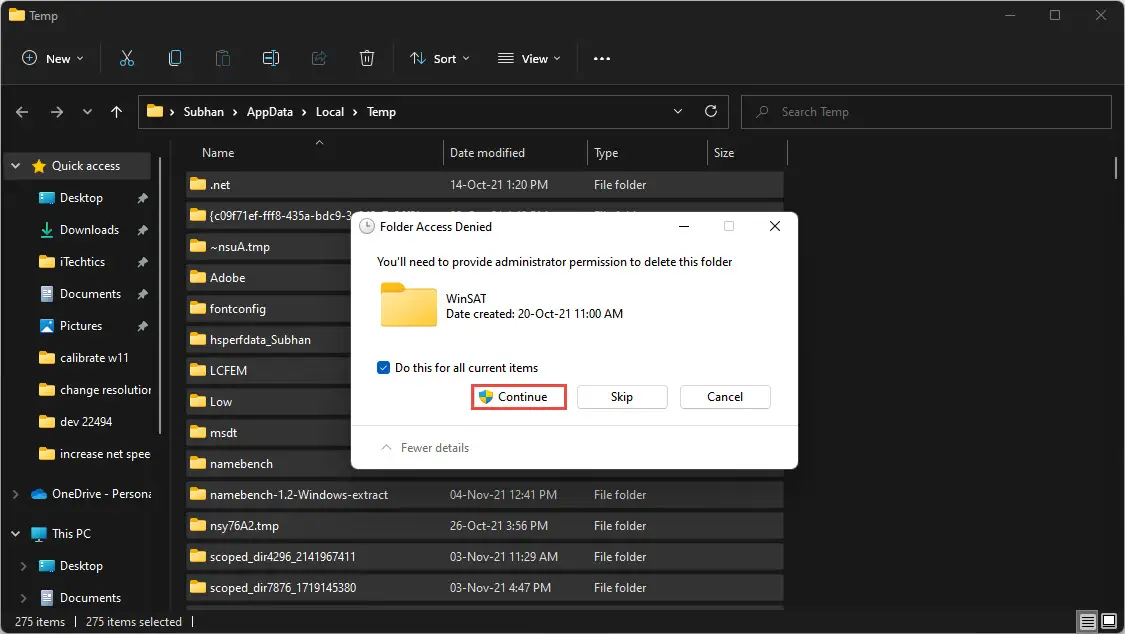
- If any items cannot be deleted or require special permissions, check the box next to “Do this for all current items” in the dialog box, and then click Skip.
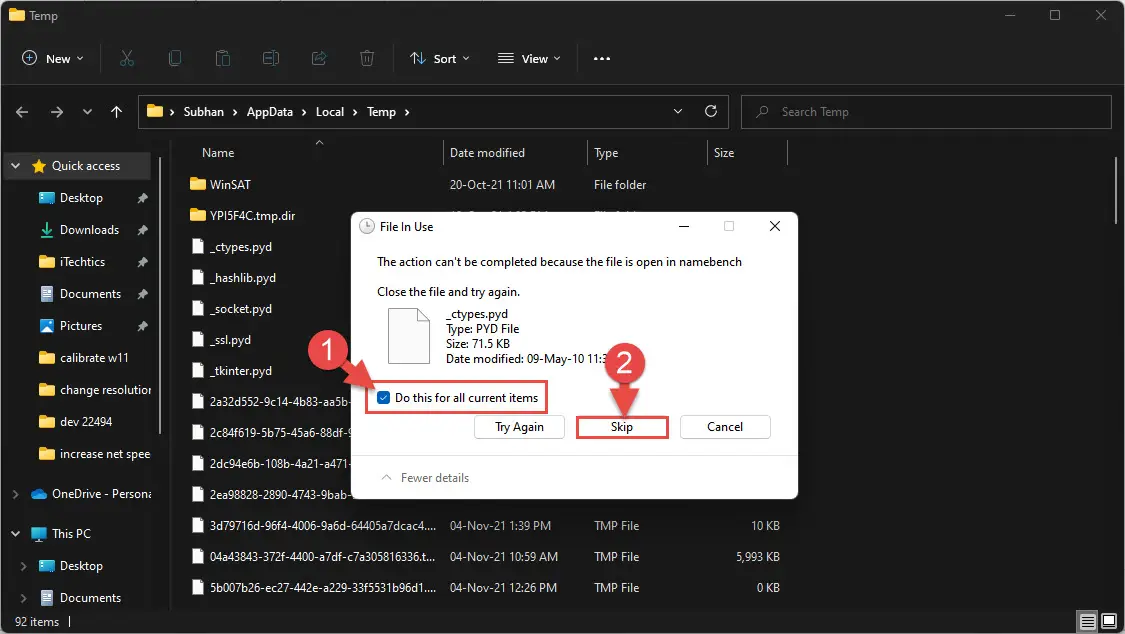
Once the possible temp files have been deleted, try deleting the file/folder that was throwing the error in the first place.
Disable Controlled Folder Access
Controlled Folder Access is part of Windows Security, which protects your critical system files from malicious content and accidental deletion. This can restrict your access to a file or folder, preventing you from making any changes, including removing it. The feature must then be disabled to delete the item.
We strongly recommend you do not disable Controlled Folder Access, as it protects critical system files, and deleting one could be harmful to your operating system. If you decide to proceed with this, it would be wise to create a system restore point.
- Navigate to the following:
Settings app >> Privacy and Security >> <a href="https://www.itechtics.com/enable-windows-security-updates-over-metered-connections/">Windows Security</a> >> Virus and threat protection - Windows Security will now open. Scroll down and click Manage settings under Virus and threat protection settings.

- Now scroll down and click Manage Controlled folder access.

- On the next page, toggle the slider below Controlled folder access to the Off position.

Once disabled, try to delete the item you want to and check if successful.
Boot into Safe Mode
In Safe Mode, no unnecessary apps, programs, or hardware are enabled by default, which eliminates the possibility of another program using the item you are trying to delete.
Follow the steps below to boot Windows into Safe Mode:
- Open the Start Menu. From there, click on the Power button while holding down the Shift Key on the keyboard.
- Click Restart still while holding the Shift Key and hold it until the computer reboots. Once it reboots, let go of the press key.
- The system will now boot into recovery mode. From there, click Troubleshoot.

- Then click Advanced options.

- Then click Startup Settings.

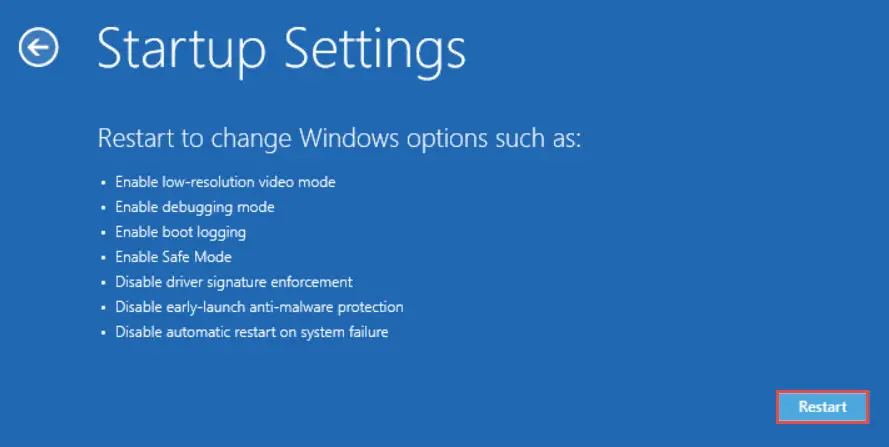
- On the next screen, click Restart.
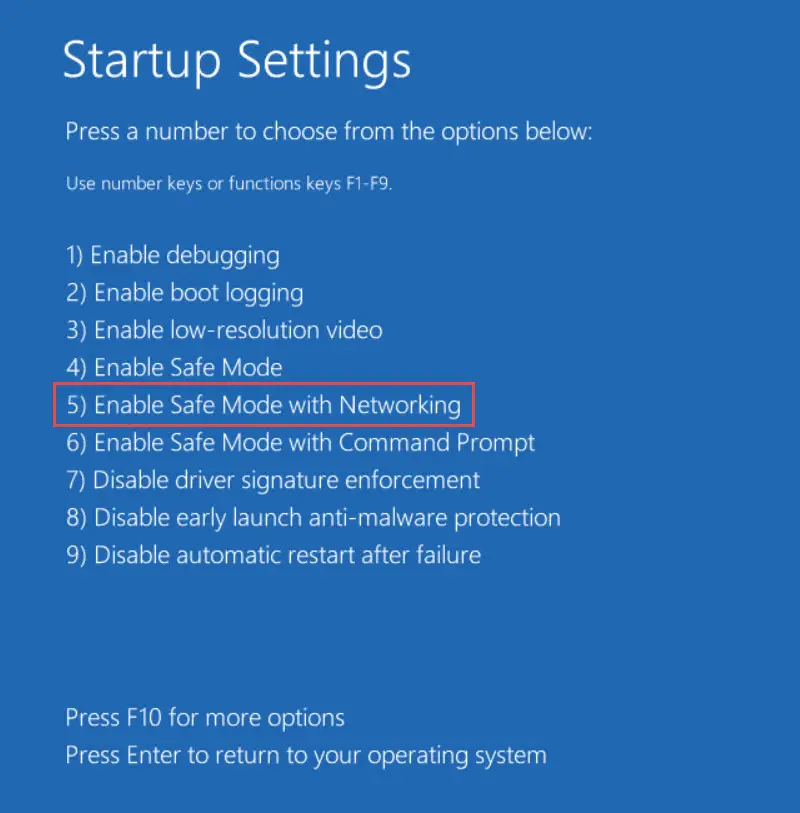
- Now press the F5 function key to Enable Safe Mode with networking.
Your device will now boot into Safe Mode. When it does, the desktop will look something like this:
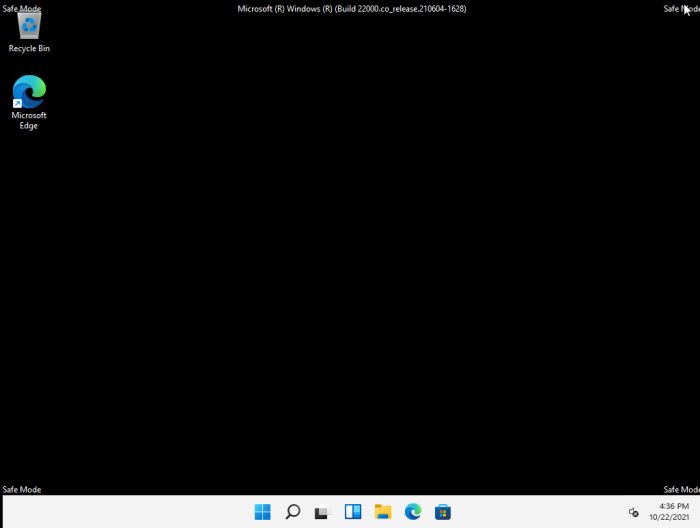
Now use File Explorer to delete the file / folder you have not been able to use in regular mode.
Using Process Explorer
Process Explorer is Microsoft’s software designed for you to know which programs have which files or directories open. Thus, it can be used to close any handles running in the background that is preventing a file from being deleted.
Process Explorer is a portable tool. Follow the steps below to download and use it:
- Download Process Explorer through this Microsoft Page.
- Once downloaded, extract the content and run the tool. Run prosexp if you have a 32-bit operating system, or prosexp64 for a 64-bit OS.
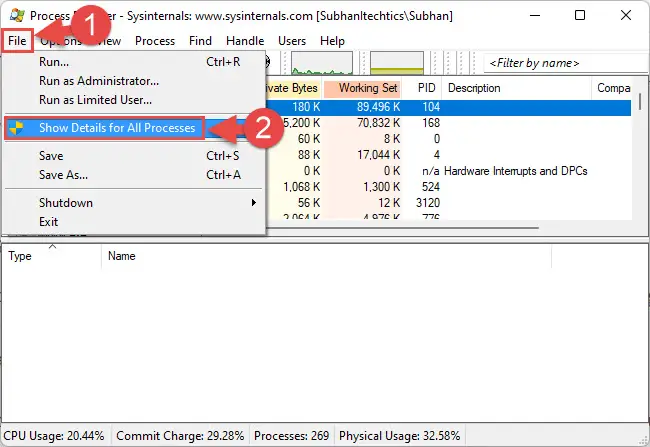
- From the Process Explorer tool, click File from the top menu, and then click Show details for all processes.
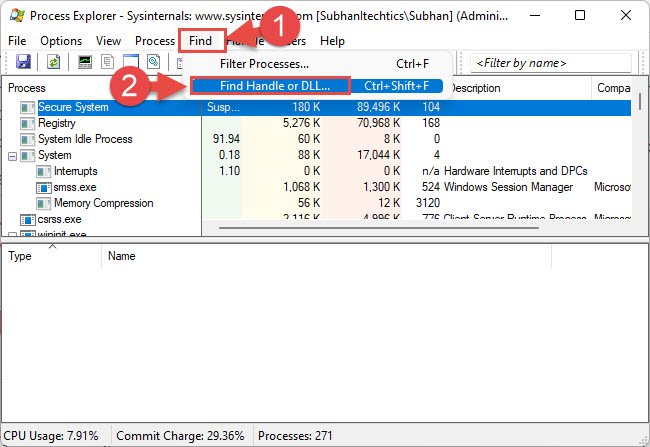
- Now click Find from the top menu and then click Find Handle or DLL.
- On the popup, enter the name of the locked file you are trying to delete, and click Search. When the search results show up, click on the file.

- Now, back on the Process Explorer tool, right-click on the locked file and click Close Handle from the context menu.

- Repeat step 6 for all processes using this particular file.
Once all the associated process Handles have been closed, you can now safely delete the locked file, which should now be unlocked.
Third-party Applications
If you want a quick and convenient solution to delete locked files in Windows, and want to avoid all the fixes discussed above, then you could use third-party freeware applications that unlock and delete the files that are too stubborn to delete using the conventional methods.
We have tried and tested the following 5 freeware tools for you to unlock and force-delete files and folders on Windows 11 or 10. Click on the respective link to download the tool. Installing them is pretty much conventional – simply go through with the installation wizard.
Once installed, provide the app with the locked file/folder and you should be able to permanently delete it using the tool.
- EMCO UnLock IT
- Wise Force Deleter
- Lock Hunter (Temporary Deletion – Stored in Recycle Bin)
- IObit Unlocker
- Unlocker
Final Thoughts
We prefer not to use third-party applications on our PCs. This is because some of them are from untrusted sources and may contain malicious data that could infect your PC. That said, this is one of the reasons we have tested out the third-party applications mentioned above before recommending them to you.
These apps allow you to avoid the hassle of unlocking and deleting a file or folder.

