
Key Points
- Display Driver Uninstaller (DDU) removes Intel, AMD, and Nvidia drivers from scratch, and leaves no trace.
- To uninstall your display driver, download the tool, extract it, boot the computer into safe mode, run the DDU utility, choose your preferences, select the type of driver and manufacturer, and then proceed to clean.
An up-to-date graphics driver is always an integral part of a smooth, seamless computer experience. However, you may often encounter issues with graphics drivers, especially when it is time to upgrade them.
Often, you may find yourself wanting to perform a clean display driver, which means completely removing the older driver and all of its traces, and then installing the new driver. This approach is especially useful when troubleshooting the display or its drivers. But do you know how to completely remove a graphics driver?
While it is easier to uninstall or roll back a graphics driver using the Device Management console or the vendor-provided control panel, they still do not completely remove a graphics driver. You can still find traces of files and values inside the Windows Registries from the uninstalled drivers, which isn’t always favorable for the new driver, as it can hinder their installation process, or cause other performance issues.
This is where the “Display Driver Uninstaller (DDU)” comes in handy. DDU is an open-source tool designed to uninstall Intel, AMD, and Nvidia graphics drivers from scratch so that you can perform a clean install with ease. In this post, we are going to show you how to use DDU to completely uninstall your existing display driver and make room for a new one.
Table of Contents
Download Display Driver Uninstaller (DDU)
The DDU utility does not have an official website and you need to use third-party mirrors to download it. Which is why we have provided our own download link for you to use.
The downloaded DDU utility has been scanned and tested for viruses and is completely safe to use. Simply click on the following link to download Display Driver Uninstaller.
 Display Driver Uninstaller (1.0 MiB, 3,101 hits)
Once you click, your download should begin automatically.
Support and requirements for Display Driver Uninstaller
Like all software, the DDU also has a few limitations that need to be considered before using it. Here are a few things you need to consider:
- DDU can only be used on Windows 7 and above.
- At the moment, it is only applicable to Nvidia, AMD, and Intel GPUs
- It requires Microsoft .NET Framework 4.8 or higher
Make sure that your system satisfies these requirements before proceeding to use DDU to uninstall a driver.
Uninstall display graphics driver with Display Driver Uninstaller
Once you have downloaded the tool from the given link, use the following steps to uninstall your display driver from scratch:
-
Once DDU is downloaded, right-click on it and extract its contents.

Extract the contents -
Navigate to the extracted folder and run the DDU application.

Run the uninstaller -
Click Extract to extract the setup contents.

Extract the setup contents -
Now press the Windows Key + R to open the Run Command box.
-
Type in “msconfig” and press Enter to open the System Configuration window.
-
Switch to the Boot tab.
-
Select “Safe boot,” then select “Network” below it, and then click Apply and OK.

Boot into safe mode using System Configuration -
In the confirmation dialog box, click Restart.

Restart the computer into safe mode The computer will now restart into safe mode with networking.
Explore other methods to boot the computer into safe mode.
-
Once restarted, navigate to the extracted DDU folder again, and open a sub-folder named “DDU vXX.X.X.X“. Run the “Display Driver Uninstaller” application.

Run the DDU app -
If you are running the tool for the first time, you will see a dialog box. Click Ok.

Proceed with first-time prompt -
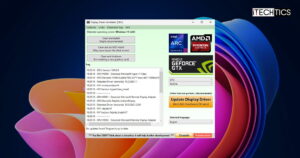
In the Options window, adjust the settings for the tool and click Close.

Adjust the settings for the tool -
Expand the top drop-down menu and select the type of driver that you want to uninstall.

Select the type of driver to remove -
Then expand the other drop-down menu and select the manufacturer of the driver.

Select the vendor for the driver -
Click “Clean and restart.”

Clean and restart The tool will now begin removing the selected and then automatically restart the computer. When the computer restarts, you may proceed to boot it normally and out of safe mode, then continue to install a new display driver.


Conclusion
The purpose of the Display Driver Uninstaller is to give the users the experience as if they were going to be installing a display driver for the first time. The DDU utility uninstalls the graphics driver and removes all of its traces from the computer, which is exactly what is needed when troubleshooting corrupting drivers.