Blue Screens of Death (BSoDs) are not only annoying but dangerous for your systems. They mean that your system had to immediately shut down and prevent itself from damage.
BSoDs usually give out a code that can help you troubleshoot the root cause of the problem. Once such error code is “DPC WATCHDOG VIOLATION.” This BSoD error can particularly be annoying as it does not allow you to proceed and boot into Windows. Even if you are able to boot, this BSoD will likely occur again and again, until the problem is removed.
In this article, we show you the many ways you can fix the “DPC WATCHDOG VIOLATION” BSoD and continue with your work.
Table of Contents
What is the DPC Watchdog Violation BSoD
DPC stands for “Deferred Procedure Call.” DPC is a Windows feature that handles interruptions within the OS. Whereas the Watchdog is the bug checker which constantly communicates with the different system components to check up on them, and ensures that they are working normally.
When the Watchdog timer does not receive a reply from a component and is unable to communicate with it, it throws a BSoD in an attempt to save the computer from any harm that may result from the gap in the communication.
What Causes the DPC Watchdog Violation BSoD
The “DPC Watchdog Violation” error can occur due to different reasons. These include the following:
-
A driver on your PC is outdated or corrupted.
-
There is incompatible hardware or software on your PC.
-
There is a conflict between two applications.
-
Critical system files are corrupted or damaged.
Due to any one of these reasons, you can encounter the “DPC WATCHDOG VIOLATION” BSoD.
Moreover, the BSoD can occur under different circumstances. For example, it can happen when attempting to transfer data over the internet or connecting to Wi-Fi.
Regardless of your situation, continue to perform the given solutions below and resolve the issue.
Fix “DPC WATCHDOG VIOLATION” BSoD
Perform the solutions below in the given chronological order, which moves from a less-aggressive approach to a more-aggressive approach toward resolving the BSoD.
Disconnect External Peripherals
It may be possible that your newly-attached keyboard or any other peripheral may be the culprit of the BSoD. Any hardware incompatibility issues can immediately result in the BSoD error code “DPC WATCHDOG VIOLATION.”
We recommend that you disconnect all connected hardware and device, and then check if you still encounter the BSoD. If you don’t, this means that the issue was with a hardware device.
To pinpoint which hardware was problematic, you can connect them one by one and the device which throws the same BSoD is your villain.
Run Program Compatibility Troubleshooter
Both Windows 10 and 11 come with preinstalled troubleshooters that automatically scan and troubleshoot the different components of your PC. Run the “Program Compatibility Troubleshooter” to try and rectify the issue with any recently-installed apps so that you do not encounter a “DPC WATCHDOG VIOLATION” BSoD because of it.
Follow these steps to run the troubleshooter:
-
Navigate to:
Settings app >> System >> Troubleshoot >> Other Troubleshooters
-
Click Run in front of “Program Compatibility Troubleshooter.”

Run Program Compatibility Troubleshooter The troubleshooting wizard will now launch.
-
From the wizard, select the recently-installed app to troubleshoot.

Select an app to troubleshoot Select the application to troubleshoot and then click Next.
-
Select “Try recommended settings.”

Use recommended settings -
Now click Next.
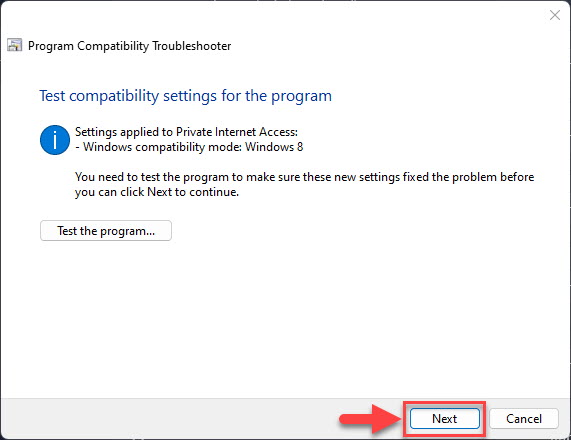
Proceed -
Select “Yes, save these settings for this program.”
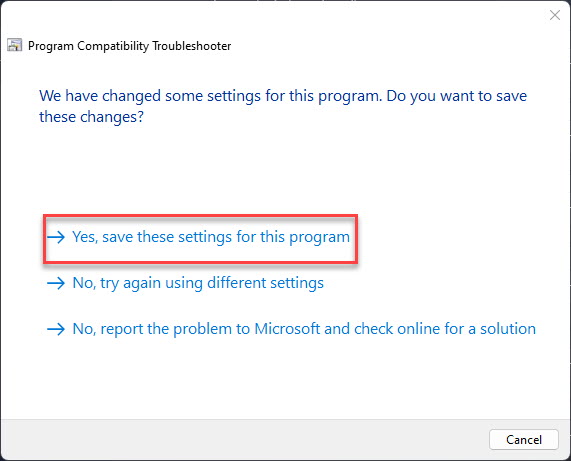
Save changes If the wizard was able to make any changes to the problematic app, click “Yes, save these settings for this program.”
When the changes are applied, check to see if you still encounter the “DPC WATCHDOG VIOLATION” BSoD.
If the problem persists, try troubleshooting any other app which was recently installed.
Uninstall Recently-Installed Apps and Programs
If the BSoD was experienced after an app installation, and troubleshooting it did not resolve the error, then try to uninstall the app entirely. If there are compatibility issues with the app, then removing it should surely fix the problem.
Follow these steps to uninstall an app or program:
-
Open the Programs and Features applet by typing in “appwiz.cpl” in the Run Command box.
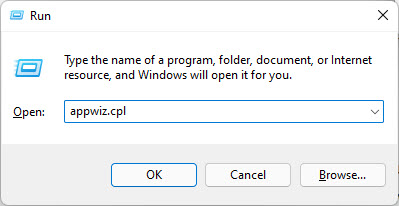
Open Programs and Features applet -
Right-click on the problematic app and click “Uninstall/change.”

Uninstall problematic app It is likely that the uninstallation wizard will now launch.
-
Proceed through the uninstallation wizard and follow the on-screen instructions to remove the app.
Once the app is removed, check to see if you still experience the BSoD. If the error remains, proceed forward with the given solutions below.
Run the CHKDSK Utility
CHKDSK is a command-line utility that scans your hard drives for damaged system files, and bad sectors and attempts to repair them. If it fails to repair any discovered bad sectors, it informs the operating system not to use them.
Either way, it makes the hard drive usable again, if the “DPC WATCHDOG VIOLATION” BSoD occurred because of bad sectors in the first place.
-
Run the following cmdlet in an elevated Command Prompt:
Chkdsk C: /f /r /x
Run the CHKDSK utility -
Enter Y for “yes” when asked to schedule the CHKDSK utility the next time the computer reboots.
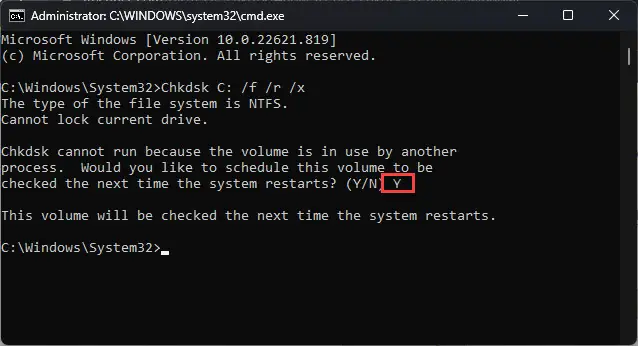
Check the disk next time the computer restarts -
Restart your PC.
Once it reboots, the Check Disk utility will run and scan your hard drive. This can take a while, in some cases, hours. Let the scan finish and reboot into Windows.
Once the CHKDSK utility has successfully been executed, check to see if the issue remains. If it does, apply the following fix.
Fix Corrupted Files with DISM and SFC
Deployment Image Servicing and Management (DISM) and System File Checker (SFC) are built-in tools in Windows that can scan and repair system files. Use the following steps to run the DISM and SFC scans in an attempt to repair the critical system files:
-
Launch an elevated Command Prompt.
-
Execute the following commands one after the other:
DISM.exe /Online /Cleanup-image /Checkhealth DISM.exe /Online /Cleanup-image /Scanhealth DISM.exe /Online /Cleanup-image /Restorehealth -
Then run the SFC scan using this cmdlet:
SFC /ScanNow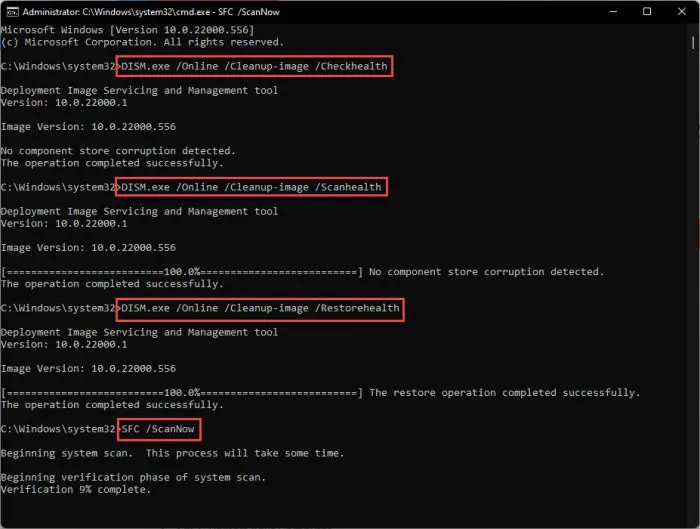
Execute DISM and SFC cmdlets to repair system files
Once the scans are complete, use your computer for a while and check if the BSoD repeats itself.
If the error remains, there are still a few things you can do to mitigate it.
Update Hard Drive’s Firmware
As we mentioned earlier, the driver running your SSD/ hard drive can be outdated or malfunctioning, resulting in a “DPC WATCHDOG VIOLATION” BSoD. Follow these steps to update the drive’s firmware automatically:
-
Open the Device Manager by typing in “devmgmt.msc” in the Run Command box.

Open Device Manager -
Expand “Disk drives.”

Expand Disk drives -
Right-click on a drive and then click “Update driver” from the context menu.

Update disk driver The update driver wizard will now open.
-
Click “Search automatically for drivers.”

Search for drivers automatically The wizard will now search the web and download and install the latest available driver (if one is available).
-
Close the driver update wizard.
If the wizard was unable to install the latest driver, you can try installing it manually. However, if the latest driver is already available, you can try and reinstall the current driver.
Once the driver has been updated, check if the problem persists. If it does, then you must also change the AHCI controller firmware.
Change SATA AHCI Controller
The AHCI controller controls the data transfer protocol between the motherboard and the storage drive. If you have a controller installed from the manufacturer (IaStorAC.Sys), try changing to the one from Microsoft (Storahci.Sys).
Follow these steps to change the SATA AHCI controller to Storahci.Sys:
-
Open the Device Manager by typing in “devmgmt.msc” in the Run Command box.

Open Device Manager -
Expand “IDE ATA/ATAPI controllers.”

Expand AHCI controller options -
Right-click the AHCI controller and click “Properties” from the context menu.

Open AHCI controller properties -
Switch to the “Driver” tab.

Switch to the Driver tab -
Click “Update driver.”

Update driver The Driver Update wizard will now open.
-
Select “Browse my computer for drivers.”

Browse computer for drivers -
Click “Let me pick from a list of available drivers on my computer.”

Pick a driver from a list -
Select “Standard SATA AHCI Controller” and click Next.
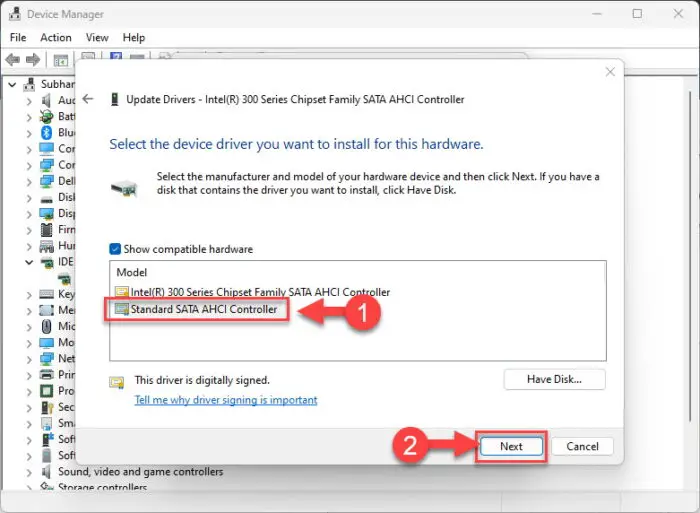
Select new driver You will now be prompted that the new driver has been installed.
-
Close the update wizard.
-
Restart the computer for the changes to take effect.
When the computer restarts, check to see if the efforts bare any fruit. If the BSoD is still experienced, then continue forward with the given solutions below.
Scan Computer for Malware
A virus may be infecting your PC and affecting how it behaves, resulting in a “DPC WATCHDOG VIOLATION” BSoD. If so, you must run a deep malware scan of your PC and remove/quarantine any anomalies.
Use the built-in Windows Security Antivirus (formerly Windows Defender) to scan your computer for malware. Here is how to do it:
-
Navigate to the following:
Settings app >> Privacy and security >> Windows Security >> Virus and threat protection
-
Click “Scan Options.”
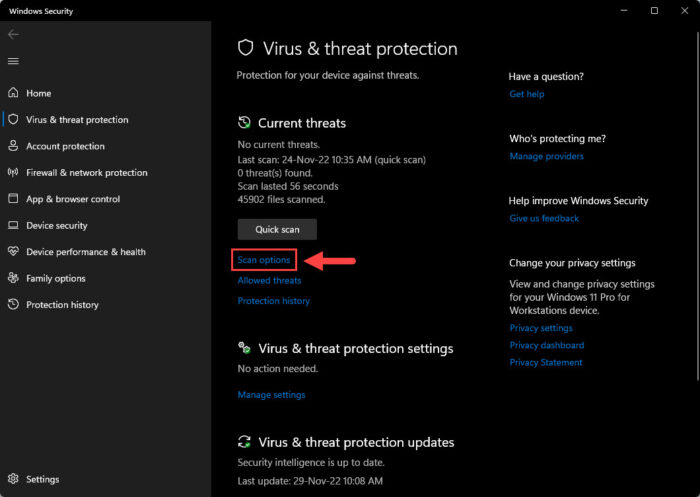
Open scan options -
Select “Full scan” and then click “Scan now.”
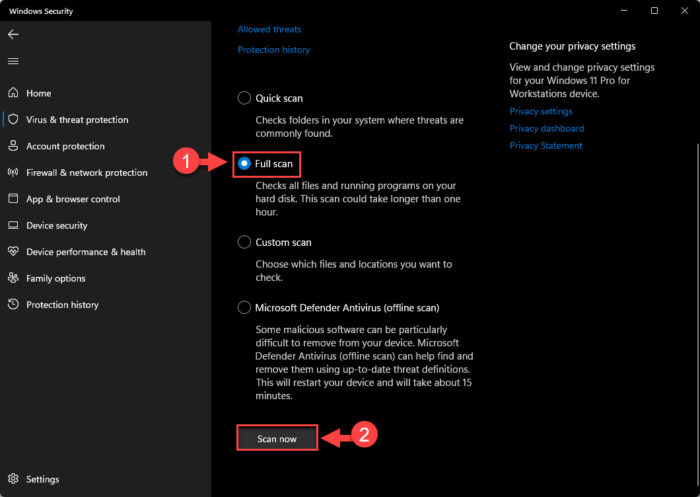
Perform a full scan
You can also perform a scan using a third-party antivirus. Here is a list of the top antivirus software to use to perform the scan. If you are proceeding to purchase antivirus software, here are the 17 aspects you should always consider.
Once a virus is detected and removed/quarantined, check to see if the BSoD has been mitigated.
Install Pending Windows Updates
Windows updates often include system files that are overwritten on the existing system files. It may be possible that any corrupted system files are automatically replaced during the update process, fixing the “DPC WATCHDOG VIOLATION” error.
Follow these steps to check for updates on a Windows PC:
-
Navigate to:
Settings app >> Windows Update
-
Click “Check for updates.”
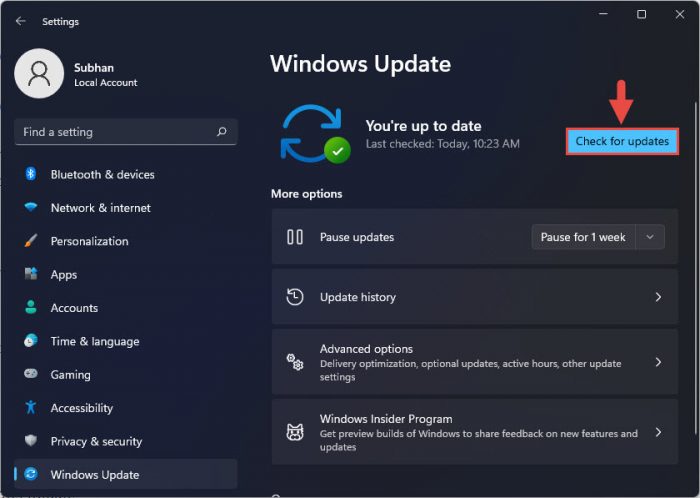
Check for pending updates The app will now begin searching the web for updates.
-
If any update(s) is available, download and install it.
-
Once the update(s) is installed, restart the computer.
Check Event Viewer
If none of the solutions have worked for you so far, then we suggest that you refer to the Event Viewer. The Event Viewer isn’t a solution but should give solid guidance on what caused the error in the first place. Using that information, you can search for a solution online.
-
Launch the Event Viewer by typing in “eventvwr.msc” in the Run Command box.

Open Event Viewer -
Go to the following from the left pane:
Windows Logs >> System
-
Click “Filter current log” from the right pane.

Filter event logs -
Check both “Critical” and “Error” and click Ok.

Apply filters -
Now select the different errors in the center pane and you shall see more details under it.

View error details in Event Viewer
If you do not understand an error, you can simply Google the “Event ID” for more information on it and troubleshoot it.
Restore PC to Earlier State
Restoring a PC refers to taking your Windows to a state it was earlier captured. It means all system configuration, network settings, and files and folders will revert to a point in time as if nothing ever happened after that.
Of course, there needs to be a restore point in the history of the PC to revert it to. This can be enabled by using Backup & Restore. If you have already created a restore point in the past that you can revert to, follow these steps:
-
Open System Properties by typing in “sysdm.cpl” in the Run Command box.
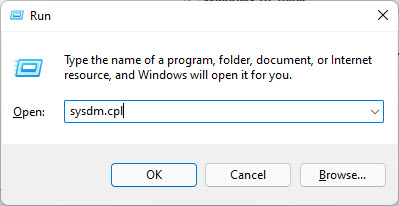
Open System Properties -
Switch to the “System Protection” tab.

Open System Protection settings -
Click “System Restore.”
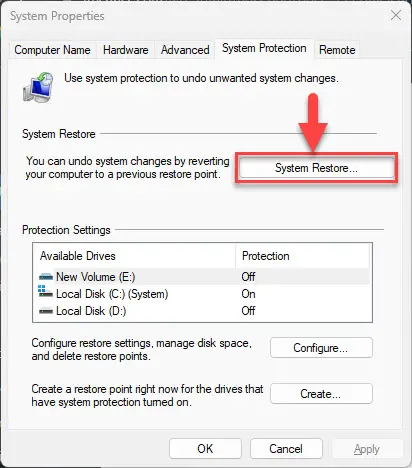
Open System Restore settings The System Restore wizard will now open.
-
Click Next.
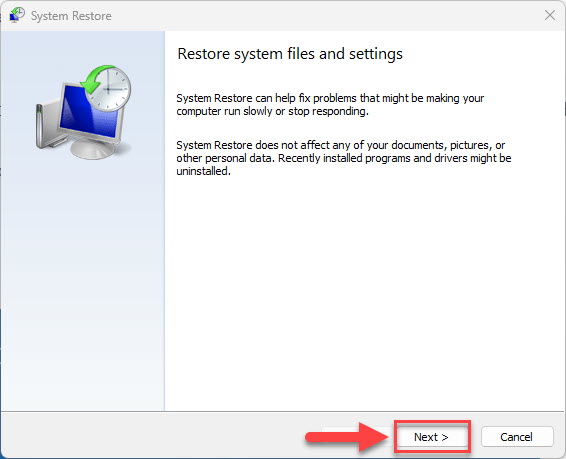
Proceed with restoration -
Select a restore point and click Next.
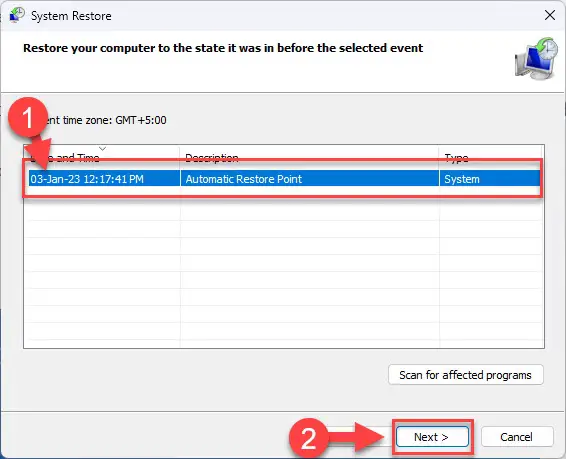
Select a restore point -
Click Finish.
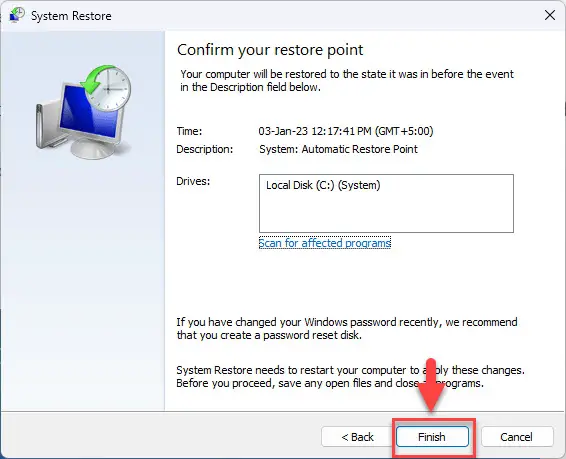
Begin restoration of the system -
Click Yes on the confirmation dialog box.

Confirm Window restoration Windows will now restore to a previous restore point. This step can take some time to complete. Do not reboot or turn off your computer during this point and wait for the restoration to complete.
-
When finished, click Restart.
This should take your PC back to when the restore point was created. If the “DPC WATCHDOG VIOLATION” BSoD issue did not exist back then, then it should be resolved.
At this point, we suggest that you do not perform the same tasks which lead to the BSoD in the first place.
If the BSoD still persists, then the only thing left to do now is reset the computer.
Reset Windows
Resetting the computer brings all configurations back to their factory default settings and values. If the solutions discussed above did not work for you, then you must now reset your PC. Here is how:
-
Navigate to the following:
Settings app >> System >> Recovery
-
Click “Reset PC” in front of Reset this PC.
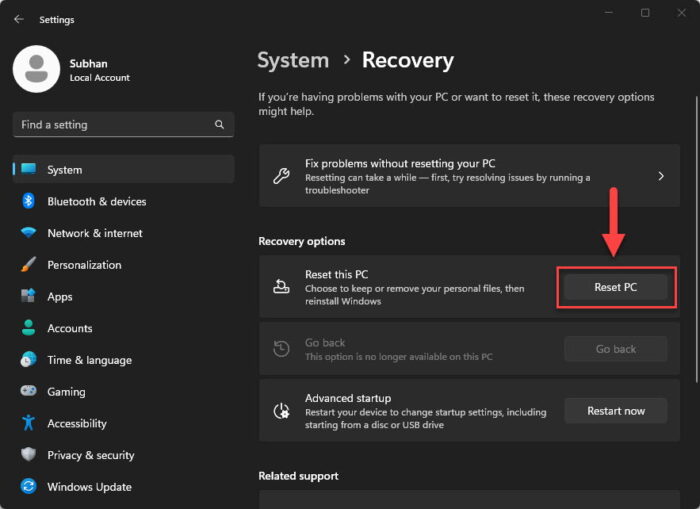
Reset computer The reset wizard will now open.
-
Click “Keep my files.”
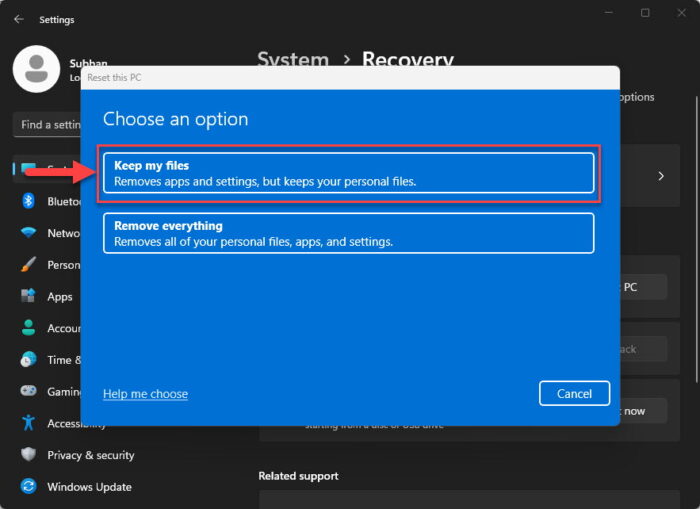
Keep files while resetting Windows -
Select “Local reinstall.”
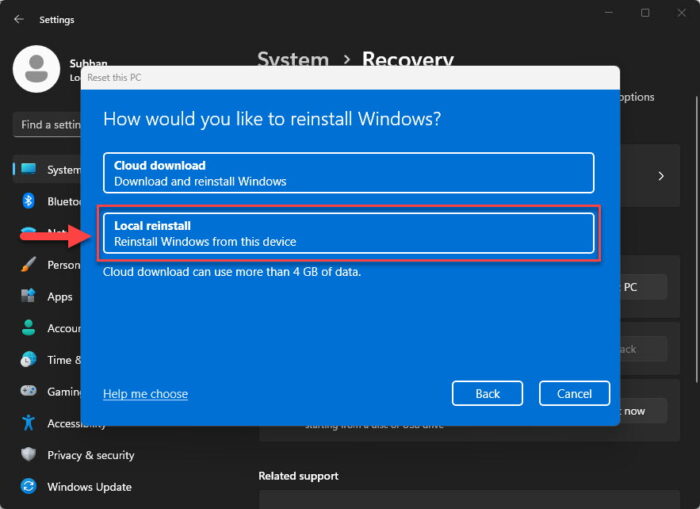
Perform local reinstallation -
Click Next.
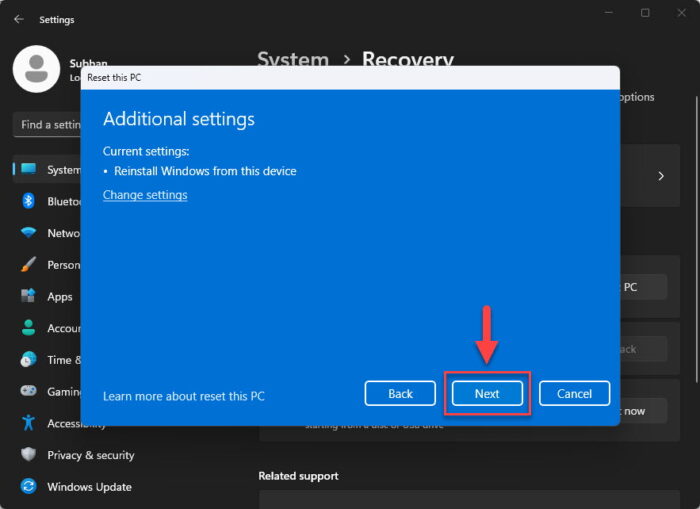
Proceed -
Click Reset.
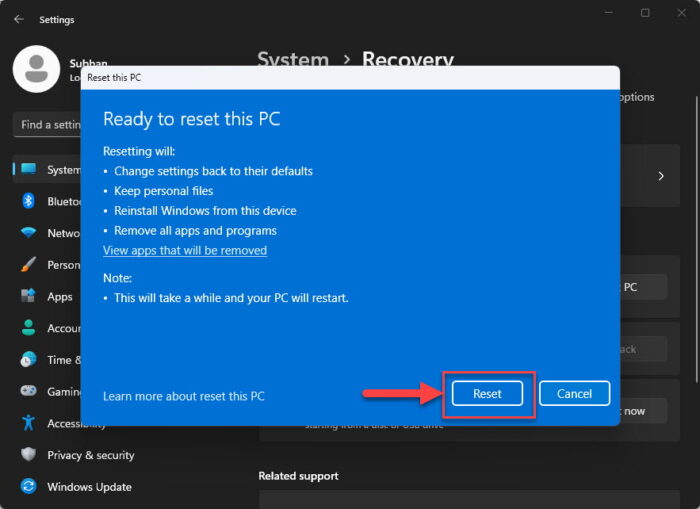
Click Reset
The operating system will now reset. This phase can take a while and the computer will then restart. When it does, check to see if you still experience the “DPC WATCHDOG VIOLATION” BSoD.
Closing Thoughts
The “DPC WATCHDOG VIOLATION” error code occurs when the Watchdog timer doesn’t receive a reply from a component within 100ms, which overwhelms it, resulting in a BSoD. But the solutions provided in this post will surely help mitigate the root cause and get your PC to work normally again.
However, in case you are still experiencing the same problem, then the only solution might be to perform a clean Windows installation as we have already tried pretty much everything else at this point.
