
Logitech G Hub is a software you can install on your computer to customize Logitech’s supported hardware. Using this software, you can perform several tasks on your connected hardware to make changes to it, like configure button actions and profiles, configure macros, customize RGB lighting, update firmware, and much more.
If you own programmable Logitech hardware, then you will probably need the G Hub software on your computer. However, people have reported encountering issues while installing it. The G Hub installation hangs, and even waiting for excruciating hours does not install it.
If you are a victim of this problem, then ti article is for you. Here, we have listed all the possible solutions to fix the issue, so you can install the G Hub software.
Table of Contents
On This Page
Why isn’t Logitech G Hub Installing?
There can be multiple reasons for Logitech G Hub not installing. Some of the common problems are missing prerequisites on your computer. These include Visual C++ packages, .NET packages, etc.
The issue can also occur because of critical file corruption, both in the OS and the G Hub files. This can cause the OS from recognizing and starting the G Hub services, preventing it from installation.
Either way, we have covered the solutions for all these issues below and will surely get G Hub installed in no time.
Fix Logitech G Hub Stuck on Installation
Apply the given solutions below to fix the installation process for G Hub in the given chronological order.
Install Latest Visual C++ Redistributable
Microsoft Visual C++ Redistributables are a package of libraries (files and resources) necessary for running programs developed with Microsoft Visual C++. These libraries are needed to install the Logitech G Hub software.
You can download all versions of Visual C++ packages from the following dedicated guide:
Download Microsoft Visual C++ Redistributables (All Versions)
Once downloaded, use the following steps to install it:
-
Run the download VC++ package, agree to the terms and conditions, and click Install.

Agree to terms and install VC -
When installed, click Restart.

Restart the computer after installation
Now, proceed to the next section to install the latest .NET package as well.
Install Latest .NET Version
Like VC++, .NEt is also a prerequisite for installing the G Hub software. Click on the respective link below to download and install the latest .NET version for your computer:
When downloaded, use the following steps to install it:
-
Execute the downloaded installation package and click Install.

Install .NET Run the installation package by double-clicking it (in the case of macOS and Windows), and then clicking Install on the installation wizard.
-
Close the wizard once the installation is complete.

Close the .NET installation wizard The installation will now begin. It does not take much time nor does it require a restart. Click Close once it has been installed successfully.
Now that both VC++ and .NET packages are installed, try reinstalling G Hub and see if it installs successfully.
If you still encounter the same issue, continue to perform the remaining solutions given below.
Close G Hub Installation and Run As Admin
There could be administrative privileges preventing the G Hub installation. End the G Hub installation and then restart the setup process with administrative privileges. Here is how:
-
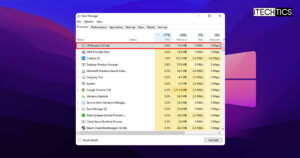
In the Processes tab, right-click the “Logitech G Hub” installer and click End Task.

Kill Logitech G Hub installation wizard -
Now, use File Explorer to navigate to the G Hub setup file, right-click it, and then click “Run as administrator.”

Run G Hub installer as administrator -
Proceed with the on-screen steps and complete the installation.


If running the installer with administrative privileges does not work, continue to perform the solutions provided below.
Enable Compatibility Mode
The Windows operating systems have a compatibility mode that allows you to run apps and programs that are compatible with different operating systems.
Use the following steps to install G Hub in compatibility mode:
-
Right-click on the G Hub setup file and click Properties.

Open G Hub installer properties -
Switch to the Compatibility tab, check “Run this program in compatibility mode for:“, and then select select “Windows 7” from the drop-down menu.

Run G Hub installer in compatibility mode -
Now click Apply and Ok, and then run the G Hub setup file with administrative privileges.
Run G Hub installer as administrator -
Proceed with the on-screen installation steps and check if G Hub installs successfully.

Clean Install G Hub
It may be possible the old G Hub temporary installation files are preventing the application from installing. Therefore, we must clear out the temporary files and folders and perform a clean G Hub installation. Perform the following steps to clear out all temporary items:
Note: If some items cannot be deleted, ignore them.
-
Use File Explorer to navigate to the following folder:
C:\Windows\Temp
-
Press CTRL + A to select everything and then press Delete on the keyboard.

Delete items in Windows temp folder -
Do the same for the user-specific temp folder at the following path:
C:\Users\[Username]\AppData\Local\Temp

Delete items in user temp folder -
Once more, do the same for the following directory:
C:\Windows\Prefetch

Delete items in the Prefetch directory


Once the temporary items are cleared, run the Logitech G Hub installer file with administrative privileges and check to see if the issue is mitigated.
Allow G Hub through Firewall
It may be possible that the Windows Defender (Windows Security) firewall is blocking G Hub’s communication with the internet. In this case, you must allow the G Hub through the firewall. Here is how to do it:
-
Open the Windows Firewall applet by typing in “firewall.cpl” in the Run Comand box.

Open the Firewall applet -
Click “Allow an app or feature through Windows Defender Firewall” on the left.

Allow app or feature through the Firewall -
Click “Change settings.”

Change firewall settings -
Scroll down the list and check the boxes in front of “LGHUB,” and then click Ok.
Note: If the software is not displayed in the list, you can click “Allow another app,” click Browse, navigate to the installation folder of the software, select the lghub.exe file, and click Add to add it to the list.

Allow G Hub through Windows Firewall


Update Windows
Although it may seem unorthodox, but it has been observed that update the Windows operating system to the latest build has often fixed the G Hub not installiing issue.
Updates often replace critical system files with updated versions, removing the older, corrupt system files. Try installing any pending updates to see if it resolves the issue:
-
Go to the following:
Settings app >> Windows Update
-
Click “Check for updates.”

Check for pending updates -
Install all pending updates and restart the computer.

After the computer reboots, check if you are now able to install the G Hub software.
Closing Words
Logitech G Hub is an essential part of the computer experience, and its worth increases even more if you are a gamer. That is why, getting it installed on your computer without errors may be crucial for many of you.
If you are encountering errors during the installation process, then this guide will help you overcome it and install the app, after which you may continue to customize you Logitech hardware.