Key Points
- The Windows 11 installation experience interface has received a major update since Windows Vista.
- The new design of the installation experience is inspired by the Media Creation Tool.
- While the new UI retains the same features and options, the workflow has been slightly altered.
Microsoft is finally revamping the Windows 11 setup experience which was much overdue. The new User Interface (UI) has already been launched in the Canary Insider channel and is thus still in its testing phase.
The interface has been changed, and some of the options on the installation wizard pages have also been moved. In other words, the workflow has been slightly changed.
Microsoft had not changed the setup wizard significantly since the launch of Windows Vista. Since then, very minor changes have been made across different operating systems. For example, the only change Windows 8 introduced was a solid blue background, which was also carried forward to Windows 10.
You can experience the new Windows setup UI when performing a clean install using an installation media. To get started right now, you must first download the Windows 11 Insider Preview Build 26040 ISO image file from Microsoft Windows Insider Preview Downloads, where Microsoft is still testing the redesigned installation setup.
There is no announcement or news on when this update will make its way to the stable releases.
How to install Windows 11 with redesigned setup experience
The new Windows 11 setup experience has been inspired by the Media Creation Tool – making the process seamless. There is now a sleek black-and-white interface in place of the violet background we have been seeing since Windows 8.
Moreover, instead of the “Install now” button, you have to select a radio button on what you want to do. Moreover, you can still shift to the legacy setup UI in case you do not like the redesigned interface.
To install Windows 11 with the new interface, follow these steps:
-
Before starting, make sure that your system meets the minimum hardware requirements for Windows 11.
-
Then start by booting from the ISO/installation media.
-
On the first wizard page, select the language and the time and currency formats, then click Next.
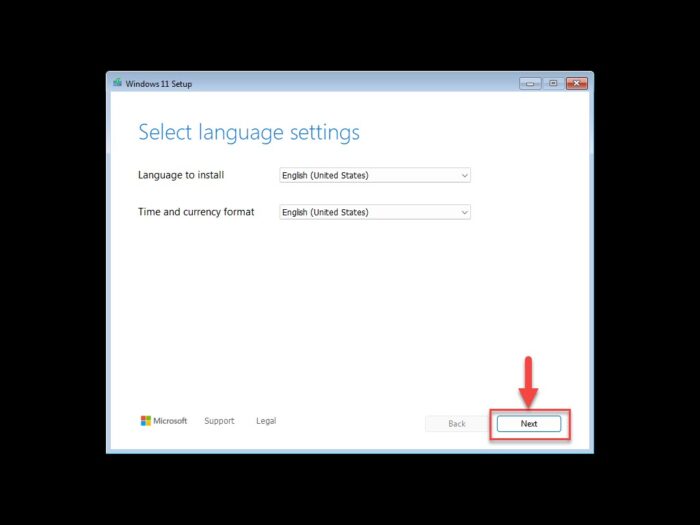
Select language time and currency formats In the legacy wizard, you will see a blue background with a similar blue-filled wizard experience.
-
On the next screen, select the input method and click Next.
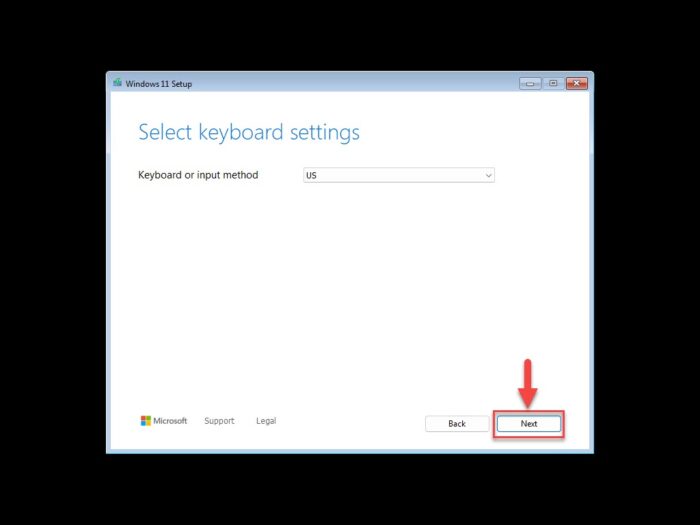
Select input layout -
Select “Install Windows 11,” check the box with “I agree everything will be deleted including files, apps, and settings,” and click Next.

Install Windows 11 and agree that everything will be deleted Optionally, you may select “Repair my PC” to boot into the Windows Recovery Environment (WinRE) where you will notice that the icons have been redesigned to match the Windows 11 UI. You may also select “Launch the legacy experience” to launch the older Windows setup UI with the blue theme.
-
Now enter the product key for your OS, or click “I don’t have a product key” and activate it later.
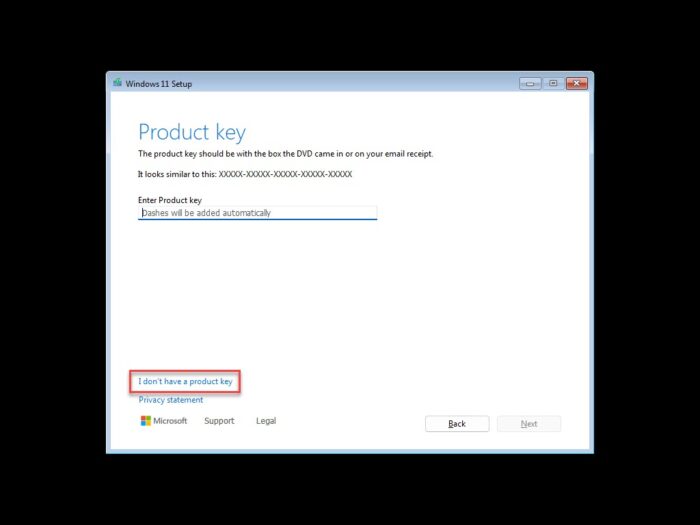
Enter Windows product key or skip -
Now select the Windows edition to install and click Next.

Select Windows edition to install -
Click Accept to agree to the licensing terms.

Agree to licensing terms -
Now select an unallocated drive and click “Create Partition.”

select unallocated space and create partition In the legacy setup UI, the options were located at the bottom of the page, but now, they appear at the top.
-
Enter the size for the primary drive and click Apply.
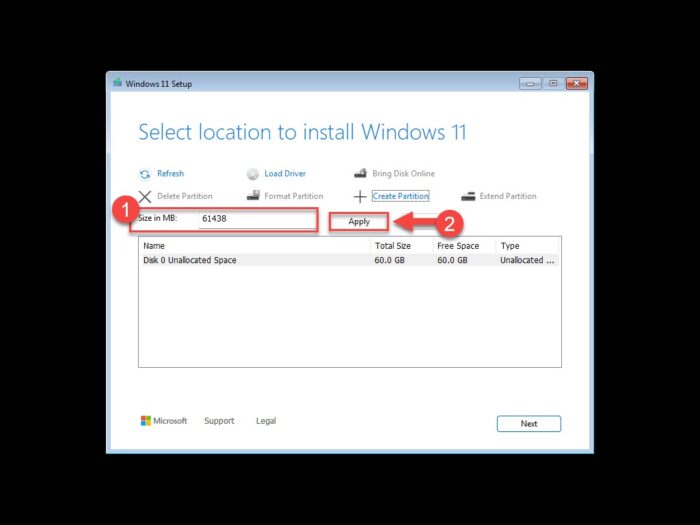
Enter partition size -
Select the primary partition to install the operating system on and click Next.
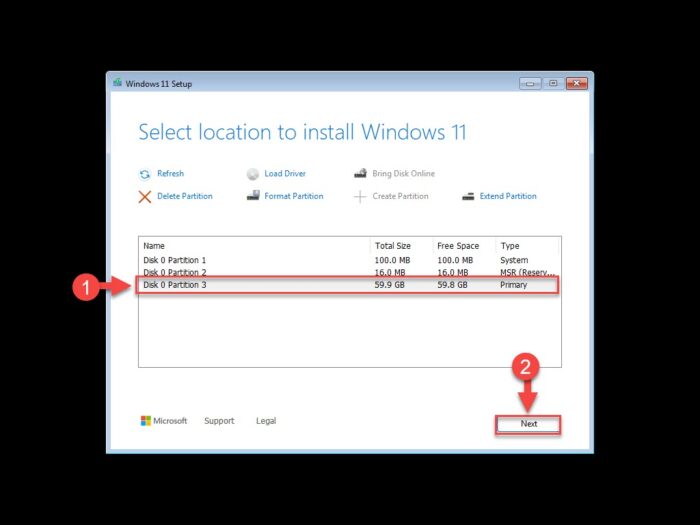
Select primary partition for installation -
On the final screen, click Install.
Windows 11 installation will begin after performing the steps above. Once the installation is complete, you will see the same Out Of Box Experience (OOBE) screen that was previously used in Windows 11.

Closing words
The Windows installation experience is something that we do not get to see often. However, it is always nice to get everything updated and brand new when you shift to a newer operating system. The installation experience UI is something that Microsoft (nor we) ever focused on, and we may have not realized it.
But now that Microsoft has finally redesigned the Windows 11 setup experience, it feels like it was a much-needed upgrade that was probably due a long time ago. So kudos to Microsoft.
