Key Points
- To share a folder, right-click it and open its Properties. On the Sharing tab, click Share, add Everyone, assign permissions, and click Share.
- To share a file/URL, you can use Nearby Sharing. Enable the feature from Settings > System > Nearby Sharing. To share the file, right-click it and click the Share button. Select the receiving device, and then accept the file on the receiving end.
You may want to retrieve files and folders from a remote PC or share one of your folders with a friend or a colleague on the same network on a computer. Thankfully, the Windows operating system provides several methods for you to do so.
Folder and file sharing is a native part of the Windows operating system, that lets you securely share what you want with other people on the network while hiding the rest of the contents on your PC. You can also use this Windows’ ability to move your data to and from another one of your own devices connected to the same network.
Sharing data over the network eliminates the need for USB flash drives and external hard drives and simplifies data migration. This guide will show you multiple methods to share files and folders over the network on a Windows 11 computer.
Before discussing how to share files and folders, there are a few prerequisites that need to be satisfied, that will allow the other devices on the network to be able to accept and access the shared content.
Table of Contents
What is Network Discovery and how to enable it?
Network Discovery is a Windows feature that allows other devices on the network to be able to see your device. It is primarily used to share files and folders between various devices on the network. It can also be used to share a locally attached printer to run tasks assigned by other computers on the network.
When enabled, this feature makes the IP address and other information public on the network. Hence, anyone on the same network could access the files and folders on the computer. However, the permission to each file and folder on the computer can be customized separately.
While enabling Network Discovery makes sharing easier, caution is advised since it makes your PC discoverable, and hence, more prone to cyberattacks.
Rather than sharing content via emails and other cloud solutions that require a lot of internet bandwidth, you can share items with the people on your network with built-in Windows capabilities. For that purpose, you must first enable Network Discovery.
Here are the steps to enable and configure Network Discovery on a Windows 11 PC:
-
Press the Windows key + i to launch the Settings app.
-
Click “Network & internet“.
-
Scroll down and click “Advanced network settings“.
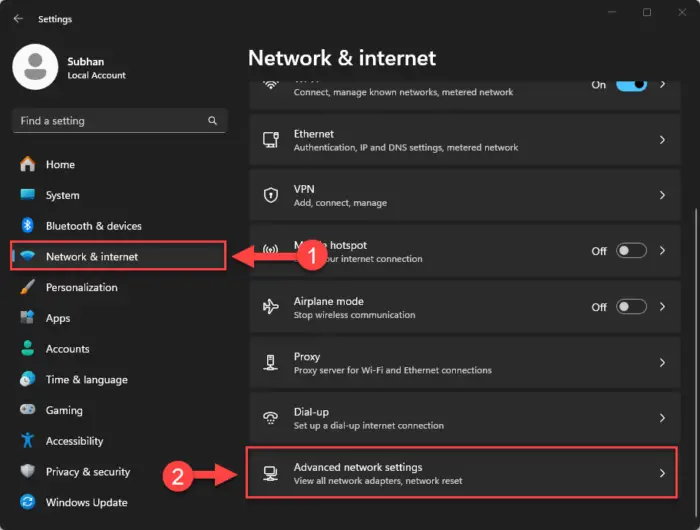
Open Advanced Network Settings -
Scroll down to the “More settings” section and click “Advanced sharing settings“.

Open Advanced Sharing Settings -
Here, expand the network type you want to enable Network Discovery on and toggle the slider in front of it into the On position.
Note: It is advised that you only enable Network Discovery on Private Networks, as it could pose a threat when enabled on public networks.

Enable Network Discovery -
Select “Set up network connected devices automatically“.
-
[Optional] You may also enable the option for “File and printer sharing” if you wish to share a connected printer with other devices on the network.

Configure Network Discovery -
Now expand “All networks“.
-
Choose whether you want to enable or disable the option for “Password protected sharing“.
When enabled, other users will be required to enter the user account and password for this PC to access the shared content. It is recommended that you enable it for security purposes.

Enable or disable password-protected sharing
After performing these steps, Network Discovery will be enabled, and therefore, any files or folders you share using the methods above will be visible to other people on the network.
Share files over network using File Explorer [Basic]
Sharing files and folders with other people on the network is a straightforward process on a Windows PC. However, depending on how you want to manage it, might make it a bit complex.
Here is the most basic method of sharing a file or a folder over the network on a Windows computer:
-
Press the Windows key + E to launch the File Explorer.
-
Navigate to the folder to share, right-click it, and click Properties.
Note: If you want to share a file instead, then you will need to share the entire containing folder. For this purpose, I suggest that you create a new folder and perform these steps on it instead, and then move the element to share within the shared folder. Alternatively, you can use the “Nearby sharing” method discussed below.

Open folder properties -
Switch to the Share tab and click Share.
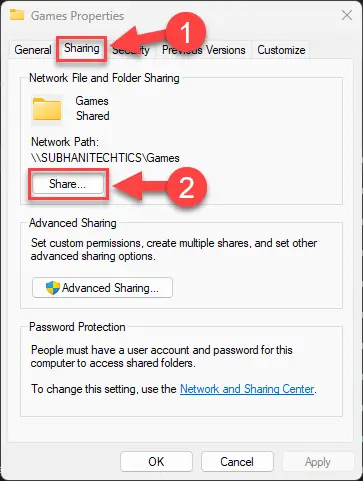
Open basic sharing settings -
Expand the drop-down menu, select Everyone, and then click Add.

Add users to share the folder with -
Expand the permissions drop-down and select from one of the options, then click Share.
You can choose from the following options:
- Read: Users can browse and open files.
- Read/Write: Users can view, open, modify, and delete the content on the folder they are sharing.
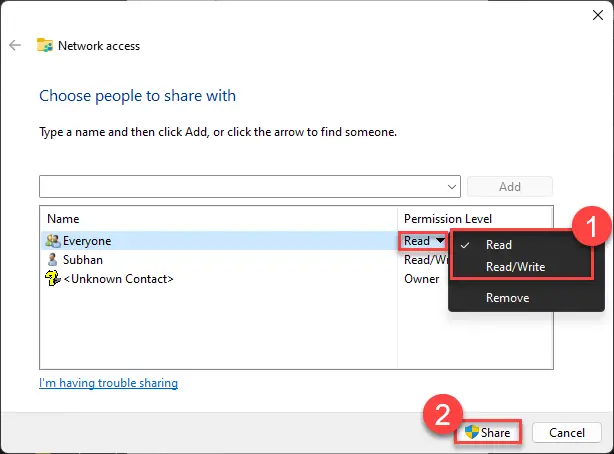
Choose the permissions for sharing -
When shared successfully, click Done.
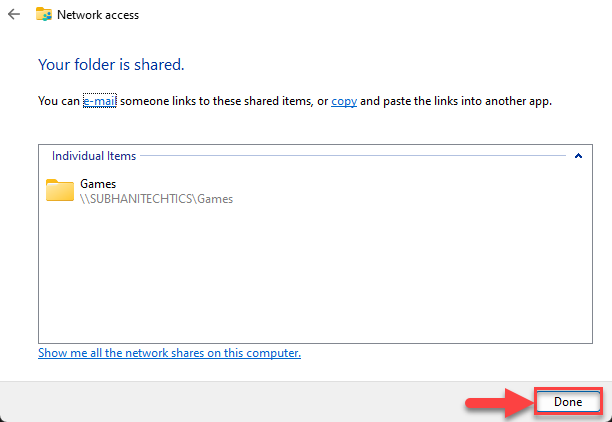
Folder shared successfully with basic settings
After performing these steps, other devices on the network should be able to access the folder and the contents within it and have the same permissions that you assigned to them in Step 5 above.

Alternative to the steps above, you can right-click the folder to share, expand “Give access to“, and click “Specific people“. This will open the same wizard as in Step 5 above. From here, you can add the user/group to share the folder with and adjust the permission level accordingly.

The method to access the shared folders of a device on the network is given at the end of this post.
Share files over network using File Explorer [Advanced]
You can also use advanced configuration options when sharing files using File Explorer. This option gives you more control over the permissions allowed to other users on the network.
Here are the steps to share a folder over the network with advanced permission configurations:
-
Navigate to the folder to share using File Explorer.
-
Right-click the folder and click Properties.

Open folder properties -
Switch to the Sharing tab and click “Advanced sharing“.

Open Advanced sharing options -
Select “Share this folder“, adjust the number of concurrent users, and then click Permissions.

Open advanced sharing permissions -
Click Add.
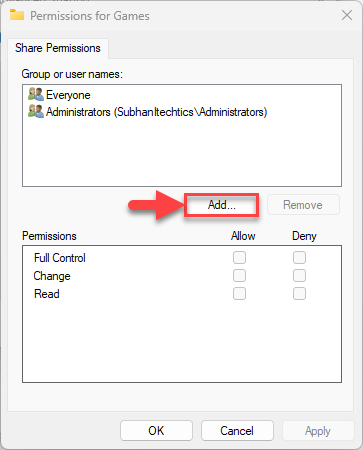
Add user -
Click Advanced.

Open advanced options -
[Optional] Click Locations and select another computer on the network to share the folder with.
Or, you can leave it default and the local users and groups will be displayed.
-
Click “Find now“.

Find users and groups in selected location -
Select a user account from the populated list to share the folder with, and click OK.
Alternatively, you can select Everyone.

Select user or group to share the folder with -
Click OK again.
-
On the Permissions window, choose which permissions to allow to the user/group, and then click Apply and OK.

Adjust permissions for sharing -
Click OK and Close on the open windows to apply the changes.
After performing these steps, the folder with be shared with the selected user or group on the network. If you selected “Everyone”, then access will be granted to everyone on the network. However, they will only have the permissions you assigned to them in Step 11 above.
Share files over network with Nearby Sharing
Nearby Sharing is a Windows feature that lets you share items with devices in your vicinity through Wi-Fi or Bluetooth. For this to work, Nearby Sharing must be enabled on both the sending device as well as the receiving device.
Additionally, unlike the sharing methods discussed above, Nearby Sharing lets you share files directly. However, it doesn’t let you share complete folders at this time.
How to enable Nearby Sharing
First, let me show you how to enable the feature.
-
Press the Windows key + i to launch the Settings app.
-
Click on System.
-
Then click “Nearby sharing“.

Open Nearby Sharing options -
Under the “Nearby sharing” drop-down, select “Everyone nearby“.

Enable Nearby Sharing
Once Nearby Sharing is enabled on both devices, you can continue to share a file or a URL with other devices.
Share files with Nearby Sharing
Here are the steps for sharing a file using Nearby Sharing:
-
Use File Explorer and navigate to the file you want to share.
-
Right-click the file and then click the Share button.
Alternatively, you can select the file and then click the Share button in the Explorer’s ribbon menu.

Share file -
Select the receiving device from the Share menu in the “Nearby Sharing” section.

Select the device to share the item -
On the receiving device, click the Save button on the notification.
After performing these steps, the received file should be available in the default saving location.
Access shared folder over the network
If you shared a folder over the network using File Explorer using any of the methods above, then the receiver will need to access your device and the shared folder(s) on it. For that, the receiving device must also have “Network Discovery” enabled.
Once enabled, they can go to the “Network” directory in File Explorer, and the devices that have anything to share on the network should be there. Opening that device should show the shared folder.

Alternatively, you can enter the name of the device in the Run Command box with double backslashes (\\) prefixed and then press Enter, as in this example:
\\SubhanItechticsI can also use the precise path to the shared folder by following the command above with another backslash and then typing the name of the folder. Here is another example:
\\SubhanItechtics\GamesClosing words
In ancient times, users had to configure their network adapters with static IPs and use a patch cable to transfer large data to other devices that were near them. Microsoft has now made the process much simpler with integrated LAN-sharing capabilities in the Windows OS.
Whether it’s a URL, a folder, or a file; this guide can help you share them with your peers in just a few clicks, without any additional cables or hardware.
