If you are using Windows Server or a Windows client PC, you can get all information about a user account, or all user accounts, using the Get-ADUser cmdlet in Windows PowerShell. Using this cmdlet, you can get account attributes, such as its Common Name (CN), samAccountName, associated email address, password expiration/creation dates, when the user last logged in, and more.
You can also export this information into a Comma-Separated Values (CSV) file to be viewed in Microsoft Excel or get it printed.
In this article, we show you how to install and use the Get-ADUser cmdlet to get various information about the user accounts, with examples.
Table of Contents
You can either use the Get-ADUser cmdlet directly on the Domain Controller (DC), or you can install the Remote Server Administration Tools (RSAT) “Active Directory Domain Services and Lightweight Directory Services Tools” snap-in on your Windows 11 or 10 PC, import the Active Directory PowerShell Module, and find the required user account information from there.
First, let us show you how to install the Active Directory PowerShell module on both Server and Windows client PCs, import the PowerShell Module, and then continue to learn how to use the Get-ADUser cmdlet.
Note: You do not need to be logged in with a domain administrator account to find user account information. Any authorized domain user can use PowerShell to run the cmdlets given below and obtain this information.
How to Install Active Directory PowerShell Module on Windows
You can download and install the Active Directory PowerShell Module by installing the “Active Directory Domain Services and Lightweight Directory Services Tools” snap-in in Windows. This can be accomplished from the Settings app, the Command Prompt, and Windows PowerShell.
Once the snap-in is installed on your PC, you must then install the module in PowerShell.
Note: On Windows 10 v1803 and older, you must download and install all RSAT tools using the MSI files. You can find the MSI files for your version of Windows here.
Install Active Directory PowerShell Module from Settings App
The easiest way to install the AD PowerShell module on a Windows PC is from the Settings app. It does involve more steps than the other methods shared below, but this is the only method using the Windows GUI.
Use these steps to install the AD PowerShell Module from the Settings app:
-
Navigate to the following:
Settings app >> Apps >> Optional Features
-
Click “View features.”
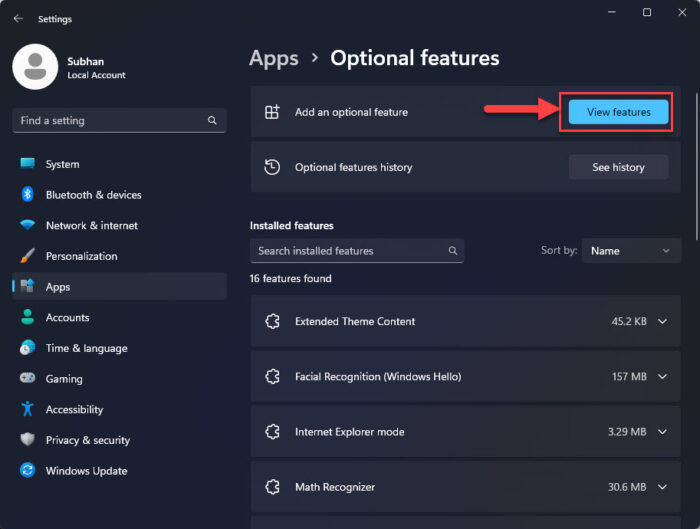
Add an optional feature -
Search for “Active Directory,” select “RSAT: Active Directory Domain Services and Lightweight Directory Services Tools,” and click Next.
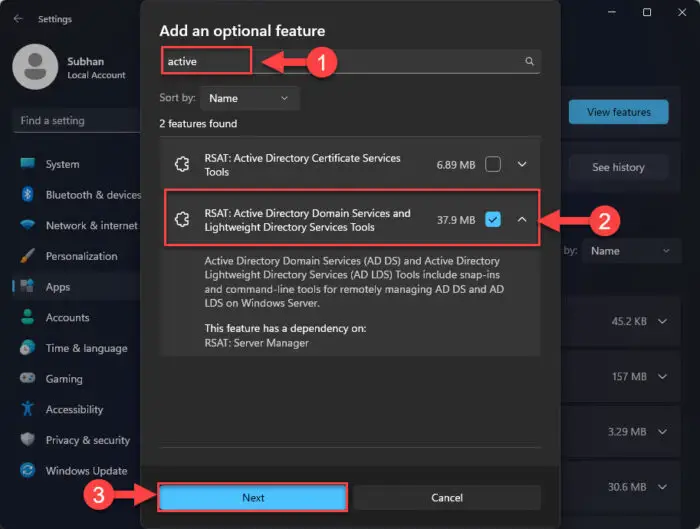
Select Active Directory Users and Computers -
Click “Install.”
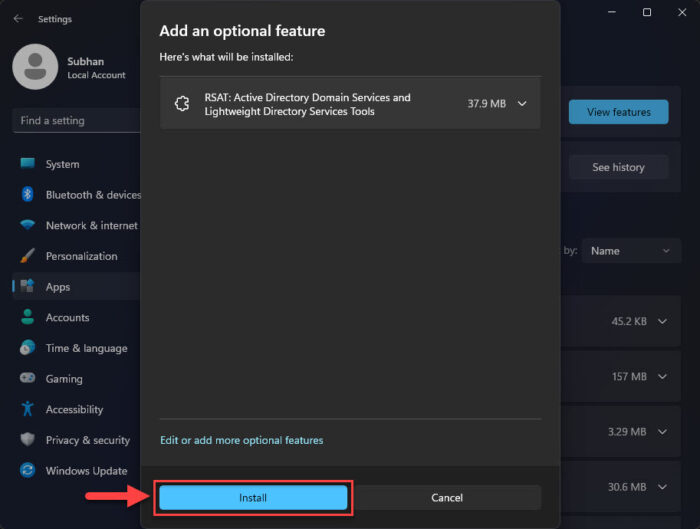
Install Active Directory Users and Computers from the Settings app -
Once installed, restart the computer.
-
Now run the following cmdlet in an elevated PowerShell instance to install the PowerShell Module:
Import-Module ActiveDirectory
Install AD PowerShell Module on Windows PC
The Active Directory PowerShell module will now be installed. If you prefer installing it using the command line, refer to the sections below.
Install Active Directory PowerShell Module from Command Prompt
Below are the simple steps to install the Active Directory PowerShell Module using the Command Prompt:
-
Open an elevated Command Prompt instance.
-
Run the following command:
DISM /Online /Add-Capability /CapabilityName:Rsat.ActiveDirectory.DS-LDS.Tools~~~~0.0.1.0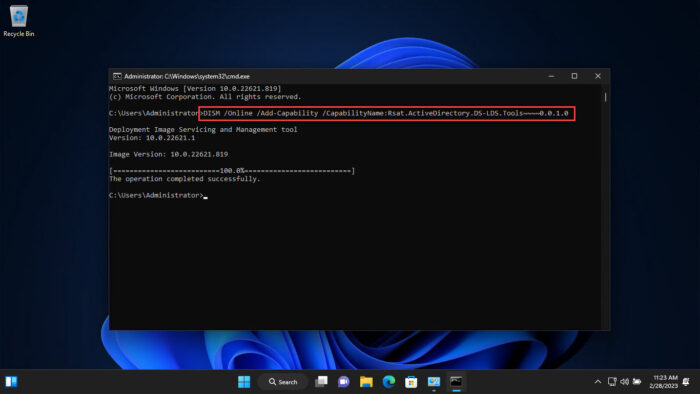
Install Active Directory Users and Computers snap-in using Command Prompt -
Now run the following cmdlet in an elevated PowerShell instance to install the PowerShell Module:
Import-Module ActiveDirectory
Install AD PowerShell Module on Windows PC
The AD PowerShell Module will now be installed. Another way to install it on a Windows client PC is directly from PowerShell itself.
Install Active Directory PowerShell Module from PowerShell
Use the following steps to install the Active Directory PowerShell module using PowerShell:
-
Launch an elevated PowerShell instance.
-
Run the following command to install ADUC:
Add-WindowsCapability -Online -Name Rsat.ActiveDirectory.DS-LDS.Tools~~~~0.0.1.0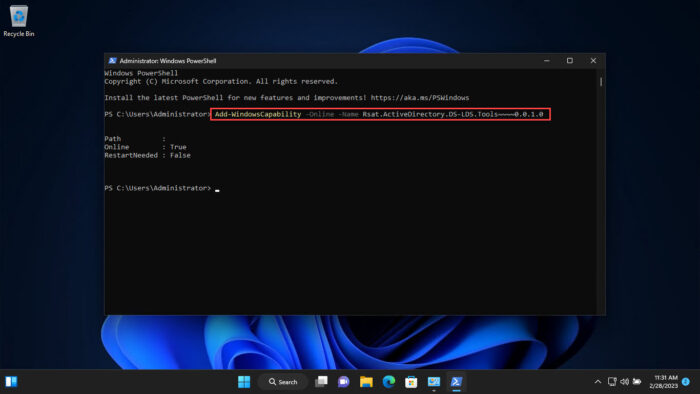
Install Active Directory Users and Computers snap-in using PowerShell -
Now run the following cmdlet in PowerShell to install the PowerShell Module:
Import-Module ActiveDirectory
Install AD PowerShell Module on Windows PC
These are all the methods to install the Active Directory PowerShell module on a Windows 11/10 PC. Let us now continue to see how to install it on a Windows Server.
How to Install Active Directory PowerShell Module on Server
If you deploy the “Active Directory Domain Services” role on a Windows Server 2012 (or newer version) machine, the AD PowerShell module is automatically installed. However, to install the AD PowerShell module on another Server member of the domain, run the following cmdlet in an elevated PowerShell:
Install-WindowsFeature -Name "RSAT-AD-PowerShell" –IncludeAllSubFeature
Now that you have learned how to install the PowerShell module on both Windows Server and Client PCs, it is now time to learn how to use the Get-ADUser cmdlet to obtain user account information.
How to Use Get-ADUser To Find User Account Information
The Get-ADUser can be used with different parameters to find and obtain different sorts of information. You can use it to get the names and associated email addresses of all user accounts, get samAccountInformation, find when the user account expired, last logged in, or when its password was created.
Since there are different parameters and techniques that can be used with this cmdlet, we have compiled a list for you to use and find the user information that you want using PowerShell.
Note: These cmdlets can be used on the Domain Controller itself, or the PC with Windows Server or Windows (client) OS after installing the PowerShell module using the steps shared above.
-
To view the list of all domain user accounts, use this cmdlet:
Get-ADUser -filter *
Get a list of all domain user accounts -
To find the properties of a specific domain user account, use the
-Identityparameter followed by any property to filter the user account. Use either of the given cmdlets as they display the same results:Replace the relevant variables according to your requirements. Since we are obtaining the information for the “Administrator” account, we have used the relevant information in the following examples. CN is “Common Name” and DC is “Domain Controller.”
Get-ADUser -Identity Administrator
Get-ADUser -Identity "CN=Administrator,CN=Users,DC=itt,DC=com"
View properties of specific domain user account Note that the
-Identityparameter only shows 10 properties for a user account (out of nearly 120). -
To get detailed information on a specific user account and show all properties, use this cmdlet:
Get-ADUser -identity Administrator -properties *
Get all information on a specific domain user account This cmdlet displays all relevant information about a user account, including when it was created, all information about its password, and everything else.
-
In the case of multiple Domain Controllers, you can specify the DC using the
-Serverparameter. Use the following cmdlet with the relevant information to find information on a specific user account on a specific Domain Controller:Get-ADUser –Server itt.com –Identity Administrator
View properties of specific domain user account on a specific Domain Controller -
You can also get user account information from another domain provided you have the required credentials. To do so, use these steps:
-
Run the following cmdlet in an elevated PowerShell:
$ADcred = Get-Credential
Prompt user account credential requirement This will prompt you to enter user credentials.
-
Enter the credentials for the user account to be used for the other domain and click Ok.
Note that this user account must have the necessary privileges to get information on domain user accounts.

Enter the credentials for the other domain’s user account These credentials will be saved in the “ADCred” variable.
-
Now run the following cmdlet whilst changing the details to get information on the specified user account on the other domain:
Get-ADUSer Administrator -Server itt.com -Credential $ADcred
Get user account information on specific user on another domain
-
-
You can also specify the properties that you want to see for a specific user account using this cmdlet:
Get-ADUser Administrator -Properties PasswordExpired, PasswordLastSet, PasswordNeverExpires, lastlogontimestamp
View specific properties for a user account You can change the input parameters to view them after
-Parametersin the command above. Each parameter must be separated by a comma. -
To view specific information for all user accounts on the domain, use this cmdlet:
Get-ADUser -filter * -properties PasswordExpired, PasswordLastSet, PasswordNeverExpires | ft Name, PasswordExpired, PasswordLastSet, PasswordNeverExpires
View specific properties for all user accounts -
To view the email addresses for all user accounts, use this cmdlet:
Get-ADUser -filter * -properties EmailAddress | select-object Name, EmailAddress
Get email addresses for all domain user accounts Since there aren’t any email addresses associated with the user accounts, none are displayed in the example above.
-
To view all the enabled user accounts with email addresses, use this cmdlet:
Get-ADUser -Filter {(mail -ne "null") -and (Enabled -eq "true")} -Properties Surname,GivenName,mail | Select-Object Name,Surname,GivenName,mail | Format-Table -
To view all user accounts without an email address, use this cmdlet:
Get-ADUser -Filter * -Properties EmailAddress | where -Property EmailAddress -eq $null
get all user accounts without email addresses -
To get information on all user accounts starting with a specific name, use this cmdlet:
Get-ADUser -filter {name -like "Brad*"} -
To find the total number of user accounts on the domain, run this command:
Get-ADUser -Filter {SamAccountName -like "*"} | Measure-Object
Get the total number of user accounts -
To get a list of the disabled user accounts along with their properties, run this cmdlet:
Get-ADUser -Filter {Enabled -eq "False"} | Select-Object SamAccountName,Name,Surname,GivenName | Format-Table
Get a list of disabled user accounts -
To get a list of when all user accounts were created on the Active Directory, run this command:
get-aduser -Filter * -Properties Name, WhenCreated | Select name, whenCreated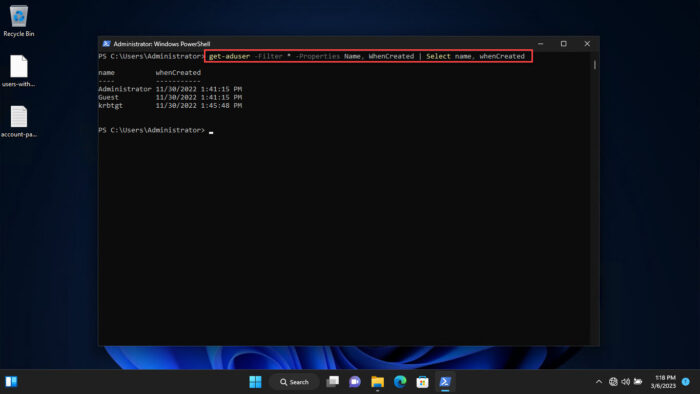
Find when all user accounts were created
The results you see when running all of these commands can also be exported to a CSV or a text file, which is what we have covered in the section below.
How to Export User Account Information using Get-ADUser in PowerShell
As we mentioned earlier in this article, you can export and save user account information to a CSV or text file.
To export the information into a CSV file, you must concatenate “ | Export-csv -path [PathToFile].csv -Append -Encoding UTF8” at the end. To export the information into a text file, you must concatenate “ > [PathToFile].txt” at the end of any of the commands discussed above.
Of course, “[PathToFile]” will need to be replaced with the complete path to where you want to save the file.
Here are examples of exporting the information into a CSV file and a text file:
-
To export information for all user accounts without an email address into a CSV file:
Get-ADUser -Filter * -Properties EmailAddress | where -Property EmailAddress -eq $null | Export-csv -path [PathToFile].csv -Append -Encoding UTF8
Export user information without email addresses to CSV file -
To export specific user account information for all users on the domain into a text file:
Get-ADUser -filter * -properties PasswordExpired, PasswordLastSet, PasswordNeverExpires | ft Name, PasswordExpired, PasswordLastSet, PasswordNeverExpires > [pathToFile].txt
Export user account password information to a text file
Closing Words
The Get-ADUser command allows you to get user account information directly on the Domain Controller, or from another computer within the domain (as long as you are logged in from a user account with the required privileges). You can view all of the (nearly) 120 attributes for a specific user account, or get information on all of them.
You can also export the results into a CSV or a text file.
There are a bunch of other filters and parameters you can apply using the “Get-ADUser” command in Windows PowerShell that we have not discussed in this article. You can find a complete list of the parameters on this Microsoft post for Get-ADUser. Alternatively, you can also get help directly in PowerShell by running the following command:
help Get-ADUserThis will display all of the parameters that you can use with the primary cmdlet.

