Key Points
- To check the Secure Boot status, run “msinfo23” in the Run Command box, and look for its status in front of “Secure Boot State.”
- For TPM 2.0 status, run “tpm.msc” in the Run Command box, and you’ll see its availability as well as TPM’s version.
- To enable TPM 2.0 and Secure Boot from BIOS, boot into Windows Recovery Environment, go to Security, Secure Boot, or Boot section, and enable the respective options.
When planning to upgrade to Windows 11, you must make sure that your device meets the minimum hardware requirements. When Microsoft launched Windows 11 in 2021, the most significant change for the end users was the new requirements. Many users could not upgrade their operating systems simply because their hardware was not meeting the new standards.
The most significant requirements for Windows 11 are the Trusted Platform Module (TPM) 2.0 and Secure Boot. Without these, you would not be able to clean-install Windows 11 or upgrade from an older version, unless you tweaked the installation packages.
Microsoft made these requirements mandatory as they enhance the system’s security at the hardware level. TPM is a piece of hardware embedded on the motherboard that stores and protects the cryptographic keys used to unlock encrypted data, like using BitLocker for hard drive encryption. Secure Boot is a software module that has been standardized by the Orginal Equipment Manufacturers (OEMs) which ensures that the firmware loaded is only from trusted sources, signed digitally.
We have already talked about the different ways of checking TPM availability and version on a Windows computer. However, this guide is different in the sense that it teaches you how to check both the TPM and Secure Boot’s status, and how to enable them to successfully install Windows 11. After having performed the procedures below, you should be able to install/upgrade to Windows 11.
Table of Contents
What is TPM 2.0
The Trusted Platform Module is a piece of hardware integrated into your computer’s motherboard. While most modern computers come equipped with it, the older ones may still lack it.
TPM version 2.0 acts as an added security protocol for the protection of your system. When you start up the computer, and the hard drive is encrypted, the TPM will provide the cryptographic information to the hardware to decrypt the data into plain, readable text. If it finds that something is off, like when the key has been manipulated without authorization, it will lock down the PC and ask for another mode of recovery, like a recovery key.
The function of a TPM chip does not just begin and end at boot and shutdown. Other applications, like Outlook, Chrome, etc., also use the TPM to handle encrypted and key-signed information.
What is Secure Boot
Every computer or electronic device that runs an operating system also requires firmware. A firmware is a piece of code that is executed even before loading the operating system. Secure Boot is a module, which is part of that firmware, which allows it to detect the signature of the software running on it.
This feature blocks malicious code from executing on the system, and only the software trusted by the OEM can run.
Secure Boot has been standardized by the OEMs to help them tackle the increasing threats of malware. With Secure Boot enabled it ensures that only the trusted firmware components, including the firmware drivers, will be loaded and executed, reducing the risk of breaches.
Together, Secure Boot and TPM 2.0 significantly enhance the core security of the system, which is why Microsoft has made it mandatory for running Windows 11 – so that security is of utmost importance.
Check the Secure Boot availability
Secure Boot (and TPM 2.0) can be enabled or disabled from the system’s firmware (BIOS). But before going to the firmware settings, check whether your computer has it or not, using these steps:
-
Press the Windows Key + R to open the Run Command box.
-
Type in “msinfo23” and press Enter to open the System Summary window.
-
Here, check for the information in front of “Secure Boot State.”

Check Secure Boot state from System Information
As you can see in the image above, Secure Boot is both available and enabled. However, if you find that it is off or disabled, then you can enable it from the firmware settings.
How to enable Secure Boot from firmware
Implement the following steps to enable Secure Boot:
-
Press the Windows Key + i to open the Settings app.
-
Go to System.
-
Click Recovery.
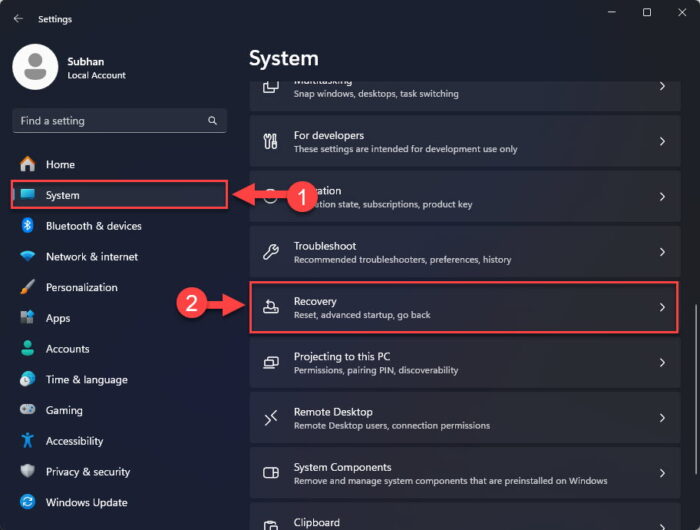
Open Recovery settings -
Click “Restart now” in front of “Advanced startup.”

Restart the computer for advanced startup -
On the confirmation popup, click “Restart now” again.
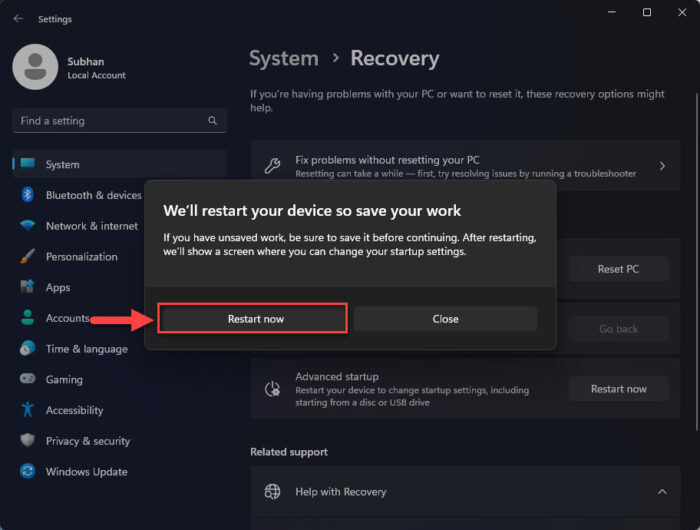
Confirm restart for advanced startup The computer will now start and then boot into Windows Recovery Environment (WinRE).
-
Click Troubleshoot.
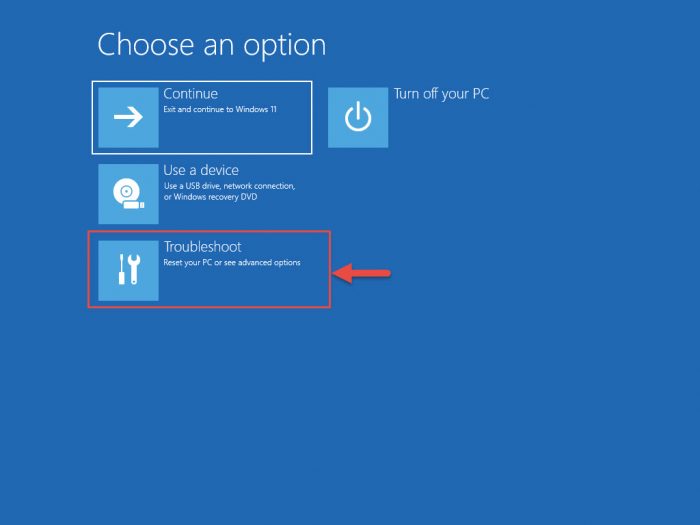
Click Advanced options -
Then click “Advanced options.”
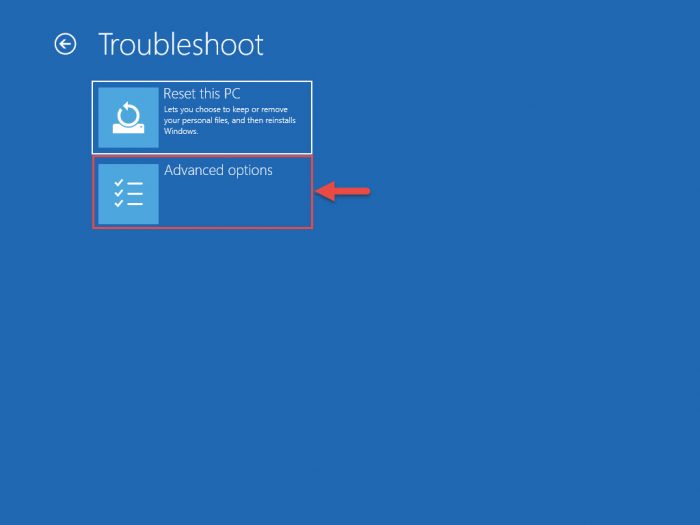
Click Advanced options -
Click “UEFI Firmware Settings.”
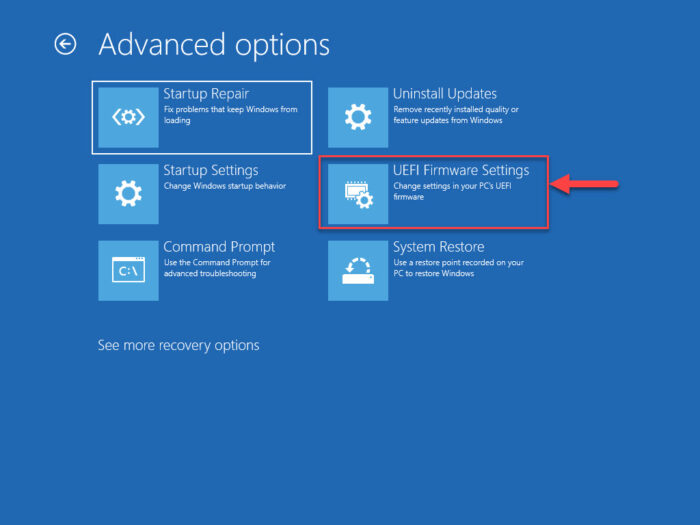
Enter UEFI firmware settings -
Now click Restart.

Restart computer The computer will now reboot again.
-
Now go to the “Secure Boot” settings.
Note: Your Secure Boot settings might be under a different section, such as Security or Boot settings.
-
Enable Secure Boot by checking the option. You might have slightly different settings, like a radio button or a drop-down menu to enable it.
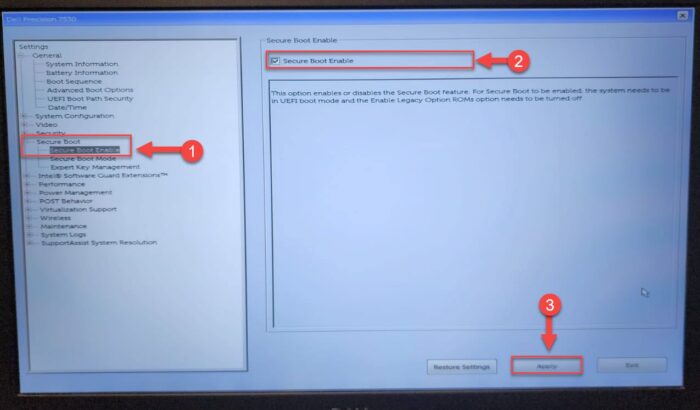
Enable Secure Boot from BIOS -
Confirm the action.
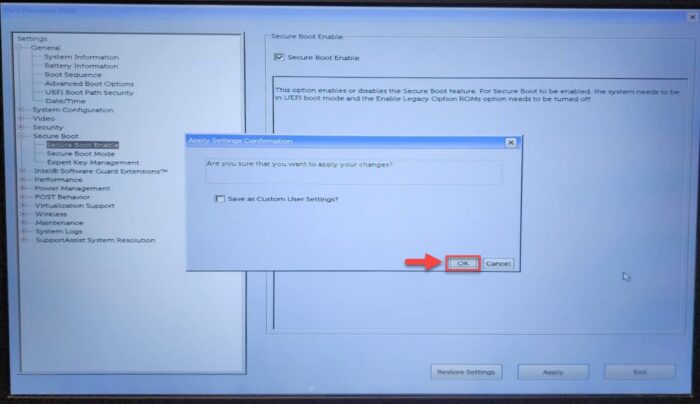
Confirm enablement of Secure Boot
After this, the computer will restart and Secure Boot will be enabled.
Check for TPM 2.0
To find out whether your current hardware has a TPM chip 2.0 chip or not, use these steps:
-
Press the Windows Key + R to open the Run Command box.
-
Type in “tpm.msc” and press Enter to open the TPM Management console.
-
Here, look for TPM’s status in the Status section. You will also find its version in the TPM Manufacturer Information section, as in this image:

Check the TPM status and version from the TPM Console
If you find written “Compatible TPM cannot be found,” it means that the TPM chip is not available on your system. It also means that TPM could be available, but is disabled. Either way, you must now go to the system BIOS to check and enable TPM 2.0.
How to enable TPM 2.0 from firmware
If you find that TPM is unavailable, or missing, you can use the following steps to check whether or not it is available directly from the system BIOS. If it is, you can also enable it.
-
Press the Windows Key + i to open the Settings app.
-
Navigate to the following:
System > Recovery
-
Click “Restart now” in front of “Advanced startup.”

Restart the computer for advanced startup -
On the confirmation popup, click “Restart now” again.

Confirm restart for advanced startup The computer will now start and then boot into WinRE.
-
Click Troubleshoot.

Click Advanced options -
Then click “Advanced options.”

Click Advanced options -
Click “UEFI Firmware Settings.”

Enter UEFI firmware settings -
Now click Restart.

Restart computer The computer will now reboot again.
-
Now go to either Advanced, Security, or Boot settings. Every OEM can have a different category heading for TPM settings.
-
Go to the TPM settings subsection (if available), check the “TPM 2.0” box, and select the “Enabled” radio button.

Enable TPM 2.0 from firmware
If you find that the TPM 2.0 option is missing, or cannot be enabled, the chances are that it is not available on your motherboard. However, if the issue is something else, try these TPM troubleshooting methods.
Takeaway
Almost all UEFI devices include Secure Boot, but it would be wiser if you still made sure that your system meets the minimum requirements so that you are not met with a surprise mid-way through the Windows 11 installation.
This guide discusses the straightforward methods to check and enable TPM 2.0 and Secure Boot on your computer to be able to install Windows 11. If both are enabled, then you may continue to install/upgrade to Windows 11, while making sure that all other requirements are met, such as a minimum of 64 GB of free space on the hard drive, a minimum of 2 CPU cores, etc.
However, if you find that either of them is not available, then you cannot install Windows 11; at least not using the conventional methods. You must then either upgrade your hardware or install Windows 11 while bypassing its TPM and Secure Boot requirements.
