Hyper-V is Microsoft’s virtualization platform. It is available on Windows Server operating systems and Microsoft has also added the Hyper-V functionality to Windows 8.1, Windows 10, and Windows 11.
Unfortunately, the Hyper-V feature is only available in Windows 10 Professional, Enterprise, and Education editions. You can’t install it on Windows 10 Home edition by default.
However, using the steps in this article, we’ll show you how to enable Hyper-V in the Windows 10 Home edition.
Table of Contents
Does Your System Support Virtualization?
Before moving forward, we need to check if our system supports virtualization. Hardware virtualization is required for Hyper-V to function correctly. Otherwise, you can use other virtualization platforms like Virtualbox and VMWare.
There are four basic requirements for Hyper-V to be installed on a Windows 10 computer:
- VM Monitor Mode Extensions
- Virtualization enabled in firmware
- Second Level Address Translation (SLAT)
- Data Execution Prevention
All four of these requirements can be easily checked through a Command Prompt cmdlet. Run the following cmdlet in an elevated Command Prompt and obtain the results on the four requirements:
systeminfoThis will generate a list, and you will find the section “Hyper-V Requirements” at the end of the list containing the details of the 4 requirements, as in the image below:
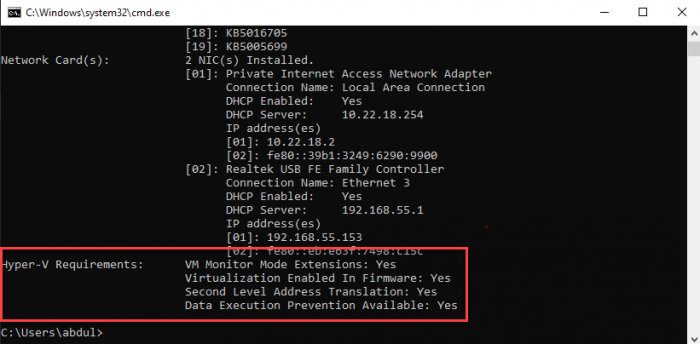
If these requirements are met, the results will display “Yes.” However, if you find that “Virtualization Enabled In Firmware” states “No,” you need to enable it using the guide below.
Enable Virtualization in Firmware/BIOS
Most modern computers support all the requirements of Hyper-V. But some systems have virtualization disabled from BIOS. You can go to the BIOS setup computer at the startup and enable Virtualization using the following steps:
-
Restart your computer and enter the BIOS setup using the hotkey.
-
Here, look for the “Virtualization” tab and click on it, or use the arrow keys on the keyboard to highlight it and press Enter.
-
Now enable Virtualization.
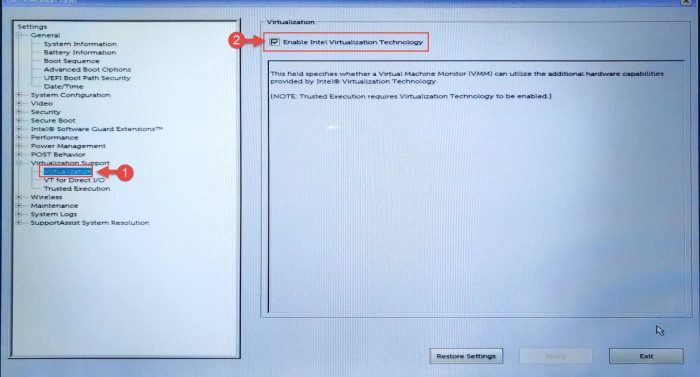
Enable virtualization from BIOS -
Now save the new settings and exit BIOS. The system will now reboot normally.
When it reboots, continue with the following steps to install and enable Hyper-V.
Install Hyper-V in Windows 10 Home
Note: Since Windows Home edition comes without Hyper-V, you must first install it. If you have the Pro, Education, or Enterprise editions, then you may skip this step and proceed to the next section of this article. To check which edition you have, type in winver in the Run Command box and obtain your operating system’s details.
Follow the steps below to install and enable Hyper-V in Windows 10 Home:
-
Download Hyper-V Installer by clicking on the following link:
 Hyper-V installer and enabler for Windows 10 Home (317 bytes, 36,204 hits)
 -
Once downloaded, right-click on the file and select Run as Administrator from the context menu. This will trigger the installation script.
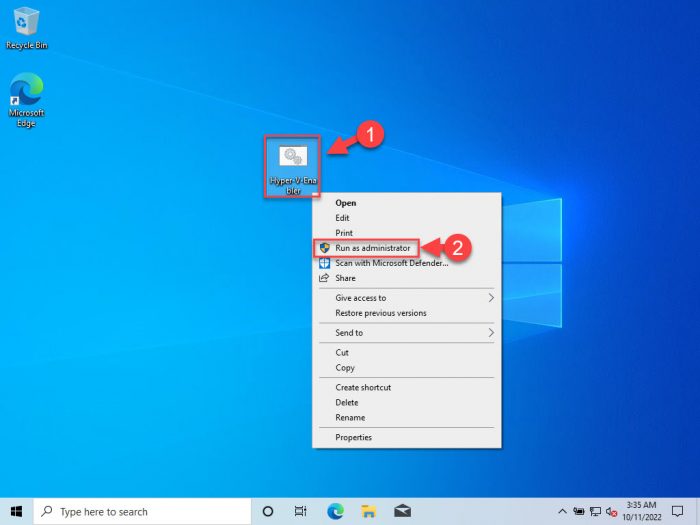
Run as admin -
If prompted with a UAC, click Yes.
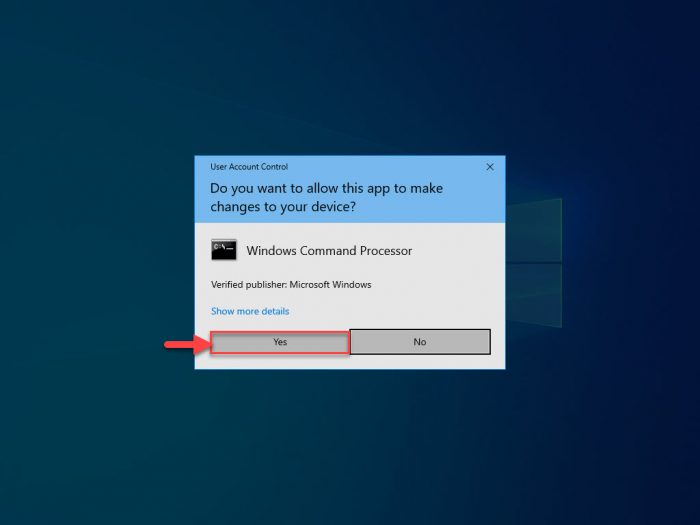
Click Yes on User Access Control It may take some time to complete the installation. Please let it complete without interruption.
-
Once complete, press Y to continue.
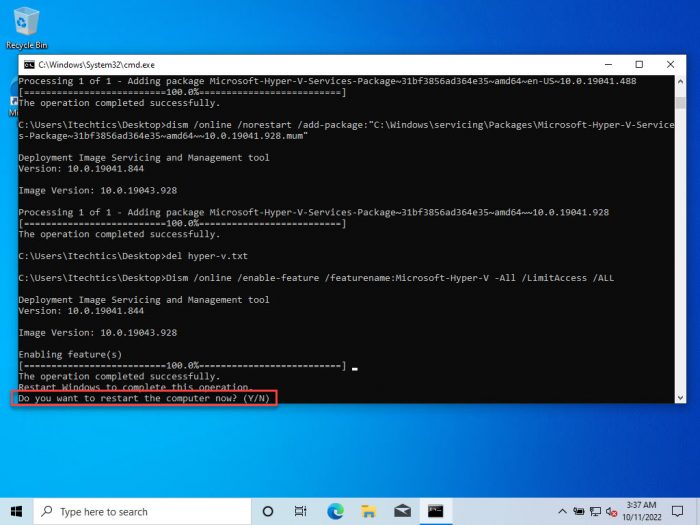
Press Y to continue The computer will now reboot and update.
Once rebooted, Hyper-V will have installed and automatically enabled on your Windows Home.
How to Enable Hyper-V on Windows 10 (Pro, Enterprise, Education)
The method given above automatically enables Hyper-V as well as installing it on a Windows Home. However, if you are running Windows Pro, Education, or Enterprise edition, then you can enable Hyper-V using any one of the following methods.
Enable Hyper-V from Optional Features
Since Hyper-V is an optional feature that one can enable when needed, you can enable it from the Optional Features applet. Here is how:
-
Open the Optional Features applet by typing in optionalfeatures in the Run Command box.
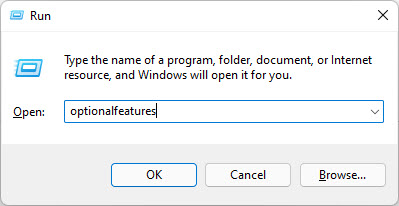
Open the Optional Features applet -
Now look for the “Hyper-V” option from the list and check the box next to it. Then click Ok.
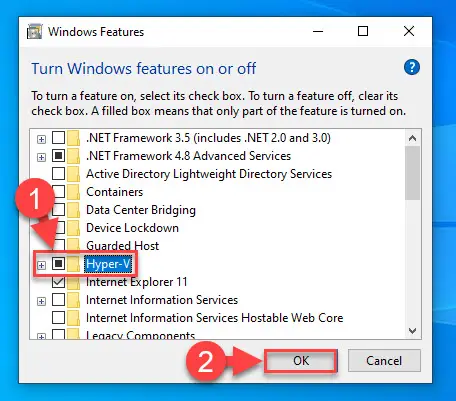
Enable Hyper V from Optional Features -
You will now see a window applying the changes. Click Close when it is done.
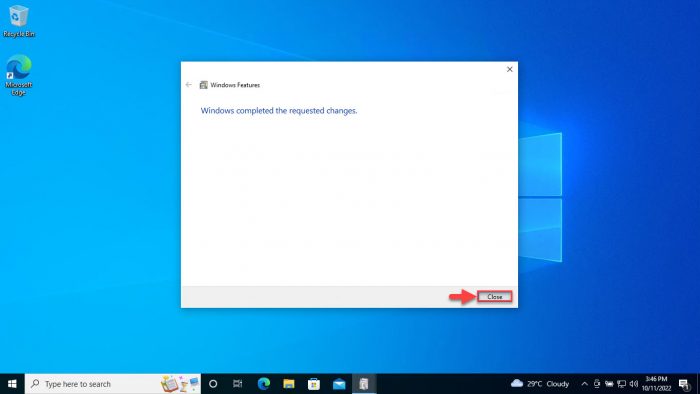
Close installation window
Hyper-V will now be installed and enabled. You can now access the Hyper-V manager by searching for it in the search box in the taskbar or through the Start menu.
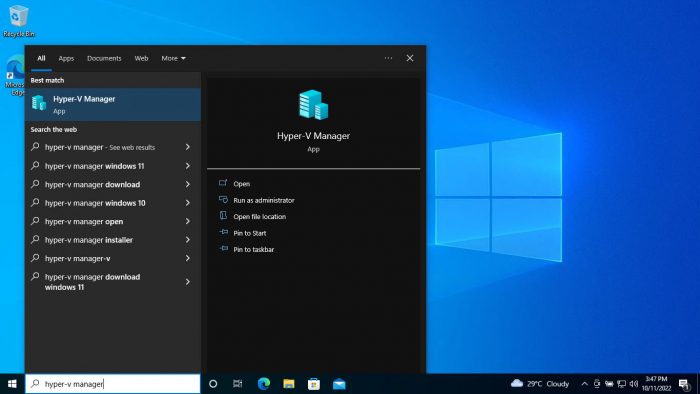
Alternatively, you can also use the other 2 command-line methods to enable Hyper-V on Windows 10.
Enable Hyper-V from Command Prompt
Follow these steps to enable Hyper-V using the DISM command tool in the Command Prompt:
-
Run the following cmdlet in an elevated Command Prompt:
DISM /Online /Enable-Feature /All /FeatureName:Microsoft-Hyper-V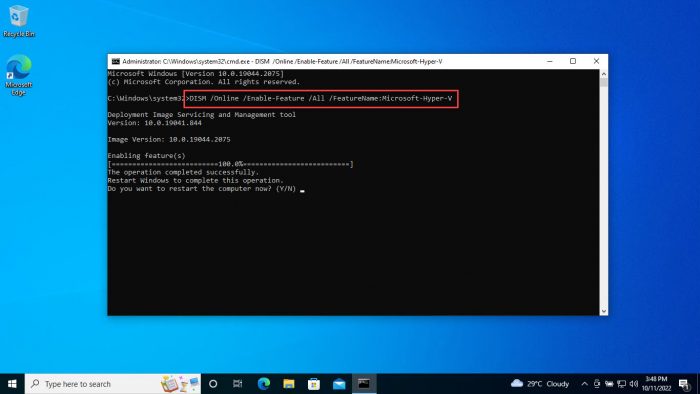
Enable Hyper V from Command Prompt -
When asked, enter Y to restart the computer:
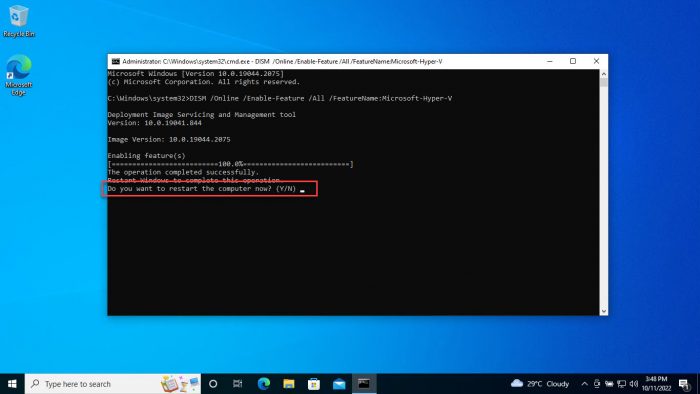
Enter Y
The computer will now restart, When it does, Hyper-V should be enabled successfully.
Enable Hyper-V from Windows PowerShell
If you’d rather prefer to use Windows PowerShell, here is how to enable Hyper-V:
-
Run the following cmdlet in an elevated PowerShell:
Enable-WindowsOptionalFeature -Online -FeatureName Microsoft-Hyper-V-All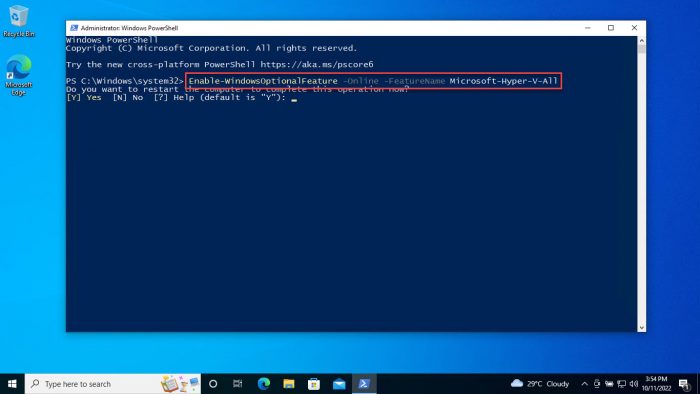
Enable Hyper V using PowerShell -
When asked, enter Y and hit Enter to restart the computer:
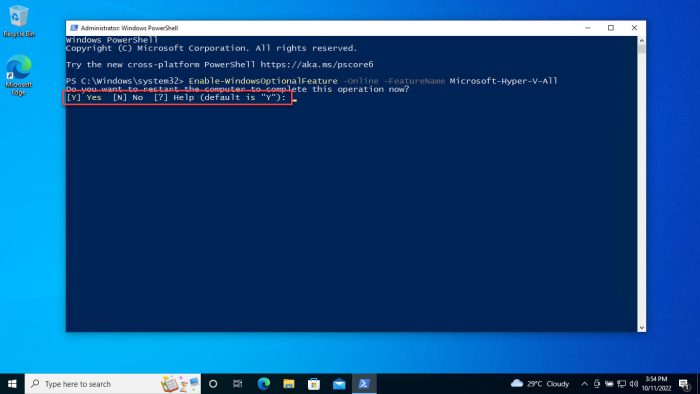
Enter Y When the computer reboots, Hyper-V will have installed successfully.
These are the 3 methods to enable Hyper-V in Windows 10, provided that the hardware is supported and Hyper-V is installed.
How to Disable Hyper-V in Windows 10 (Home, Pro, Enterprise, Education)
If you don’t want this functionality on your computer, you can always disable it. There are three ways to disable it:
-
From Optional Features
-
From Command Prompt
Run the following cmdlet in an elevated Command Prompt to disable Hyper-V:
DISM /Online /Disable-Feature /FeatureName:Microsoft-Hyper-V-allIf asked for a reboot, enter Y for Yes.
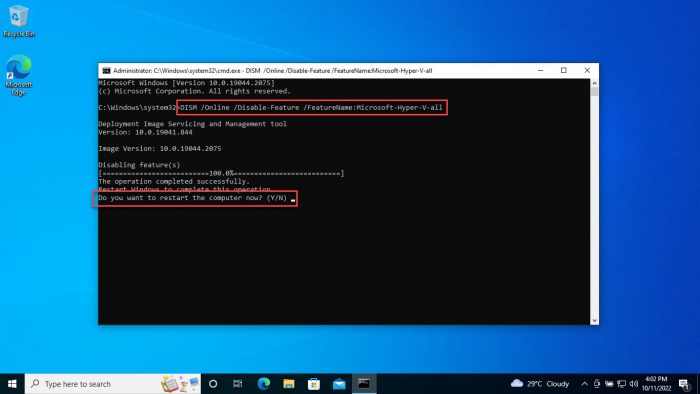
Disable Hyper V from Command Prompt -
From PowerShell
Run the following cmdlet in an elevated PowerShell to disable Hyper-V:
Disable-WindowsOptionalFeature -Online -FeatureName Microsoft-Hyper-V-AllIf asked for a reboot, enter Y for Yes.

Disable Hyper V from Windows PowerShell
Closing Thoughts
Sometimes Hyper-V is very useful even for home users. It can be used to test and evaluate new software without hurting the host system. But there are times when enabling virtualization support or installing Hyper-V is not recommended.
Hyper-V requires some system resources to run its virtual machines. For example, if you have 4 GB RAM, you won’t be able to give any resources to the virtual machine. So it would not be wise to enable Hyper-V functionality.
For what purpose do you want to enable Hyper-V functionality on your Windows 10 Home computer? Please share your thoughts in the comments below.


45 comments
Marlon
Man, you save my day. Thanks!
Tim
Hyper-V won’t work on Windows 10 Home version. It only works on Windows 10 Pro, Windows 10 Enterprise, Windows 10 Education editions.
Jules
The files perfectly installed but when the computer restart, he show a blue screen…
And he let me choice to continue the Windows launch, stop the computer or reset the PC…
(If I click on continue to windows or stop the PC he just do a blue screen and I need to select one more a option…)
Help me please ! I can use my PC anymore…
Change
I ran the batch enabled virtualization in my bios settings but when I check in my task manager, virtualization is still disabled. Also when I check in optional features, hyper v platform and hyper v hypervisor is grayed out saying “virtualization support is disabled in the firmware”.
****Yih
When I reboot my laptop, this line appears on the screen “couldn’t complete features undoing changes”
****Yih
When I reboot my laptop, this line appears on the screen “couldn’t complete features undoing changes”
Naman Gupta
Hello Sir,
I have successfully installed the hyper v but when I am checking in the task manager under virtualization section there still showing disabled
Usman Khurshid
You should enable virtualization from the system BIOS otherwise Hyper-V will not work.
Aniruddha Jagtap
it takes so long time to get install ..
Revathy
Thanks a lot! I have a doubt, sir. This is not regarding the hyper V installation but when I try to install CentOS7 on VM it shows that boot error and reboot by choosing a proper option. Can you please tell me a solution for this?
Zain
Hi Usman, I installed this & it worked for me. But I am not able to uninstall it using the command that you pasted above. It only disables hyper v but I would like to uninstall it from my system. Any help would be appreciated.
Mika Tapio Lindqvist
You can use DISM to remove installed features and packages. You need the list of packages Hyper-V support requires.
You can get the list by using command:
Dism /Online /Get-Packages | find “Hyper-V”
To delete the packages, you can use command like:
/Dism /Online /Remove-Package Microsoft-Hyper-V-ClientEdition-Package~31bf3856ad364e35~amd64~en-US~10.0.19041.928
Michael A Dempsey
Don’t worry about it. When the next windows feature upgrade happens it will disappear.
Junnie
It takes so long to install, but thx
oldschoolel
Thank You! This is the only Windows Pro feature I use and I could NOT justify the additional $99 to upgrade for ability to use one application.
MD IMRAN
After RUnning your script. Hyper visor is installed but not showing in search.
Could yould u please update on this.
Imran
Usman Khurshid
You can go to Start Menu –> Windows Administrative Tools –> Hyper-V.
Nate
thanks that was my question too.
really appreciate the tutorial!
Vestage Gaming
Hi,
Thanks for the .bat file.
I can’t seem to find Hyper-V.
I’ve checked if it’s enabled, I ran the .bat as Adminstrator and even checked in the start menu. Can you please tell me where it is located?
Ivan Herreño
Thanks, but it don´t works for my Win 10 2004:
1. The featurename was changed from “Microsoft-Hyper-V” to “HypervisorPlatform” and “VirtualMachinePlatform”, yep two features.
2. Once I enabled this two features and restart, I can view they are activated in the optionalfeatures, but I don’t find the hyper-v manager or equivalet in administrative tools or searching in windows search bar.
I use es-mx win10 version, if someone has a win10 2004 in another idiom, please test and comment.
Omar
Great work Usman, congratulations. I confess I was a little concerned about running a third party batch file, but it worked perfectly on my Windows 10 Home edition. However, I found that I have now another problem as Hyper-V is not working due to other(s) virtualization application(s) and I have to find them and discover how to disable them (the following message appers: “A hypervisor has been detected. Features required for Hyper-V will not be displayed”).
Usman Khurshid
The message you mentioned means that Hyper-V is enabled on your computer. It should work fine. Please try to open Hyper-V from Start Menu –> Administrative Tools.
aaadfsgergrg
Great, but how i uninstall now?
Eliran
Thank you very much! It worked. I would just add to others, that first you need
to close your Visual Studio if it is open. Otherwise that Bat file will run in an infinite loop.
Vignesh D
Thank you soo much. Very Appropriate comment at the correct place. I was wondering what’s happening in the script.
Rémi
I don’t have Visual Studio, yet the BAT file has been running in loop for 15 min now. What to do???
nox
it’s not a loop, check hyper-v.txt as a reference, all you need to do is to wait. For those hesitating about the .bat file, you can edit it and check those codes.
bik128
Great tutorial.
Anyone know how to add users to Hyper-V Administrators group (to not need admin privileges) to run V-machines on Windows 10 Home then? (Since windows 10 have no typical group management console).
Usman Khurshid
Hi bik128, you can use the following tutorial to add your user to Hyper-V administrators group:
https://www.itechtics.com/lusrmgr/
Enrico
Hmm for some reason my PC now lags very badly.. I hope this changes after another restart.. how could this be?
Thanks for the guide anyways!
Usman Khurshid
Hyper-V takes some resources for running smoothly. If you are low on resources, turning on Hyper-V will not be well advised.
cédric
it’s OK for me thanks for this tuto
Lip
You deserve a pint of beer
Sparky
I just wanted to know that will it affect my windows license???
Usman Khurshid
No, it will not affect your Windows license in any way.
DivineRipper
Hyper-v manager does not show in my search results but it is under Windows Administrative Tools in Start Menu.
Phu Do
Thanks Usman Khurshid and DivineRipper,
I can’t see Hyper-V in Search but in Windows Administrative Tools.
Mr.Jazz
How do I uninstall completley without System Restore?
VMware is not working, so I need to completly remove this mod pleaze, need help!!
Usman Khurshid
Please open the command prompt with administrative privileges and run the following command:
DISM /Online /Disable-Feature /All /FeatureName:Microsoft-Hyper-V
This will remove all the installed features related to Hyper-V from your computer.
Mr.Jazz
When I do this I get this error
C:\windows\system32>DISM /Online /Disable-Feature /All /FeatureName:Microsoft-Hyper-V
Deployment Image Servicing and Management tool
Version: 10.0.18362.1
Image Version: 10.0.18363.815
Error: 87
The all option is not recognized in this context.
For more information, refer to the help.
The DISM log file can be found at C:\windows\Logs\DISM\dism.log
I just want to run VMware again
Mozgosup
Remove /All from this command line – worked for me
Usman Khurshid
Please go to Run –> optionalfeatures. Uncheck everything related to Hyper-V.
Caralhos Que Ta Fodam
You are a genious. You help me so much thank you
ayahhanul-dj
Great share since I use wsl2 to run ubuntu on windows 10 home, vmmem require less resources of ram compared to non activated Hyper-V, it is only 10% required to run since activating it.
Thanks a lot for your work… :)
Napster
Genial, funciona, aun no instalo ninguna maquina, pero si se instalo el Hyper-V
Busque en muchos lados la forma de instalar el Hyper en Windows 10 Home y no encontre solution por ningun lado.
Gracias por el dato.
Espero que cuando instale las Virtuales funcionen igual que en Windows 10 Enterprise
(Great, it works, I still didn’t install any machine, but if I install the Hyper-V
I looked for many ways for installing Hyper in Windows 10 Home and I found no solution anywhere.
Thanks for the information.
I hope that when you install the Virtual machines they will work the same as in Windows 10 Enterprise)