Microsoft provides several ways to uninstall a stable update in Windows 10. You can also rollback Windows Updates including feature updates and cumulative updates. If you are using Windows Insider, then you can also rollback and uninstall the latest version of the installed Windows Insider build.
We will discuss all three scenarios one by one.
- Rollback major Windows update
- Rollback Windows Insider Preview build
- Uninstall cumulative or minor Windows updates
How to quickly undo a Windows update
- Open Windows Settings (Windows key + i)
- Select Update & Security
- Select Recovery from the left hand menu
- Under Go back to the previous version of Windows 10, click Get Started.
- In the pop-up dialog box, select the reason for rollback and then click Next.
- On the Check for updates window, click No thanks.
- On the next screen, read the recommendations and understand the consequences of a system rollback. If you already have a backup of your required data, click Next.
- On the Don’t get locked out screen, ensure you have a password if the previous build is password-locked, and then click Next.
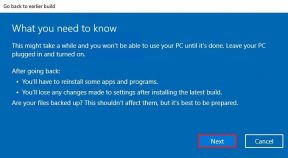
- On the next screen, click Go back to earlier build.
- Your system will now reboot and start a rollback. This step may take a few minutes.
The steps to rollback a major Windows update and Windows Insider update are the same.
Table of Contents
Note that rolling back to a previous build would undo any changes made to the computer, including settings, personalization, installation or removal of applications, etc., during this period.
Rollback major Windows updates (including Windows Insider build rollback)
If you recently installed a major feature update (Windows 10 Version 20H2 is coming soon) and it doesn’t work well on your system, you can downgrade or rollback the update within the first 10 days of installation.
You can also rollback Windows update after 10 days using this neat trick.
To rollback Windows update:
- Open Windows Settings (Windows key + i)
- Select Update & Security
- Select Recovery from the left hand menu
- Under Go back to previous version of Windows 10, click Get Started.

- In the pop-up dialog box, select the reason for rolling back and then click Next.

- On the Check for updates window, click No thanks.

- On the next screen, read the recommendations and understand the consequences of a system rollback. If you already have a backup of your required data, click Next.

- On the Don’t get locked out screen, ensure you have a password if the previous build is password-locked, and then click Next.

- On the next screen, click Go back to earlier build.

- Your system will now reboot and start a rollback. This step may take a few minutes.

Once the computer boots up again, you can check that the device has now rolled back to its previous build by typing in winver in Run.
After 10 days, Windows will delete the temporary backup of the last build from the system drive. If you follow the above mentioned instructions, you will get the following error:

You can also manually delete the previous Windows installation folder to save space on your hard drive.
Since this method can only bring you back to the previously installed build, you cannot go back to any older builds/versions. For that, you will need to restore your system entirely or make a fresh installation of Windows.
Uninstall a minor or cumulative Windows update
There are two ways to uninstall a cumulative or minor update from Windows 10:
Using Windows Settings
- Open Windows Settings (Windows key + i)
- Select Update & Security
- Select Windows Update from the left hand pane.
- From the right-hand pane, click on View Update History.
- Select Uninstall updates.
- Select the update you want to uninstall e.g., Update for Microsoft Windows (KB4578846) and press the Uninstall button.
Using command-line
- Open Command Prompt by typing in cmd in Run.
- Enter the following command:
wmic qfe list brief /format:table - This will show all the updates installed on the computer. Make sure the update you want to uninstall is on the list.
- To uninstall the update, run the following command
wusa /uninstall /kb:4578846 - Restart the computer once the update is uninstalled.
If you are not very comfortable with the latest Windows Updates, you can disable Windows Updates permanently but it is not recommended especially for Internet connected systems. Windows Updates brings in security fixes for many vulnerabilities. So it is always advised to keep your system up to date.


1 comment
Bill
WIndows Update was causing issues with Windows Explorer and seemingly completely deleted Windows Settings. This tutorial saved my laptop, thanks so much.