The Windows Credential Manager was first introduced in Windows 7 and has since been included in all Windows operating systems. This is a feature that stores sign-in information for websites where you save your credentials for using Microsoft Edge, your applications, and any usernames and passwords used to access resources on your network, such as shared folders, mapped network drives, Remote Desktop devices, etc.
This post discusses everything there is to know about this feature, which includes the following topics:
- What is Windows Credential Manager.
- Where to find it.
- How to add new credentials.
- How to edit existing credentials.
- How to remove/delete credentials in Credential Manager.
- How to backup all data in Credential Manager.
- How to restore data to Credential Manager.
- How to disable Credential Manager and prevent it from saving any passwords.
Credential Manager is a time-saving feature in Windows but simultaneously can be a pain in the neck when it does not function as it is supposed to.
One of the prominent issues with the Credential Manager is when some sign-in information is changed, but it still uses the old data registered, resulting in a failed sign-in attempt. In that case, you can either edit the stored credentials, remove them, or disable Credential Manager entirely.
Continue reading to learn more about this feature in Windows and how to use it.
Table of Contents
What is Credential Manager?
As we already mentioned, Credential Manager stores your email addresses, usernames, and passwords used to sign in to websites and other network resources and provides auto-filling support to save time.
The credentials stored are divided into 2 categories:
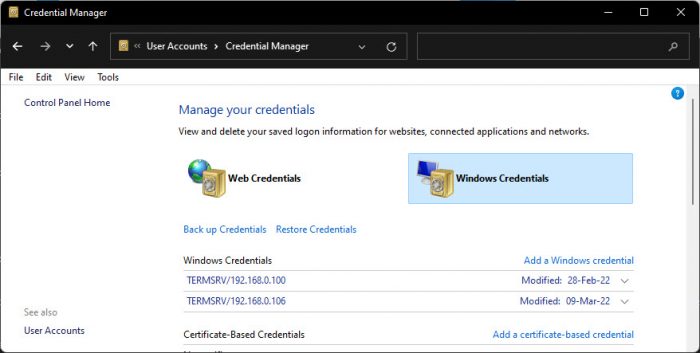
Web Credentials: These credentials are used to log into websites through the Edge browser.
Windows Credentials: These credentials are used by Windows applications, such as Skype, Microsoft Teams, OneDrive, etc., and other network-based resources to sign in. It also contains certificate-based credentials often used by organizations with complex network security.
When you select the “Remember me” or “Save password” option while putting in your credentials, the Credential Manager saves that information locally to use the next time you are trying to sign into the same device/website.
How to Open the Windows Credential Manager
You can open the Credential Manager on Windows 10 and 11 in multiple ways. Choose your preferred method from below:
Open the Credential Manager from Control Panel
Navigate to the following to access Windows Credential Manager:
Control Panel >> User Accounts >> Credential Manager
Open the Credential Manager using Start Menu
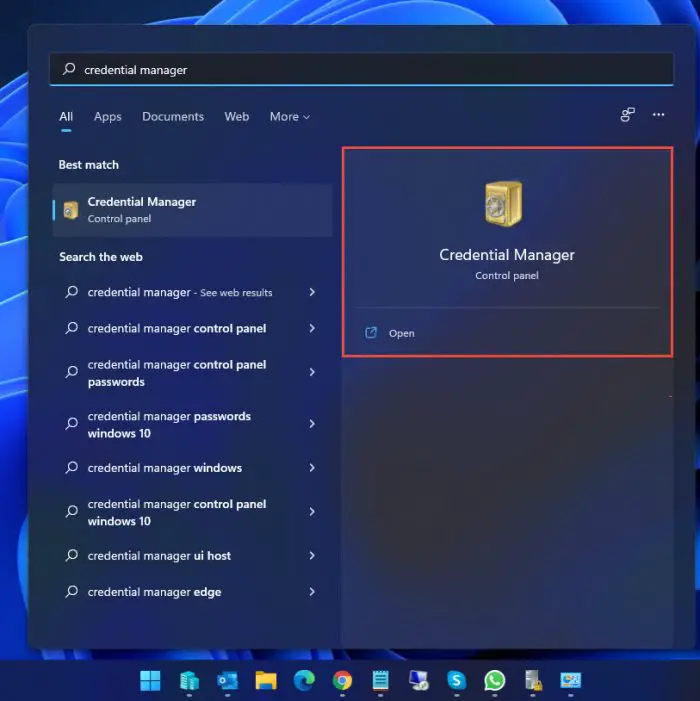
You can also search for “Credential Manager” from Windows Search or the Start menu to open the Credential Manager directly.
Open the Credential Manager using Command Line
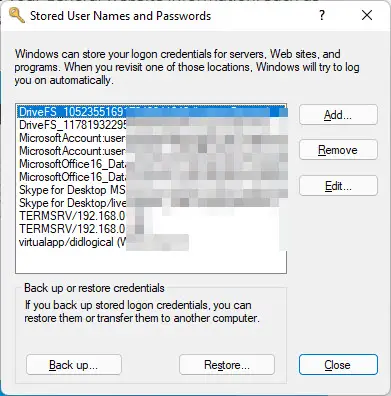
To open the Credential Manager through the Run Command box or the Command Prompt, run the following cmdlet:
rundll32.exe keymgr.dll, KRShowKeyMgrThis will not open the Credential Manager in the Control Panel window, but rather a small window will open, such as the one below. You can perform the same functions here as through the Control Panel.
Open the Credential Manager from Settings App
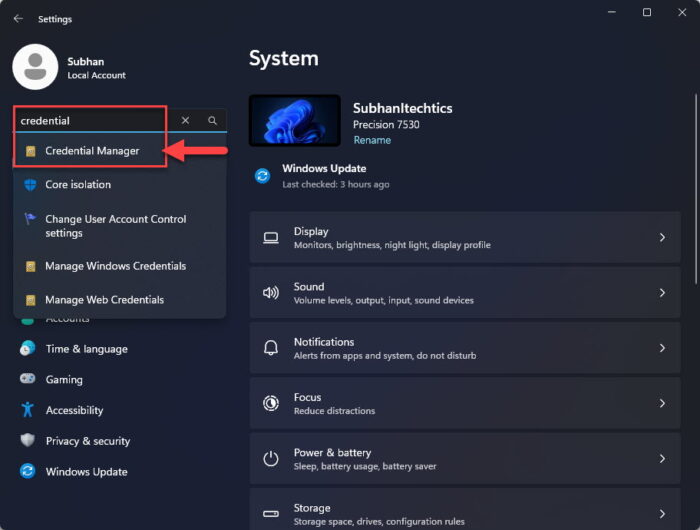
You can also open the Credential Manager from the built-in Settings app in Windows. Note that the Settings app does not have any pages for the Credential Manager, but redirects to the Control Panel.
To open the Credential Manager from the Settings app, search for it in the search box and then click “Credential Manager” from the results.
Now that you know how to access the Credential Manager, let us show you how to use it.
How to Add New Credentials to Credential Manager
When connecting to a new device on the network or accessing a new website using Microsoft Edge, you can simply save the password there to add it to the Credential Manager. Alternatively, you can also add new sign-in information directly to your Credential Manager:
Note: You can only add Windows Credentials manually to the Credential Manager.
-
Open Credential Manager by navigating to the following:
Control Panel >> User Accounts >> Credential Manager
-
Switch to the Windows Credentials tab and then click “Add a Windows credential.”

Add a new Windows credential -
On the next screen, enter the source to connect to, the username, and its password to authenticate, then click Ok.

Enter the destination and credentials
The sign-in information will now be saved and will automatically be suggested when you try and connect to the source.
How to Remove Credentials from Credential Manager
To remove or delete your credentials from Credential Manager, follow these steps:
-
Open Credential Manager by navigating to the following:
Control Panel >> User Accounts >> Credential Manager
-
Look for the sign-in information you want to remove, then click on the arrowhead in front of it to expand it.

Expand credential details -
Now click Remove.

Remove credential from Credential Manager -
On the confirmation dialog box, click Yes.

Confirm credential removal
The Credential Manager will now no longer save your credentials.
How to Edit Username/Password in Credential Manager
You can change the username and password to your existing credentials in the Credential Manager. However, you cannot change the source. To change the source, you need to remove this entry and then create a new one from the methods given above.
To make changes to your existing credentials in the Credential Manager, follow these steps:
-
Open Credential Manager by navigating to the following:
Control Panel >> User Accounts >> Credential Manager
-
Look for the sign-in information you want to remove, then click on the arrowhead in front of it to expand it.

Expand the credentials to edit -
Now click Edit.
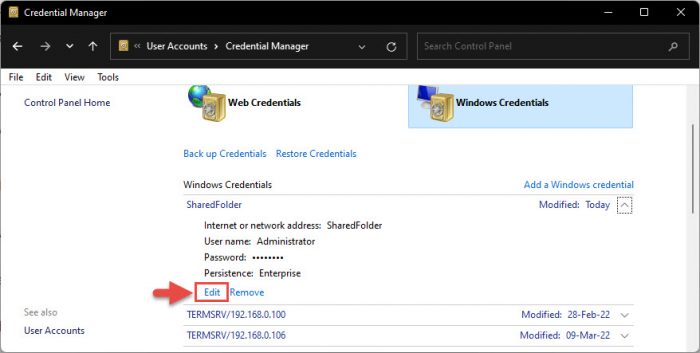
Edit the credentials -
Here, make the necessary changes and click Save.
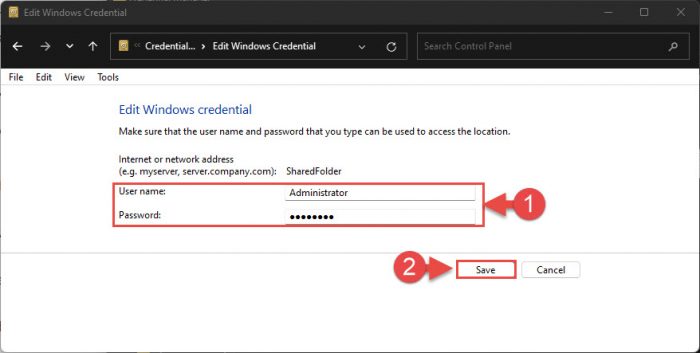
Save the changes to the credentials
How to Backup Username/Password from Credential Manager
You can also back up your saved credentials in the Credential Manager. This can be very helpful in case you are performing a clean Windows installation, resetting the computer, or getting rid of it.
This backup can then be restored on another Windows computer using the method discussed below.
Perform the following steps to back up all your credentials:
-
Open Credential Manager by navigating to the following:
Control Panel >> User Accounts >> Credential Manager
-
Switch to the Windows Credentials tab and then click “Back up Credentials.”
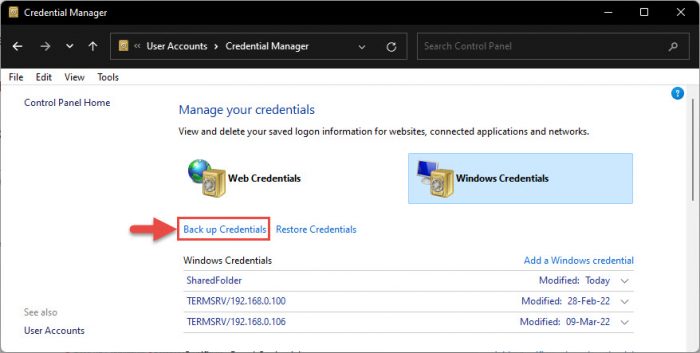
Backup the credentials -
From the Backup wizard, click Browse.
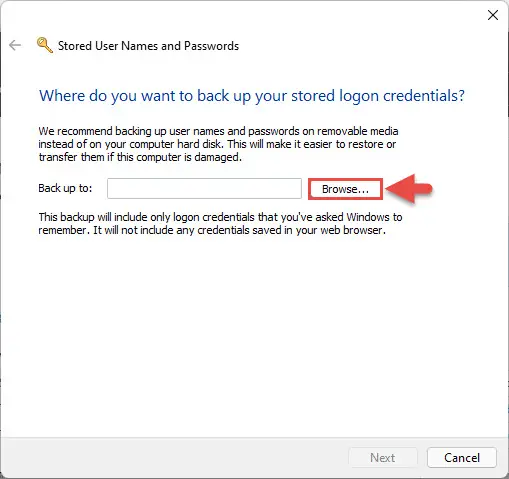
Browse to the location to store the credentials -
Now enter a name for the backup file and click Save.

Save the credentials backup file -
Back on the wizard, click Next.
-
You will now be asked to press the CTRL + ALT + Delete keys simultaneously to proceed with the backup. Press the keys.

Press CTRL + Alt + Del keys -
Now enter a password and confirm it to protect the backup file, then click Next.

Enter and confirm password to protect credentials backup file -
Click Finish.
The backup file will now be generated with a “.CRD” file extension. You can now use this file to import the credentials into the Credential Manager on another computer, or on the same computer, after a Windows reinstallation/resetting.
How to Import Credentials into Credential Manager
Follow the steps below to use the .CRD file to import the credentials into the Credential Manager:
-
Open Credential Manager by navigating to the following:
Control Panel >> User Accounts >> Credential Manager
-
Switch to the Windows Credentials tab and then click “Restore Credentials.”
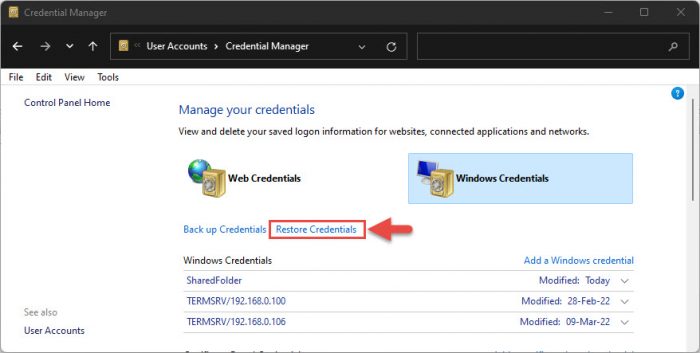
Restore credentials -
Click “Browse” and select the .CRD file which was generated while creating a backup. Then click Next.

Select the credentials backup file -
Now, press the CTRL + ALT + Delete keys simultaneously.
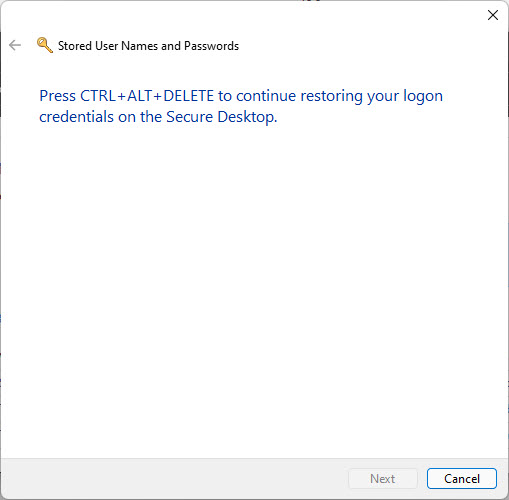
Press CTRL + Alt + Del keys to begin the restoration of credentials -
Enter the password that was used to secure the file while creating the backup, and click Next.

Enter the secure password for the backup file -
You will now be confirmed that the credentials have been backed up successfully. Click Finish.
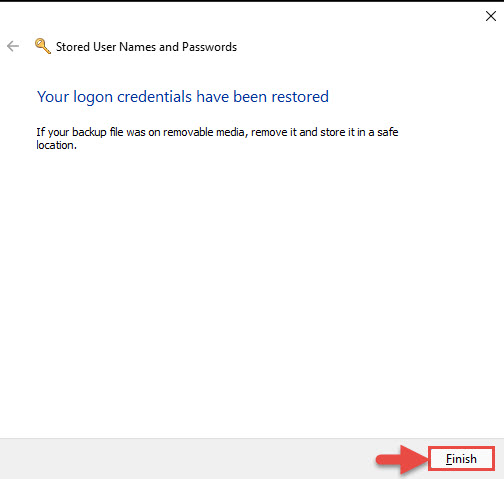
Credentials restored successfully
The credentials will now be imported/restored to your computer.
We have discussed all the different things you can manage in the Credential Manager up until now. If you are not fond of using it or think your passwords can be compromised by the Credential Manager, you can disable this feature entirely. However, you will then need to manually enter your credentials for all resources every time
How to Disable Windows Credential Manager
Disable Credential Manager from Services
Perform the following steps to disable Credential Manager using Windows Services:
-
Open the Services Console by typing in “services.msc” in the Run Command box.

Open the Services Console -
Right-click on the “Credential Manager” service and then click “Properties.”

Open Credential Manager service properties -
Select “Startup type” as “Disabled“, then click the “Stop” button. Now click Apply and Ok.
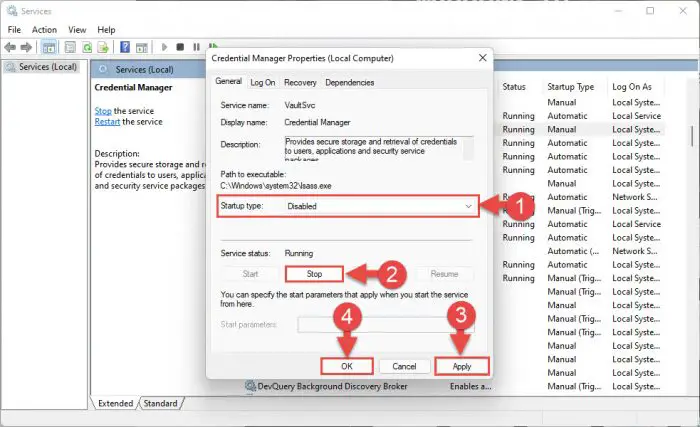
Disable the Credential Manager service
The Credential Manager is now disabled. When you try to access it, you will see the following error message:
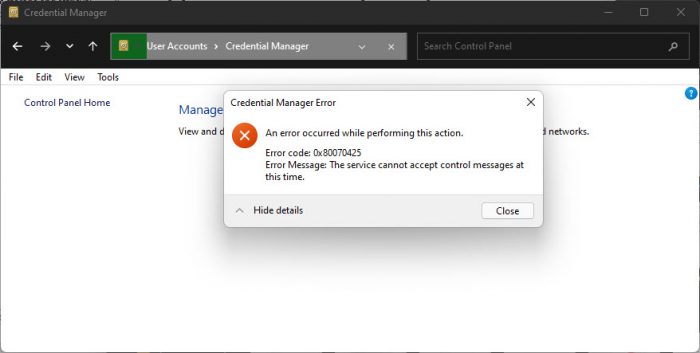
If you want to rerun the feature in the future, return to the “Properties” window of the “Credential Manager” service, set “Startup type” to Automatic, and then start the service.
Disable Credential Manager from Group Policy
You can also disable the Credential Manager from Group Policy. However, this method does not completely disable the Credential Manager, only the credentials used for network devices are removed and disabled.
Here is how to do it:
Note: The following method uses the Local Security Policy Editor, which is not available in Windows Home editions. Learn how to install and enable the Local Security Policy Editor in Windows Home.
-
Open the Local Security Policy Editor by typing in “secpol.msc” in the Run Command box.
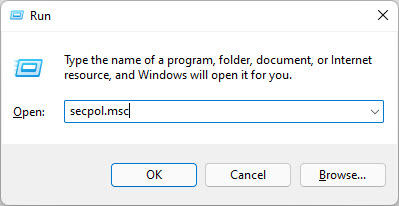
Open the Local Security Policy Editor -
Navigate to the following from the left pane:
Security Settings >> Local Policies >> Security Options
-
Double-click the policy “Network access: Do not allow storage of passwords and credentials for network authentication” from the right pane.

Open the Credential Manager’s local security policy -
Select “Enabled,” and then click Apply and Ok.

Disable the Credential Manager using Group Policy
As you may notice, the Windows Credentials in the Credential Manager for network devices will disappear, but they will still be saved on your computer.
To bring them back and allow them to be saved again, simply return to the policy and select the “Disabled” radio button.
Disable Credential Manager using Command Prompt
To disable the Credential Manager from the Command Prompt, perform these steps:
-
Run the following command in an elevated Command Prompt:
REG add "HKLM\SYSTEM\CurrentControlSet\services\VaultSvc" /v Start /t REG_DWORD /d 4 /f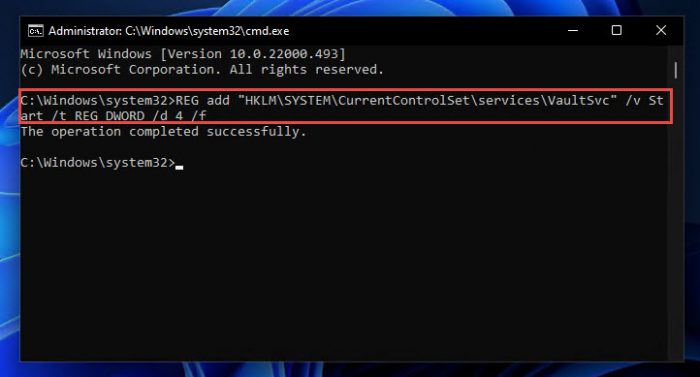
Disable the Credential Manager using Command Prompt -
Now use the following cmdlet to stop the relevant service.
sc stop VaultSvc
Stop the dependent service for the Credential manager -
Restart the computer.
Once the computer reboots, you will see that the Credential Manager is no longer accessible.
If you wish to re-enable it, simply run the following cmdlet in elevated Command Prompt and restart your PC.
REG add "HKLM\SYSTEM\CurrentControlSet\services\VaultSvc" /v Start /t REG_DWORD /d 2 /fOnce it reboots, the service will run automatically, and the Credential Manager will begin working again.
Final Thoughts
Credential Manager is a useful feature to have, especially if you access a lot of network resources on a daily basis. However, it is not as secure as you would want it to be.
If programmed correctly, an elevated process can easily obtain your credentials from the Credential Manager, since they are in plain text. This is usually the reason people prefer to disable it.
If you think we left out a feature for the Credential Manager, let us know in the comments section below, so we can add it for others to benefit from.


