Key Points
- PowerShell Copilot lets you generate code quickly by querying the GPT-4 language model.
- PowerShell Coplit uses APIs that incur costs.
- The process involves installing a PowerShell module that uses GitHub Copilot and GitHub repositories to generate code.
Are you new to PowerShell coding and do not know the syntaxes? Or are you looking to speed up your PowerShell coding? Either way, GitHub Copilot will help you significantly speed up, autocomplete, and generate code for you from a single line of input.
Microsoft announced Microsoft 365 Copilot a while back, which is a feature inside Microsoft 365 applications integrated with OpenAI‘s GPT-4 language model. Microsoft also announced and is delivering on incorporating AI into other tools and software as well, such as Microsoft Edge, the Windows OS, Skype, etc. However, they left out PowerShell.
While they may eventually add AI technology to PowerShell, you do not need to wait for it. Instead, you can use GitHub Copilot – an AI-powered tool that will help you program faster. GitHub Copilot uses the existing repositories on GitHub to code for the programmer with the aid of a single-liner input.
Although GitHub Copilot can be used to program in any language on a vast range of supported platforms, we will be using it for PowerShell. Additionally, after the 30-day trial period, GitHub Copilot costs $10 per month. To avoid this cost, you can use the PowerShell module “PowerShellAI.”
The PowerShellAI module uses the same AI language model as the GitHub Copilot, which is OpenAI’s GPT-4 model.
In this post, we show you how to install the PowerShellAI module on PowerShell, set it up, and then learn the many ways to use it with examples.
The overall process includes 4 steps that we have covered below:
- Installing the PowerShellAI module
- Confirm sufficient credit in the OpenAI account
- Linking the OpenAI secret key
- Using the GitHub PowerShell Copilot
Table of Contents
Install the PowerShellAI module
The first thing we must do is install the PowerShellAI module in PowerShell. Use the following steps on your Windows computer to install the module:
Note: Make sure that you have the latest version of PowerShell installed (at least PowerShell 7). You can download the latest version of PowerShell here.
-
Open an elevated PowerShell instance.
-
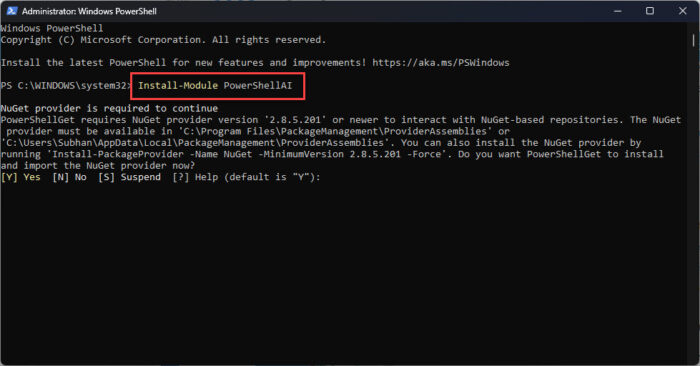
Run the following command:
Install-Module PowerShellAI
Install the PowerShellAI module -
When asked for confirmation, type in “Y” for Yes and press Enter.

Confirm action -
You will now be warned about an untrusted repository. Enter “Y” again.

Proceed with installing an untrusted repository -
Then, run the following command:
Import-Module PowerShellAI
The PowerShellAI module will now begin installation on your computer, and shouldn’t take more than a few seconds. When it is installed, move to the next phase of the process.
Confirm available credit
Although ChatGPT is free to use, when using it through an Application Programming Interface (API), it costs you some money. The pricing model for ChatGPT is based on per query. More specifically, it is based on tokens.
As OpenAI puts it, you can think of tokens as pieces of words. Every 1000 (1K) tokens are about 750 words. By this definition, 1500 words are 2K tokens. OpenAI charges the consumer for every 1K tokens. However, the pricing model is different for each language model.
You can find more details about the pricing on this OpenAI pricing page.
That said, you need to make sure that you have sufficient credit/balance in your OpenAI account to perform the number of queries in PowerShell that you want to. You can check this on the OpenAI Usage Details page after logging in.
Note that, when you create a new OpenAi account, you are gifted with complimentary credit. You can also use that initially. However, this complimentary credit expires. If it has expired, then you must add a payment method to be able to use GitHub PowerShell Copilot and perform queries.
If you do not have sufficient credit inside your OpenAI account, you will not be able to perform a query, and will be prompted with an error message similar to the one in the image below:

Once it is confirmed that you have the necessary funds, proceed to the next step phase in the process.
Link OpenAI secret key
The next step is to link a secret key, which is a code generated by OpenAI, with the PowerShellAI module that you installed.
When you access your OpenAI account or ChatGPT through the web interface using a browser, you enter a username and a password. This is how OpenAI confirms that you are who you say you are, and that you have the right to log in. However, when using a third-party module or tool to access the GPT-4 technology and perform queries, OpenAI uses an API.
To verify to the API that you are who you say you are, OpenAI generates a special key, known as the “secret key.” This secret key is unique to your account. You must generate this key through your OpenAI account and then link it with the PowerShellAI module.
Use the following steps to create a secret key and link it to the PowerShellAI module:
-
If not already done, log into your OpenAI account.
-
Go to the “Build your application” page.
-
Click “Create new secret key.”

Create a new OpenAI secret key -
Enter a custom name for the key and click “Create secret key.”

Name the secret key -
Copy the secret key and click Done.

Copy the secret key -
Paste and save the key in a text file.
Note: It is imperative that you securely save the key somewhere since you will not be able to see it again. If you fail to save the key, you will need to repeat the steps above and create a new key.
-
Now, return to PowerShell and run the following command:
Set-OpenAIKey
Run command to set the secret key -
When asked for the Key, paste the secret key copied in Step 5, and press Enter.

Link your OpenAI account with the PowerShellAI module
That is it! You will have successfully configured the PowerShellAI module to your PowerShell and can continue to use GitHub Copilot to code with speed.
Using the GitHub PowerShell Copilot
PowerShell Copliot is now ready to be used. Since the module is now installed and activated, you can invoke it at any point, even after restarting PowerShell, and begin querying GPT-4.
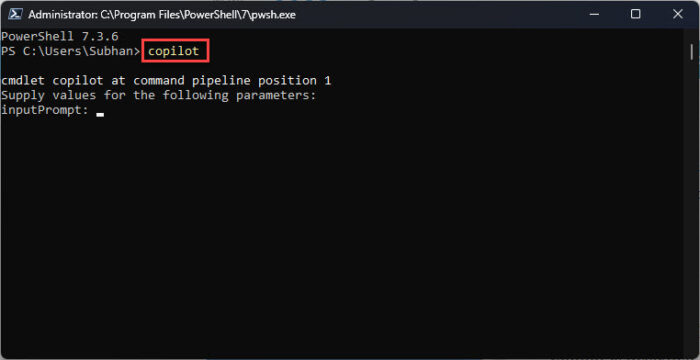
To invoke PowerShellAI, simply run the following command in PowerShell:
Copilot
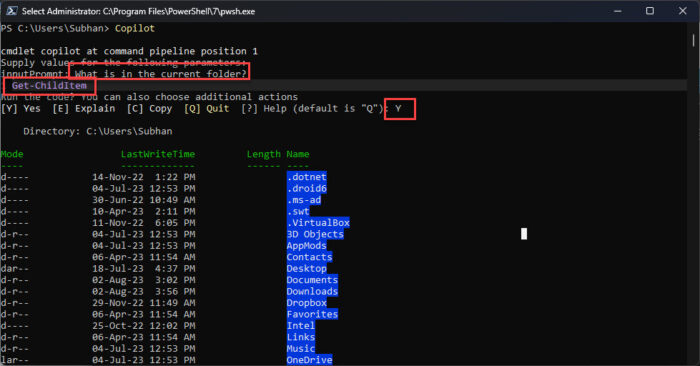
Now, you can run your query in ChatGPT directly from PowerShell. In the following example, we asked PowerShellAI to show the contents of the current directory:
What is in the current folder?
The module will then process the sentence and auto-generate a command to fit the request. However, before running the suggested command, it will ask you for confirmation (so it doesn’t accidentally run a wrong command). If the command seems correct, enter “Y” for Yes.

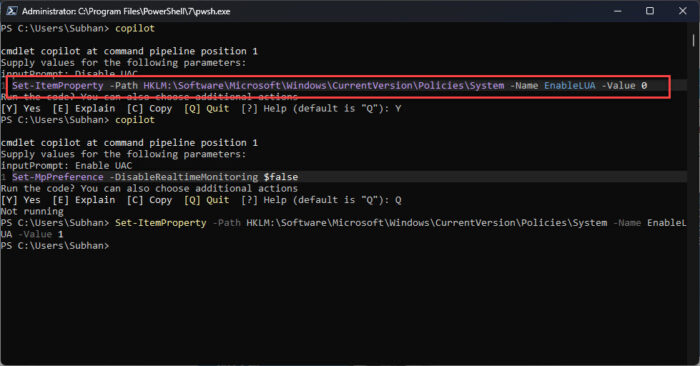
In the next example below, we asked PowerShellAI to disable the User Account Control (UAC). It generated a command that would make changes to the Windows Registry. Since it was a trial computer, we went ahead with it, and it successfully made the necessary changes.

Note that after running each query, you are being billed on the number of words. Additionally, you must also re-invoke the PowerShellAI module by using the word “copilot” after each query.
Conclusion
While Microsoft 365 Copilot is excellent for performing other tasks, PowerShell Copilot is ideal for generating PowerShell code and speeding up the process. Moreover, it gives great learning potential to newcomers that are new to PowerShell script creation and syntaxes.
This article shows you how to set up, integrate, and use PowerShell Copilot. Note that the queries shared in this post are merely examples – the true potential of PowerShell Coplit lies within your thinking.
That being said, while running certain queries, we noticed that they were not accurate. For example, when adjusting the screen brightness via PowerShell, we noticed that it used an old command, which is no longer valid. This is because this approach with PowerShell Coplit uses the GitHub Copilot, which uses the code on GitHub as its primary repository. Therefore, the generated code may not always be as accurate.
